Using tmux - dkoes/docs GitHub Wiki
Using tmux for terminal shell management
Have you ever:
- wanted to take control of one of your terminal windows while away from your workstation?
- felt like you have too many terminal windows?
- logged into a remote machine and been annoyed that you have to start with a new terminal session?
- wished you could organize your terminal sessions by project?
These are some of the reasons you should consider using a session manager like tmux or screen.
tmux, the "terminal multiplexer", is a command line tool that lets you persist, organize, and manage all of your terminal sessions. Once you create a tmux session, you can log into it any time, anywhere and all of your windows/scrollback histories will be saved. Cool! 😎
How to organize windows in tmux
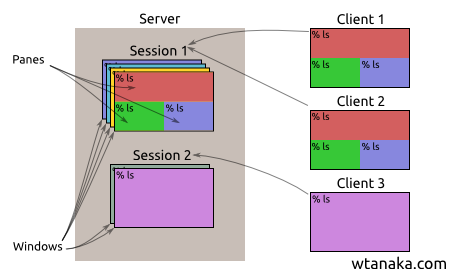
tmux is an application that runs on a single computer, or server, and is based on a hierarchy of 3 levels. The graphic above shows how these levels are organized, and how different clients can view different sessions simultaneously, with the terminal state being synchronized between each client. In other words, if you have tmux running on your workstation and you are logged into session 1 on your workstation and via ssh on your laptop, the shell looks the same on both computers. Awesome!
1. Sessions
Sessions are named and completely separate entities. While viewing a session, you have easy access to that session's windows and panes only.
I recommend using sessions to manage distinct projects or assignments that you are working on.
2. Windows
Each tmux session can have many windows, which are analogous to tabs in a web browser. When logged into a tmux session, you can move between windows. The bottom bar of tmux displays a list of the windows for your current session.
I recommend using windows to manage tasks for your current assignment/project. One window can be for running your Jupyter Notebook server, another for processing data, and another for browsing files, etc.
3. Panes
Each window can be subdivided (vertical/horizontal splits) into many panes. These are analogous to panes on a window in real life. You can view multiple panes simultaneously.
I recommend using panes to organize the subtasks for a task. For instance, one pane can be viewing a file, the other pane can be browsing files, or running top/htop, etc.
Basic commands
Here are some of the most important commands from the perspective of the author:
tmux: startstmuxwith a new session. Default session names are integers starting at 0.tmux a -t MY_SESSION: attaches to an existing sessiontmux a -t MY_SESSION -d: attaches to existing session and resizes the window appropriately by detaching other instances of the session
While inside a tmux session, you control your environment using the control command CNTRL + b (your version of tmux may use something else). To send a command to tmux while attached to a session, type the control command, followed by one of the following:
c: create a new window in this session,: rename the current windown/p: navigate to next/previous windows: navigate to a different session$: rename the current session%: split the window vertically": split the window horizontallyd: detach from the current session
Below is a nice summary of several other popular commands from the Linux Academy blog:

Important!!
If your computer restarts, you will lose all of your sessions. There is a way to automate session creation, but personally, I don't find it to be too much of a hassle to recreate windows when necessary.
Potentially useful addons
- I have enabled
mouse modewhich lets you use your mouse to scroll within windows, as well as point and click on the windows and panes to navigate. To enable this, addset -g mouse onto your~/.tmux.conffile. - Add the following to
~/.tmux.confso that new windows/panes open in the same directory.bind '"' split-window -c "#{pane_current_path}" bind % split-window -h -c "#{pane_current_path}" bind c new-window -c "#{pane_current_path}" - Increase your scrollback limit by adding
set -g history-limit 20000to~/.tmux.conf. - Install tmux plugin manager to enable scrolling tweaks, so you can use your mouse to scroll within
vi,less, etc. Once you've followed those instructions, add the following to your~/.tmux.conf:set -g @plugin 'tmux-plugins/tpm' set -g @plugin 'tmux-plugins/tmux-sensible' set -g @plugin 'nhdaly/tmux-better-mouse-mode' set -g @emulate-scroll-for-no-mouse-alternate-buffer "on" # lets less and vi scroll in tmux - Another tip: run
tmuxon any workstation you use to persist your history on that machine!