Locomotive Cabs, Controls, & Indicators - derail-valley-modding/custom-car-loader GitHub Wiki
Cab Teleportation & Audio Dampening
The "teleport to cab" functionality when hovering over a loco is controlled by a special transform on the exterior prefab. This transform must be a child of the root of the prefab named "[cab]". The location of this transform is the position and rotation that the player will be moved to when teleporting inside. You must have at least one collider component as a child of the [cab], the teleport prompt appears when pointing at this collider. The collider must also have the "Is Trigger" flag set! Finally, any mesh renderers you add to children of [cab] will be visible when hovering and invisible otherwise - this is how the blue window effect is created. You can add multiple cabs, but the name of each must start with "[cab]". You can add a number at the end of the name in order to uniquely identify each cab region. When adding door and windows (see Custom Controls section below), you can associate each opening with a certain cab number so that moving the door or window will properly let in sound from outside. You can also disable the audio dampening feature if your locomotive has an open-air cab by changing the "Muffle Interior Audio" checkbox on the car setup script.

Interior Prefabs
Cab interiors are handled as a separate object from the main locomotive body. When constructing a cab, keep in mind that the cab prefabs are always instantiated at the (0,0,0) position relative to the main train car's transform. Since most cabs will need an offset, it is recommended to create an empty parent object at the origin, then add children offset to the correct position. Once your interior is complete, make sure it is a prefab by dragging it into the Assets tab (it should turn blue) and then set this new prefab as the Interior on the main TrainCarSetup script (in the main car prefab).
Controls & Indicators
The various game scripts referenced below can be found inside CCL_GameScripts.dll, within the Assets/DVCustomCarLoader/Scripts/ folder. These scripts will also appear in the Add New Component > Scripts > CCL_GameScripts menu when editing a GameObject.
All controls and indicators are bound to the locomotive scripts on spawn; this system allows arbitrary numbers of controls and indicators bound to each simulation value. Controls provide the property "Input Binding" which takes one of the available input types. Indicators & Lamps take an Output Binding set to one of the available simulation values. Not all output values are compatible with all indicators; some values are numeric and others are threshold/boolean values.
| Output Value | Gauge Compatible | Lamp Compatible |
|---|---|---|
| Couplers (coupling integrity) | ✔️ | |
| Engine Damage | ✔️ | |
| Engine Temp | ✔️ | ✔️ |
| Fuel | ✔️ | ✔️ |
| Oil | ✔️ | ✔️ |
| Sand | ✔️ | ✔️ |
| Wheelslip | ✔️ | |
| Power On | ✔️ | |
| Engine On | ✔️ | |
| Sand Deploy | ✔️ | |
| Fan | ✔️ | |
| Brake Pipe | ✔️ | |
| Brake Reservoir | ✔️ | |
| Independent Pipe | ✔️ | |
| Independent Reservoir (not implemented) | ✔️ | |
| Speed | ✔️ | |
| Engine RPM | ✔️ | |
| Engine RPM Gauge | ✔️ | |
| Headlights | ✔️ | |
| Cab Lights | ✔️ | |
| Lights Forward | ✔️ | |
| Lights Reverse | ✔️ | |
| Amperage | ✔️ | |
| FireTemp | ✔️ | |
| WaterLevel | ✔️ | |
| BoilerPressure | ✔️ | |
| FireboxLevel | ✔️ | |
| Cutoff | ✔️ | |
| InjectorFlow | ✔️ | |
| StokerFlow | ✔️ |
Pre-Built Clusters
For quick setup, some pre-constructed dashboard prefabs are provided under Assets/DVCustomCarLoader/Prefabs/Cab. These include the brake system, throttle, and gauge cluster from the shunter, as well as the control stand and speedometer from the DE6.
Copied Controls
The easiest way to add cab components is by using the CopiedCabControl scripts. These do exactly what they say in the name: they create a copy of a base game control or indicator at transform where the script is attached. When these scripts are added to an object, they should show gizmos with a rough outline of the real control. You may have to turn on gizmos in the scene window to get them to show up.
Copyable inputs:
- CopiedLever
- CopiedButton
- CopiedRotary
- CopiedToggle
Copyable indicators:
- CopiedGauge
- CopiedLamp
Custom Controls
For most of the custom controls, add the script to an transform which will serve as the anchor/pivot point. The moving parts & meshes are then added as children of that transform. All control setup scripts have an Interaction Colliders property, which should consist of references to the objects containing your control's colliders. This is important to ensure that the collider layers are set correctly.
Controls also have a static interaction area property that enables a larger interaction area - this is useful for levers as it allows manipulation without hovering precisely over the handle. Simply create a gameobject with an attached collider and assign it to the Static Interaction Area property.

Levers/Doors
Created by applying the LeverSetup script to an empty pivot gameobject located at the pivot point. The actual moving part of the lever can then be added as children of the empty object, containing renderers etc. If you wish to use the lever as a door hinge, set the input binding to None and check the "Track As Door" box.

Pullers/Windows
The puller control starts at its initial position, corresponding to a value of 0. The linear limit property defines the sliding distance along the object's Y axis. If you wish to use a puller control as a sliding window, set the input binding to None and the Track As Window property to true.
Exterior prefab doors & windows
Doors and windows can be added as part of the exterior prefab instead of the interior prefab. However, since the exterior of the car is not set to interactable by default, any door or window objects must be set to layer 13 (the object holding the lever/puller setup plus children). If not set to interactable, the components will not respond to scrolling or clicking.
Steam Engine Cabs
Firebox Setup
A prefab for adding a firebox is provided under Prefabs -> Cab. You can simply add this prefab as a child of your steam engine interior and the supporting scripts will be added at startup. You can scale and move the firebox object to align it with your model; the red outline is the approximate area where coal can be added.
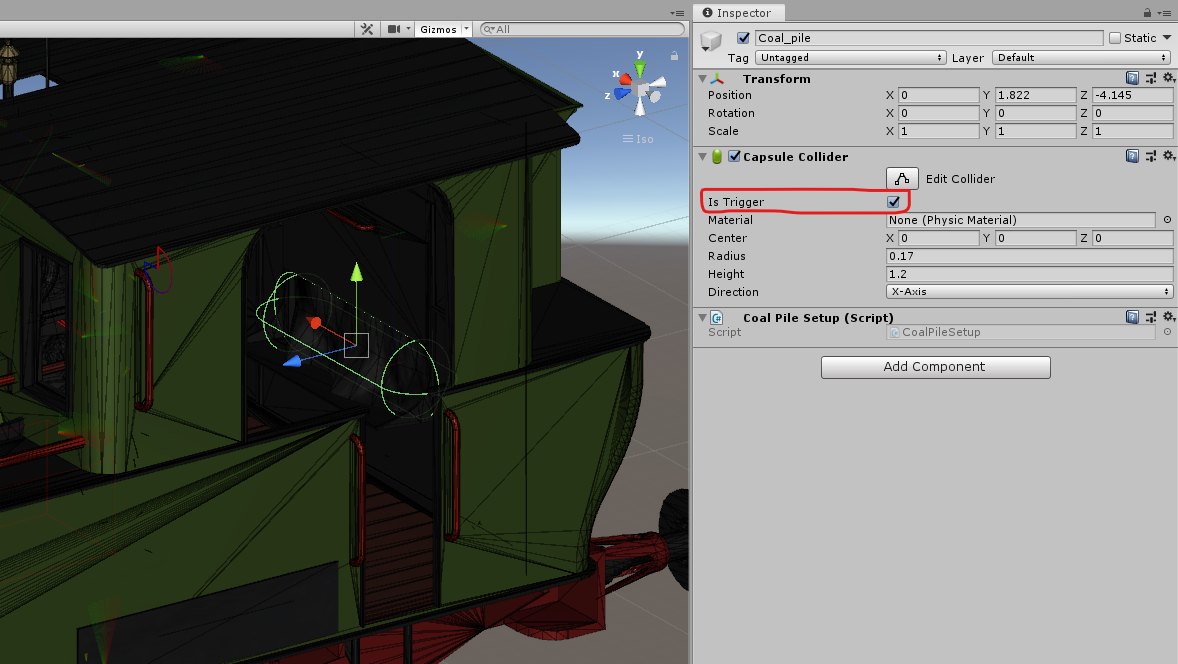
Coal Piles
The location where coal is picked up onto a shovel is specified with the Coal Pile Setup component. Create a child of the interior prefab and add a Coal Pile Setup and a Capsule Collider that defines the pile area. This component should be on your locomotive, not the tender, even if it is not a tank engine. For VR support, you must check the Is Trigger checkbox of the associated capsule collider and ensures that it is clear of any walkable/item colliders from the exterior.