DBtune synthetic workload guide - dbtuneai/synthetic_workload GitHub Wiki
We walk you through how to tune the configuration of PostgreSQL in one of the synthetic benchmarks of BenchBase using DBtune. This wiki describes what are the relevant available benchmarks that can be used for this task, how to set up a cloud instance and how to perform a full tuning session with DBtune. The estimated time to set up a tuning session is 30 minutes.
This wiki is separate from the DBtune user guide. This wiki focuses on how to run an evaluation of DBtune using available synthetic benchmarks. If you have never used DBtune and you want to evaluate it on a synthetic benchmark, we recommend starting with this wiki.
Use Ubuntu 24.04 or Debian, since these are the operating systems we have setup scripts for. DBtune also supports other operating systems, see the DBtune user guide for more information.
We suggest launching a Standard_D4ads_v6 instance with an added SSD on Microsoft Azure. Attach a disk by selecting the Create and attach a new disk option with disk tier P15, which includes a storage type called Premium SSD LRS, size of 256 GB and Max IOPS 1100.
We suggest launching an m5dn.2xlarge instance for this task.
Cloud providers all differ to some extent but any instance which roughly corresponds in size, e.g., CPU, RAM, disk type and IOPS, with a different cloud provider should also work for the scope of this wiki.
SSH in your cloud instance and clone this repo — The repo supports instructions for both AWS EC2 and Azure VM.
git clone https://github.com/dbtuneai/synthetic_workload.gitAdd the name of the disk you want the database on as an environment variable, so that the setup script can mount that disk to a folder.
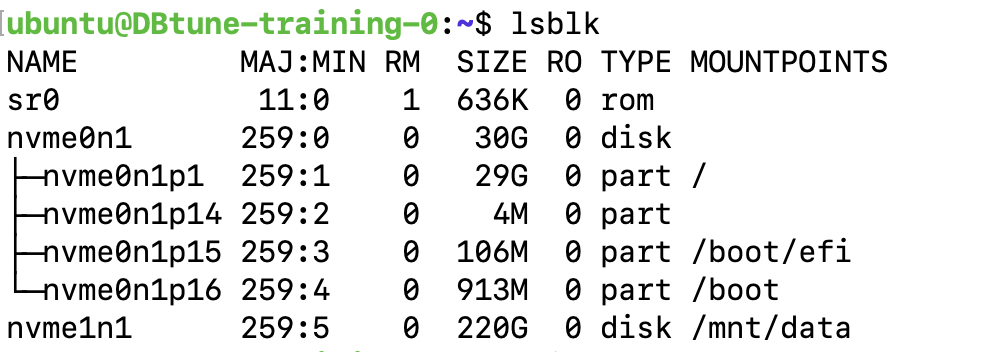
Run the command:
lsblkFrom the output check the name of the unmounted disk, i.e., nvme1n1 in this screenshot:
Then run the command:
export VAR=nvme1n1On a type-d instance, such as m5dn.2xlarge, the disk name will be nvme1n1, you can check with the command lsblk. Then run:
export VAR=nvme1n1From the output check the name of the unmounted disk, i.e., nvme1n1 in this screenshot:
Then run the command:
export VAR={name_of_disk}Run the setup script from the synthetic_workload folder for your OS of choice by replacing the string setup_ubuntu_24 in the command below — The systems currently supported by this repo are ubuntu and debian:
cd synthetic_workload
source setup_ubuntu_24.sh
This script runs for about 6 minutes and automates the following steps:
- Mount the specified disk to a directory.
- Install relevant packages for the benchmark.
- Install PostgreSQL 18 (binaries in
/usr/binand libraries in/var/lib/postgresql/18/main). - Install the BenchBase benchmarking suite.
- Move the loader and runner BenchBase scripts, and the pre-configured config files into the BenchBase folder called benchbase-postgres.
- Copy the PostgreSQL data directory to the mounted directory and set the PostgreSQL parameter data_directory accordingly.
- Set the PostgreSQL parameter max_connections.
- Create a PostgreSQL user.
You can check the PostgreSQL status using the commands sudo service postgresql status and validate using this example file. Alternatively you can use sudo systemctl status 'postgresql*'.
Additionally, you can analyze the PostgreSQL log located at /var/log/postgresql/postgresql-18-main.log and see an example log here.
For this experiment, we are using different benchmarks based on the cloud environment:
-
On Azure VM instances, we are using the epinions benchmark, which is pre-configured to run on the Standard_D4ads_v6 instance type.
-
On AWS EC2 instances, we are using the resourcestresser benchmark, which is pre-configured to run on the m5dn.2xlarge instance type.
Guidelines for choosing the benchmark settings and their downsides, as well as a description of all the available benchmarks in BenchBase can be found in this wiki.
For guidelines on how to use this repo with a different cloud instance can be found in this wiki.
Getting the database workload using BenchBase ready to be used is time consuming. This is because we need to load the data first (~30 minutes for resourcestresser) and then warmup the workload for a while so that the workload reaches the steady state (~90 minutes for resourcestresser). This is what we call Option 1 below. While this process takes in total ~2 hours for resourcestresser it is even longer for other benchmarks.
To speed up the process, we have created a snapshot of the resourcestresser benchmark and stored it on S3. It takes ~10 minutes to download this snapshot, compared to ~2 hours for Option 1. If you are using an EC2 instance provided by DBtune, you can use this snapshot directly by following Option 2 below.
This option is available for both AWS and Azure.
Run the following command from the benchbase-postgres folder, which was created when you ran the setup.sh script. On EC2 m5dn.2xlarge with our pre-configured settings resourcestresser takes ~30 minutes to load — You can check that the loading is being performed correctly by checking your output with this log. On Azure VM these approximate loading times will depend on the type of attached disk.
cd benchbase-postgres
python3 loader.py --benchmark resourcestresser
Replace resourcestresser with epinions or chbenchmark, if you wish to run another benchmark. epinions and chbenchmark take ~12 hours and ~80 minutes to load, respectively.
Getting the database workload using BenchBase ready to be used is time consuming. This is because we need to load the data first and then warm up the workload for a while so that it reaches a steady state. To speed up the process, we have created snapshots of benchmarks and stored them in cloud storage. Using these snapshots takes ~10 mins to download compared to ~2 hours for option 1.
For Azure VM instances:
We've created a snapshot of the epinions benchmark (~720 minutes to load, ~120 minutes to reach steady state). If you are using an Azure VM instance provided by DBtune, run these commands to copy the snapshot from Azure blob storage to your VM instance:
sudo service postgresql stop
sudo -E azcopy login --service-principal --application-id $AZCOPY_SPA_CLIENT_ID --tenant-id $AZCOPY_SPA_TENANT_ID
sudo azcopy copy "https://benchmarksnapshots.blob.core.windows.net/snapshots/epinions/pg18/postgresql/*" /mnt/data/postgresql/ --recursive
sudo chmod -R 750 /mnt/data/postgresql
sudo chown -R postgres:postgres /mnt/data/postgresql
sudo service postgresql start
For AWS EC2 instances:
We've created a snapshot of the resourcestresser benchmark (~30 minutes to load, ~90 minutes to reach steady state). If you are using an EC2 instance provided by DBtune, run these commands to copy the snapshot from S3 to your EC2 instance:
sudo service postgresql stop
sudo aws s3 cp s3://benchmarks-sql-dump/resourcestresser/pg18/postgresql/ /mnt/data/postgresql/ --recursive
sudo chmod -R 750 /mnt/data/postgresql
sudo chown -R postgres:postgres /mnt/data/postgresql
sudo service postgresql startUse terminal multiplexer screen for data loading and running the workload by running the command below — It will be useful if you want to disconnect while the benchmark is running and the tuning is being performed.
screenThese are helpful terminal multiplexer commands.
List all the screens: screen -ls
Attach the screen: screen -r {id}
Detach the screen: ctrl-a + ctrl-d
Run the runner.py command from the benchbase-postgres folder to run the appropriate benchmark for your cloud provider:
For Azure VM instances (epinions benchmark):
cd benchbase-postgres
python3 runner.py --benchmark epinions
You can check that the script is running correctly by checking your output with this log.
For AWS EC2 instances (resourcestresser benchmark):
cd benchbase-postgres
python3 runner.py --benchmark resourcestresser
You can check that the script is running correctly by checking your output with this log.
Detach the terminal after starting the workload by pressing:
Ctrl-a + Ctrl-d
This warmup period is only needed for the synthetic nature of the BenchBase workload — Real-world workloads don't need this warmup period.
Let it run for 90 minutes if you are running resourcestresser.
No further action needed.
Now that your cloud instance is prepared and the PostgreSQL database instance is up and running with your chosen BenchBase workload, you're ready to begin a tuning session with DBtune.
To start, please consult the DBtune user guide for comprehensive instructions on initiating a tuning session.
In step 3, point 4, you’ll need to modify the YAML configuration file. Ensure to enter the connection string as follows:
postgresql://admin:password@localhost:5432/benchbaseThe “connection_url” should correctly reference the benchbase database as specified in the earlier setup.