Raspberry Pi OpenWRT Overview - cu-ecen-aeld/buildroot-assignments-base GitHub Wiki
The Requirement of a Router
The core of this project is capturing and streaming images over the network. Achieving consistent transfer of images with minimal latency is optimal over a wired network. This will also help capture images at the maximum framerate possible by the camera and transfer them over the network without any glitches.
The easy solution is an off-the-shelf router+swtich+AP(Access Point) device where both the client and server Raspberry Pi's can be plugged in and are ready to go. But, a Raspberry Pi can be used as a router with router firmware. OpenWRT is one of the popular firmware available for the Raspberry pi and is extremely versatile.
The firmware is available as a pre-built image or it can also be built from source, similar to building with Buildroot.
Why OpenWRT
- OpenWRT is open-source and is implemented on base Linux.
- It allows us to install any other packages and run additional software like MQTT brokers, Management Software / Dashboards.
- There is good community support to help set up the firmware.
- Pre-built images are available.
Hardware Used
A Raspberry Pi 3B+ was used as the platform for OpenWRT, it has one 100M ethernet port and WiFi Radios which can be set up as an AP. Another USB to Ethernet adapter has been used to set up the secondary ethernet interface.
OpenWRT Basic Configuration
Here is a step by step instructions to set up OpenWRT on a Raspberry Pi.
- Download the prebuitimage corresponding to the version of your Raspberry Pi. You can also choose to build it from source.
- The image can be flashed onto the SD card using the Raspberry Pi imager.
- When OpenWRT boots up, the ethernet port on the Raspberry Pi is configured to use the static IP 192.168.1.1 and the wireless network is not setup. OpenWRT can be reached via HDMI out of the Raspberry Pi or by connecting to the ethernet port of the Pi via another computer and navigating to http://192.168.1.1 to access Luci, the web UI for the router. One can also SSH into the router at the same IP.
- Set a new password by running the following command
passwd root
- At this point the single ethernet interface is configured to a static address and DHCP server is enabled, and the WiFi Access point is not enabled.
- To convert the existing setup to include additional ethernet interfaces, USB to ethernet adapters can be used. Most of the USB to Ethernet adapters are USB3.0 and will need the following kernel driver to be installed.
kmod-usb-net-asix-ax88179
The driver can be installed using the opkg package manager or via the web interface of the router, in the software section. This can be done once the Raspberry Pi's ethernet interface has been reconfigured to access the internet. First, the /etc/config/network should be edited to be reconfigured, the static IP address needs to be set to the IP range of the upstream router. DNS and gateway also have to be added as shown below.

Lastly, DHCP should be disabled on this interface by writing "option ignore '1'" under dhcp lan in the /etc/config/dhcp file. As shown below.
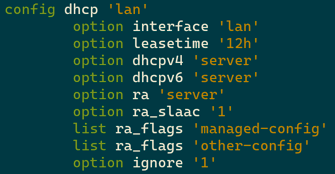
After a reboot, this interface can be used to access the internet. The USB to Ethernet adapter or any other package can be installed via the web interface or using the opkg package manager.
Once the packages are installed, the above configuration changes can be undone to enable DCHP and set the static IP back to its default.
-
Once the driver is installed, an additional ethernet port can be attached to the Pi and configured as a new interface. This interface can be used as a WAN port by setting it up as a DHCP client and the firewall zone to WAN. This port can be used to connect to an upstream router to access the internet.
-
Lastly the wireless radio can be enabled from the wireless settings on the web interface.
Here is a YouTube Video with basic setup instructions.
Configuring OpenWRT for the Project
In this project two Raspberry Pis are to be able to communicate over a wired network. Hence the additional USB to Ethernet adapter was set up as another local network and not a WAN port. The below diagram shows the setup.

- Two subnets (192.168.1.x & 192.168.2.x) are set up and tied to the two ethernet interfaces. The WiFi has been tied with the first subnet.
- There is a DHCP server running on each of these interfaces.
- To enable routing between the two networks, an IP routing rule has been added. This allows the packets from one subnet to be able to reach the other and vice versa.
- The WiFi is configured with an SSID and a password.
- The two Raspberry Pis in the project will connect to the two ethernet interfaces and will be assigned IP Addresses. These IP addresses will be configured to be static.
Running Your Own Code on the OpenWRT Router
Even though the Raspberry Pi is configured to be a router, any of your code can still be deployed since it is still a Linux machine. Ideally one can run things like MQTT servers, Management Servers, IoT backends and network monitoring tools. Since we also have access to the GPIOs, we can also deploy applications which make use of GPIO and hardware peripherals.
Here is a link to a project which implements a management server running on OpenWRT using Node-RED.
This wiki page contains more information about installing Node-RED on OpenWRT and setting up a management server.