Raspberry Pi Hardware Support - cu-ecen-aeld/buildroot-assignments-base GitHub Wiki
AESD RPi Buildroot Instructions
This page includes notes about setting up Raspberry Pi hardware using AESD buildroot assignments.
Buildroot Configuration
Follow the instructions in Setting up Buildroot for Hardware Builds using the instructions below for step 2.
- Make the changes to support Raspberry Pi as shown in this merge request. If you are in sync with the master branch you can use
git fetch buildroot-assignments-base
git merge buildroot-assignments-base/hw-rpi
to merge in the changes. (where buildroot-assignments-base is the git remote corresponding to this repository) If not in sync, you can copy the changes in manually based on referencing the merge request.
By default in buildroot-assignments-base/hw-rpi, the Raspberry Pi 3 target is selected.
Configuration Changes and Buildroot Builds
Handling buildroot configurations changes can be tricky. The build, clean, and save config scripts attempt to help you with this but you still ultimately need to understand a bit about what is happening at each step and pay attention to what the scripts are telling you about your setup.
Changing the Buildroot Commit
Several of the configurations in the base_external/configs directory shown in the pull request linked above are specific to the buildroot commit you are using for your build. When using a different buildroot commit than the one referenced in the linked PR above, or to switching buildroot branches to try other versions of buildroot you must start the clean process by deleting the content of base_external/configs, since your configuration will be built on a different version of buildroot. You will then need to re-modify your configuration with any changes you've made to the base configuration since the start of your project.
If you are not changing the buildroot commit, you do not want to start the clean process by deleting the content of base_external/configs, since your existing configuration likely contains other changes you want to include in your project.
Cleaning
When using buildroot you typically need to clean after you make changes to configuration and save the configuration with the save-config script. A few tips about cleaning:
- There's no need to clean before you make changes to your configuration, however if you do you need to perform an initial build to write your defconfig configuration before save-config.
- If you perform a clean, then change configuration, then save-config.sh you will essentially be modifying and saving an empty configuration. This results in an image which doesn't build any output files for your SDCard. If you find yourself in this situation, treat it like changing the buildroot commit as described above - delete the problematic defconfig file and start over.
- Any changes you make to your configuration before you
save-config.shwill be lost during clean. So if you've recently made configuration changes and want to keep them you need to be sure tosave-config.shbefore you run the clean step.
- Clean your buildroot subdirectory using the
clean.shscript used with your buildroot assignments (which performs distclean) or by runningmake -C buildroot distcleanfrom the root directory.
- This will delete your existing configuration from
buildroot/.config, and delete all build output in preparation for your rebuild.
Initial Build after Cleaning
- Make sure shared.sh is setup to reference the correct defconfig for your project.
- This reference is used both to build the project based on a default configuration and to provide the location where the save-config.sh script saves configuration changes.
- Run build.sh to generate a new configuration using the default config.
- Look closely at the messages printed during the build. The first run should only apply the defconfig specified by shared.sh. Make sure it's the correct one for your project (targeting the correct platform).
- Re-run build.sh again to start the build
Configuration Changes
After each configuration change, run save-config.sh to save the configuration to your base_external/configs directory.
- Pay attention to the changes to this file, ensure the changes make sense.
- If the content of the file was completely deleted when attempting to save-config.sh, something went wrong with one of the previous steps and you aren't using the correct configuration. Restart the steps above.
- Often buildroot configuration changes require a clean build. See details in the buildroot manual. If in doubt at all, it's safest to clean build. However don't clean build until after saving your configuration, or you will lose your configuration changes!
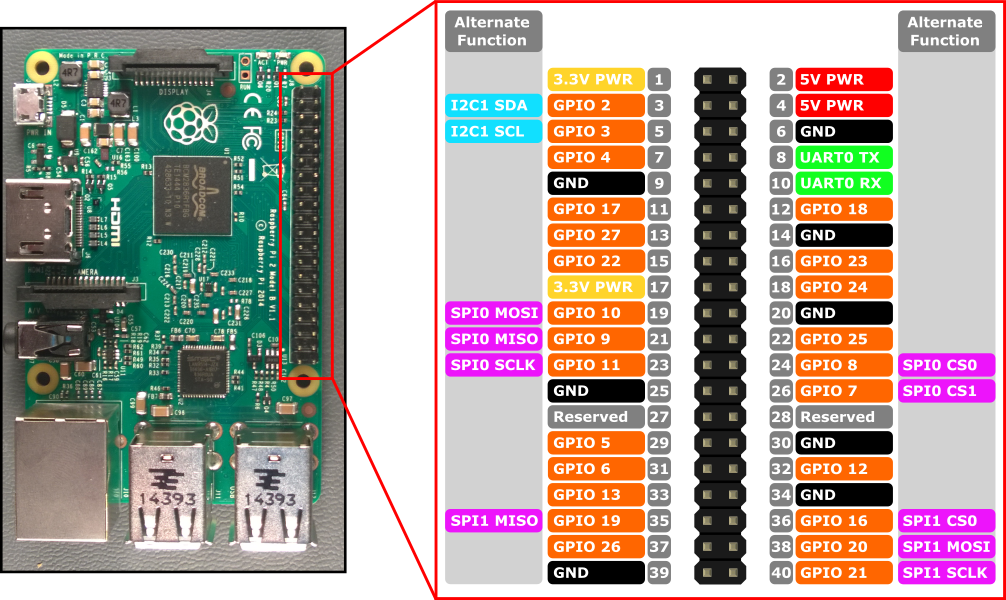
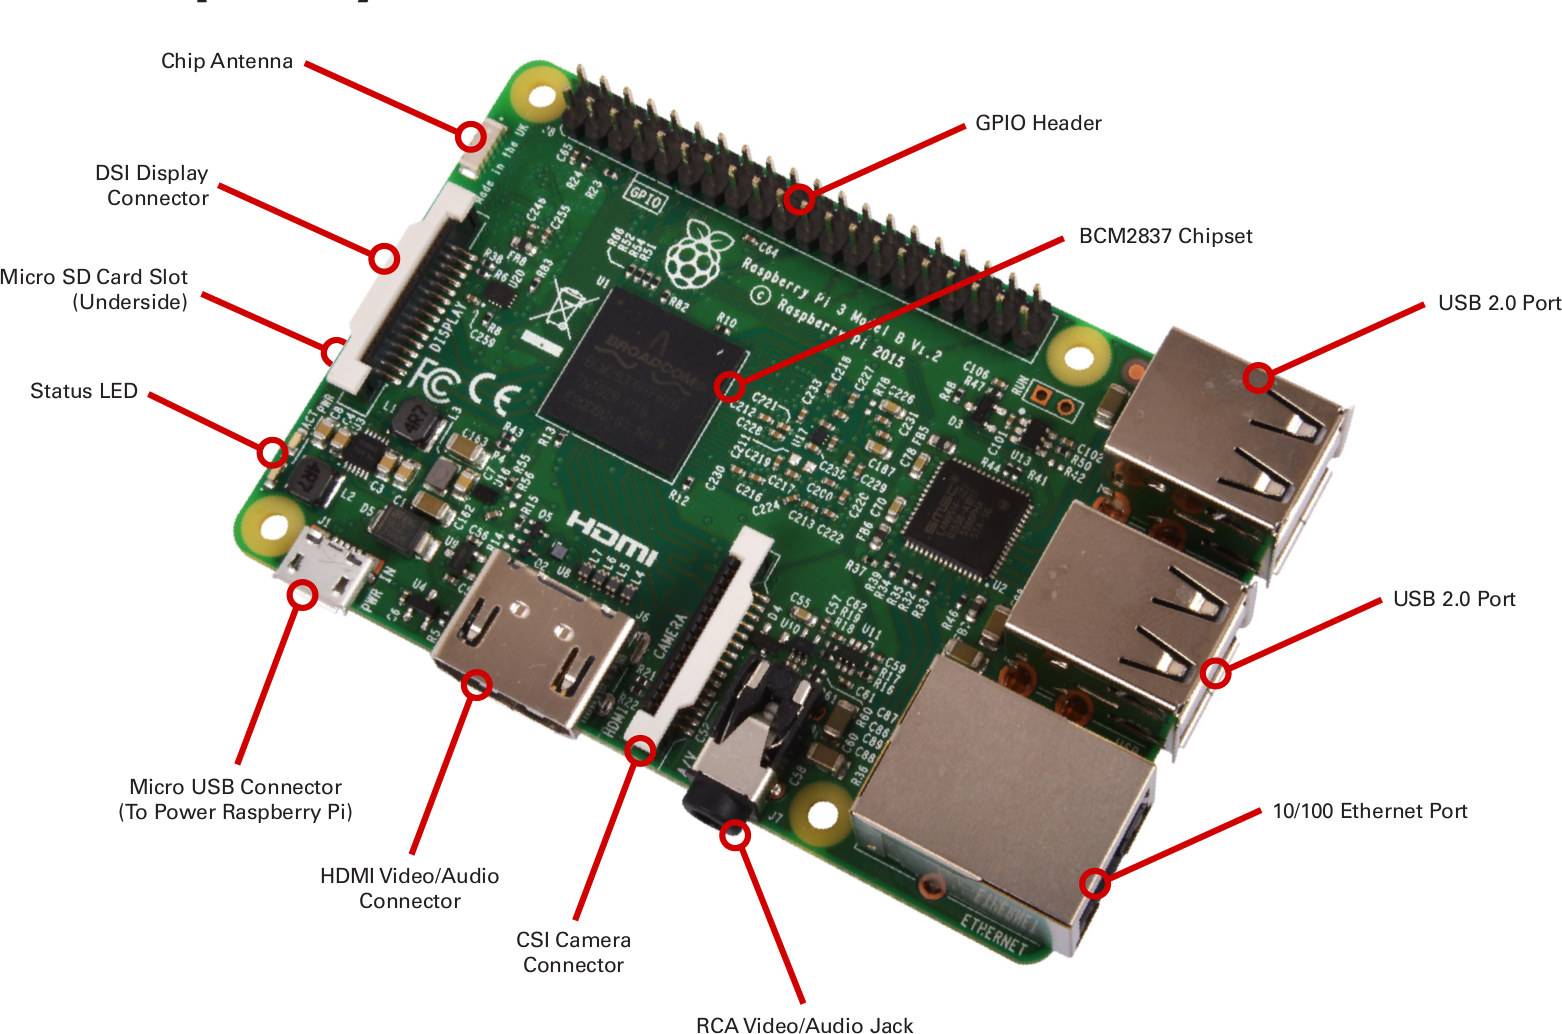
Hardware Overview for Rpi 3
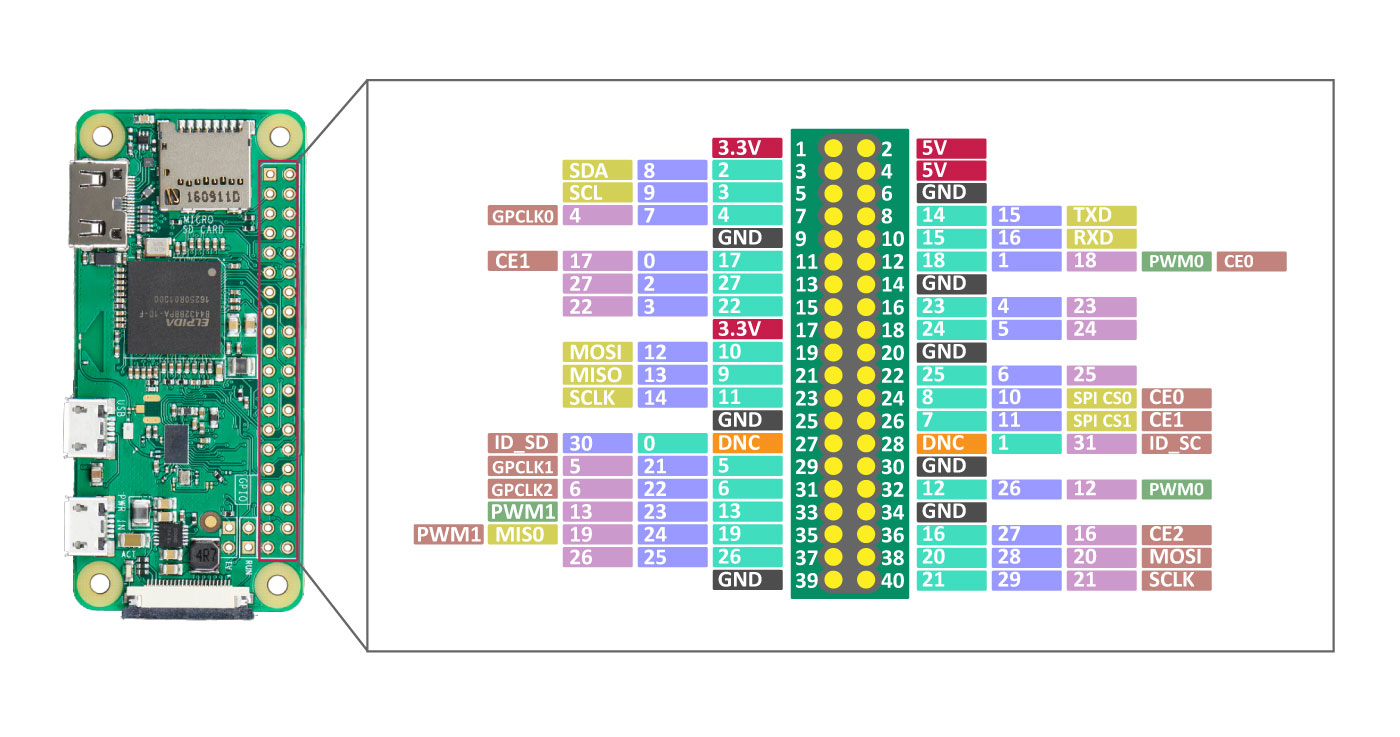
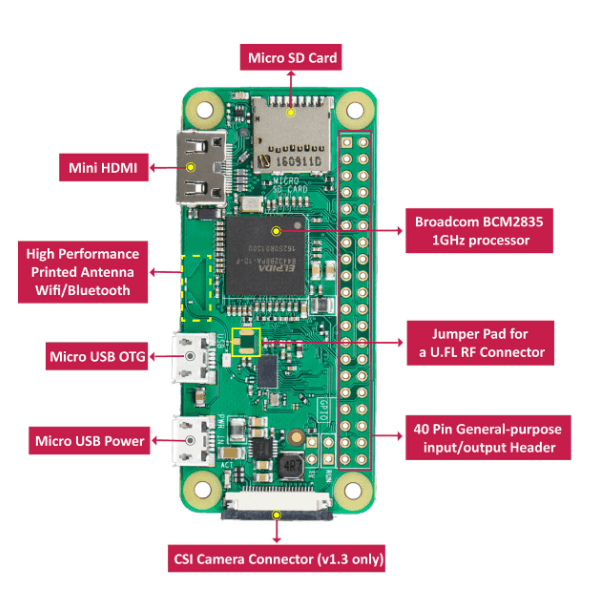
Hardware Overview for Rpi ZeroW
Flashing to external SDCard
See instructions in Flashing Images to SD Card for details.
Booting from SDcard
Insert the SDcard into your Raspberry Pi, and power it up. Your new system should come up now and start command line utility as that of qemu
Connecting to the device
You have several options to connect to the terminal on the device. Many will use SSH server, such as the dropbear installation we used in previous assignments, to interact with hardware.
Connecting through Keyboard and Monitor
Note: Raspberry Pi ZeroW uses Mini HDMI and Micro USB ports
The easiest option is to connect via HDMI monitor and USB keyboard to use the terminal. This can be especially useful to find the IP address assigned to the system. Useip addr after logging in to find the IP address you can use with SSH to login and/or transfer files to the system.
Connecting through Ethernet
Note: Raspberry Pi ZeroW does not have an ethernet port If you boot with the Ethernet port connected to a router, the device should obtain an address via DHCP. However, it might not be obvious which address is asigned until you can login via some other means. If you are connected to a local router you can use the router status page to find the device labeled "buildroot" and the corresponding IP address. You can also use a network scanning application like Angry IP to list the IP addresses on your current network. You can look for an IP address which responds to ping when connected, then drops off when you unplug the network cable the device.