3. Crossmember Construction - crunchysteve/TriceratopsTwo GitHub Wiki
Overview
The Crossmember is this trike's equivalent to a bicycle's fork. In fact, on mine, I've cut the steerer tube off a fork from a donor bike. This part does all the business end of turning the front wheels. In Triceratops' case, the wheels rotate in two dimensions, the actual steering, and the tilt factor, to "tighten" the handling. Here's a bare frameset pic...

As main frame leans into a corner, the inside end of the crossmember pivots towards the rear, causing the tierods to force the tilt brackets, and therefore the wheels, to tilt into the corner. By moving the mount point points of the tierod frame ends forwards or backwards along a slotted bracket causes a more aggressive lean if moved towards the rear, or gentler if moved forwards. Literally leaning the seat with your body weight pushes the frame towards the inside wheel, causing the tierod to push that wheel ove in the same direction, also tilting the outside wheel towards the turn.
NOTES ON WELDING
This project requires welding and welding is dangerous. Aside from burns and potential for electric shock, you can severely damage your eyesight, even go blind, if you don't take the proper safety precautions. Always use the appropriate safety equipment for your welder, leather full length apron, leather gloves, face shield (MIG/TIG welding) or goggles (brazing or silver soldering) and always double and triple check everything before beginning each weld. Never take safety for granted! Be safe!
Also, I am in NO WAY encouraging you to do this. If you build this trike, you do evry, single part of it at your own risk! You have been warned. Be careful out there! If you've never welded before, do a welding course, in person, not online, before you start!
That is all.
Parts
As per the wisdom of the great Atomic Zombie, designer of recumbents, bicycle choppers, lowriders, etc, this project will recycle old frame parts. The first of these is the steerer tube from an old mountain bike fork. The new materials needed are...
- 1x 548mm length of 35mm x 1.6mm hollow square section structural steel (AKA 35 x 1.6 SHS) for the main cross piece,
- 2x 35mm lengths of 20 x 1.6 SHS structural steel for the tilt bosses,
- 2x 35mm lengths of 16mm x 1.6 elliptical hollow section structural steel (AKA 16 x 1.6 SHS) for tilt boss bushes.
- Enough welding wire on your TIG welder's spool to finish the job. (If you're down to your last few turns, go get another spool, I'll wait.)
Construction
Steerer Tube Prep
First, I prepared my steerer tube. I'd advise selecting a longish one off a large frame. I'm going with 1 & 1/8 inch as that's standard now. The steerer gets welded onto the crossmember on a 45° angle, AT_THE_VERY_CENTRE! Not 0.5mm left or right, or your trike will steer unevenly, left compared to right. Obvious, I know, but it's better to get this right now.
To salvage the steerer, I cut the fork legs off with a cutting disk on my angle grinder, then ground off the remains and weld using a grinding disk. You will change disks on your grinder quite a lot with this project. Next I cut a precise v-notch in the base of the stem, where we just ground of the remains of the fork legs. Look for the brake holes, we want these to be above the top face of the crossmember (hole at the back of the stem) and ahead of the front face of the crossmember. So your v-slot sits between the brake holes, running left to right. The brake holes will provide ventilation to inside, so it won't rust from condensation inside it. The finished piece should look something like this...

I also 3D printed a brace to hold and clamp the steerer to the crossmember. You can get the OpenSCAD file here to tweak it to fit your steerer, if you're using a 1". If you're using a 1 & 1/8, the STL file is here.

Clamp the stem in the top of the brace with an elastic band, centre it PERFECTLY on the crossmember, clamp it and weld it... But wait! You've got to do some cutting and welding on the crossmember! Do all the welding last!
Crossmember Cut & Assembly
Next, we'll do the cutting and fitting of the crossmember ends. Because, as is shown in the bare frame image above, we have to pivot the tilt brackets (which the front wheels mount to) off the ends of the crossmember, so we need bushes at the ends to carry the pivot bolts. To keep the design simple, I'm using 20 x 1.6 SHS tube and 3D printing bushes to fit from carbon-fibre impregnated PETG. You could instead use 16 x 1.6 EHS (round tube) inside the 20 x 1.6 SHS as bushes.
So, after cutting our 35 x 1.6 SHS to length (548mm), our next cuts, on the bottom face, at both ends, is this 20mm x 20mm notch to accomodate the square bosses.
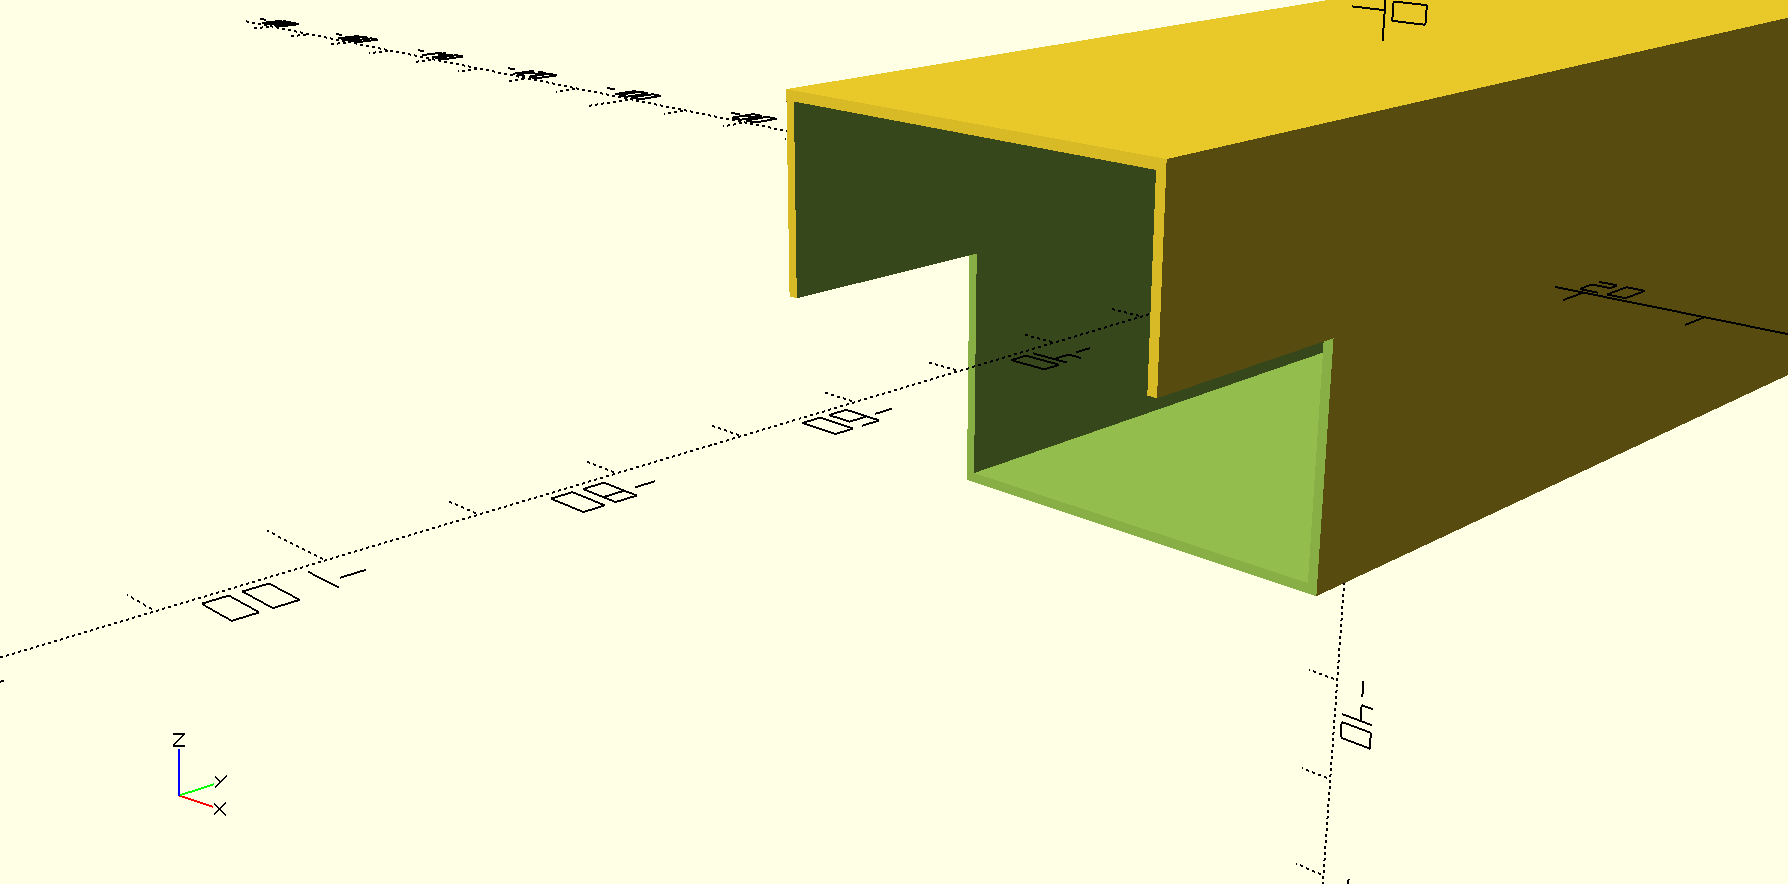
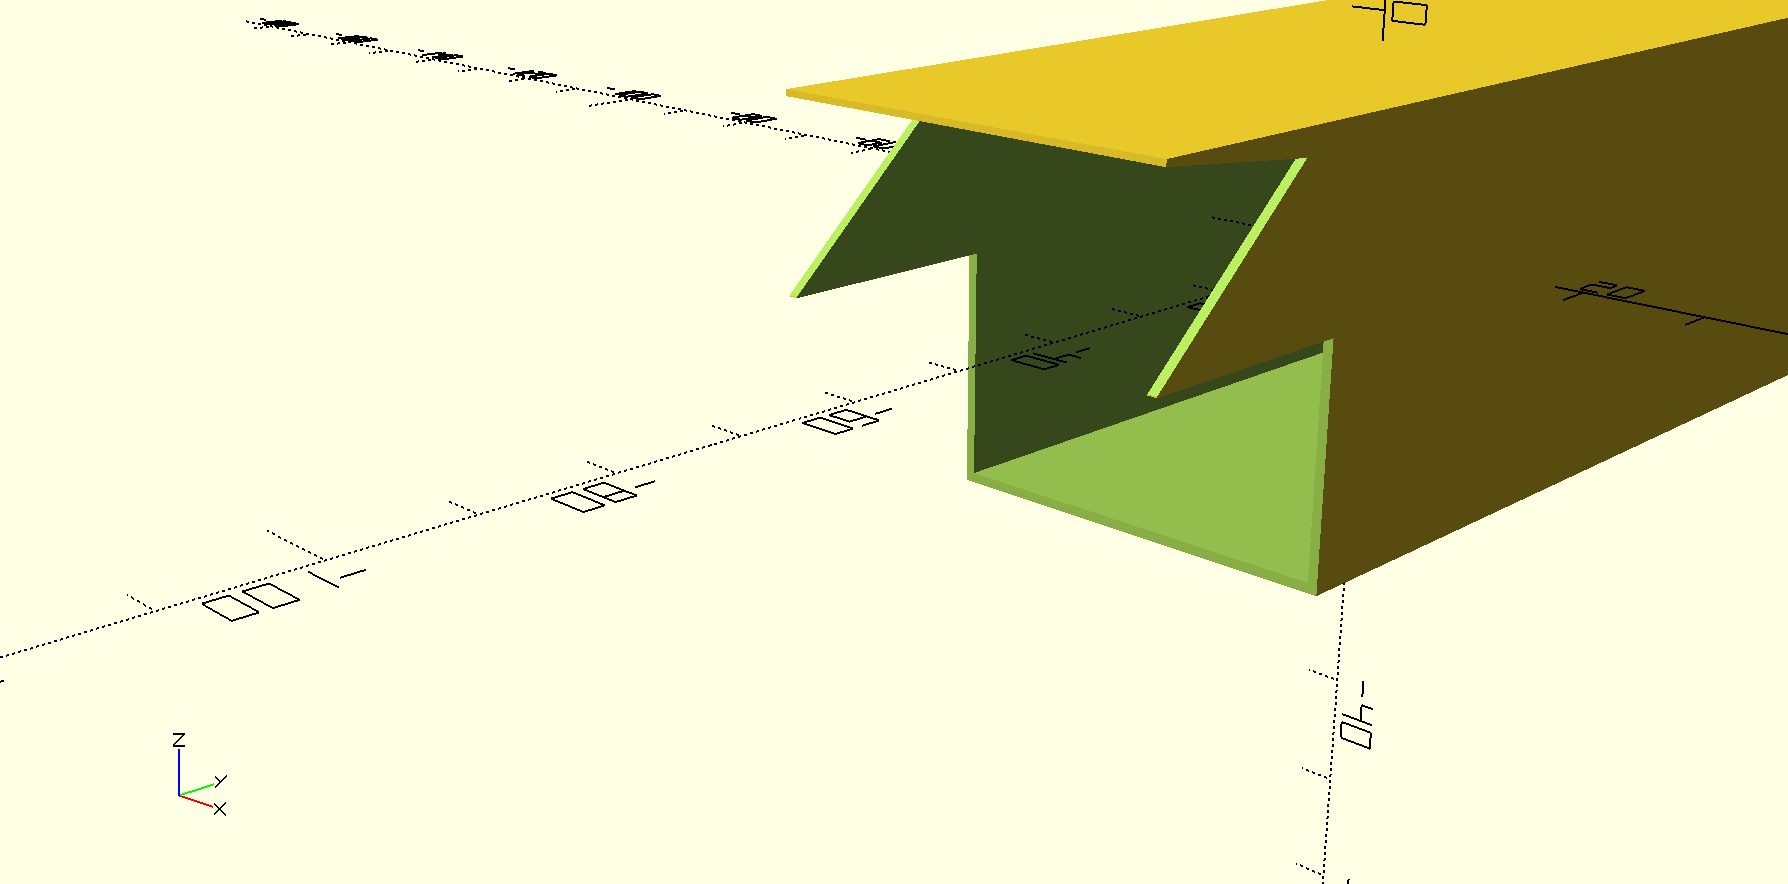
Next, we're cutting this diagonal notch and bending that top flap down to form a chamfer. Now we can weld down the sides of the chamfer! Yay, welding at last
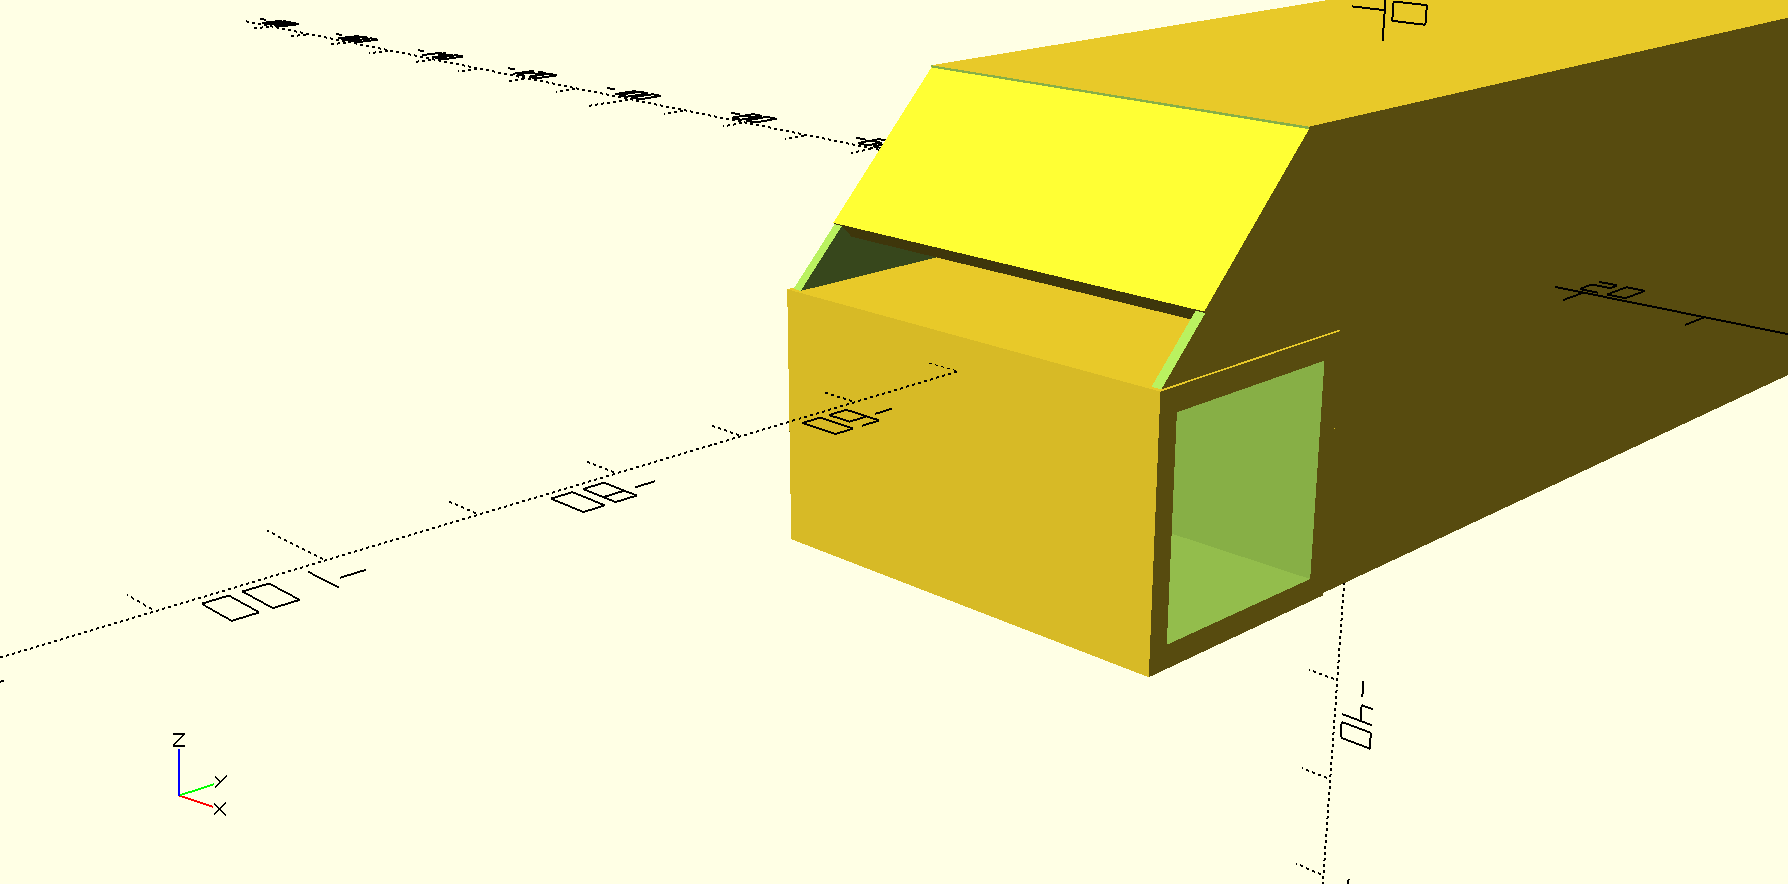
We do these cuts and welds at each end, adding the square bosses, and weld them in place, like this.
Like I say, at this point, I'm 3D printing my bushings in carbon-fibre stock but, if you don't have easy access to a 3D printer, you can do this next stage.

Really lightly tack these in place, don't get any weld inside the 16 x 1.6 EHS, and use 1/2 inch UNC bolts instead of M12 if using this method. You can also do a fillet to close that gap above the square bush. Also, mount your EHS bushes against the end-most and bottom faces of the 20 x 1.6 SHS tubes. This gives your tile brackets more clearance to pivot around the stubby, chamfered ends of the crossmember.
Final Crossmember Assembly
Finally, we attach the steerer to the crossmember, taking absolute care to mount it in the jig (if you're using one, please use a jig) and clamp it exactly at the centre of the crossmember. If this is out of alignment in ANY degree, your steering will be borked. This is probably the most important join. Here's the pic of this again. I'm holding it for the photo, but obviously, you'll measure twice, even 3 times, clamp everything and weld it once! If you mess this up, this bit is hard to fix. At the least, you'll probably need another steerer tube, even if you don't bugger the crossmember.
Weld all the way around the top interface of the stem and crossmember, remove the jig, turn the crossmember backwards, then weld all the way around the bottom interface. Clean and inspect your welds. Make sure you haven't left any spots unmelted. If there look like there might be gaps or places for rust to get a toehold under the paintjob, grind away just enough to remove the blemish and reweld it. For this kind of cleanup, point grinding tools in a drill are more precise than an angle grinder.
Congratulations! You've just finished construction of the first part of your trike! Next, we'll build the main frame.