Example Notebook - cps-vip/cps-cosimulation-env GitHub Wiki
This notebook is given as an example of the quality needed to get an A for a 2 credit hour student. It has the following features (taken from the rubric):
- Average of 2 entries per week.
- Each entry represents 2-3 hours of work outside of class
- Notebook content describes technical work in a way that is detailed and clear.
- Notebook details should be sufficient to allow a new student to pick up exactly where the notebook leaves off without needing any resources not referenced in your notebook.
- Nearly every entry includes at least one supporting material.
- Supporting material includes links, diagrams, and code blocks.
- Includes any important notes from any meetings (both in and out of class) that is relevant to current tasks/goals.
As mentioned, this notebook shows the quality we expect for a 2 credit hour student. 1 credit hour students are expected to an average of 1 entry per week, while 3 credit hour students are expected to have an average of 3 entries per week.
Starting Fall 2026, we will implement a weekly check for notebooks to make sure they are up to date. This will be 5% of your grade. This will be done via a python script that is run at the beginning of class, so make sure your notebooks are up-to-date before class starts.
To get credit, it must be formatted in markdown the following way:
# Fall/Spring 20xx

## Week 1

### Entry 1
This week I...

### Entry 2
We had a team meeting where we...

## Week 2
...
We will expect the current semester on top, with the weeks and entries in ascending order (i.e. week/entry 1 at the top). To get full credit each week, each entry must have a text and at least one supporting artifact (an image, link, or code block).
We will also be keeping track of the average entries per week and compare that to the number of credit hours you are taking:
| # of Credit Hours | Average # of Weekly Entries |
|---|---|
| 1 | 1 |
| 2 | 2 |
| 3 | 3 |
A manual, in-depth analysis of the quality of your notebook will still occur both at the middle and end of the semester.
Note: This example notebook is for a new student. Returning students should use the first week entries to provide a summary/background of their work last semester. This summary should give new students/instructors enough of a technical background of your previous work that they can understand the rest of your work you plan on doing this semester
- First week of class. Went over some cyberphysical fundamentals.
- Went over Markdown Tutorial[https://github.com/adam-p/markdown-here/wiki/markdown-cheatsheet] and reviewed the Notebook Editing Tips
- One of the helpful things I learned was how to create code blocks w/ syntax highlighting:
print("This is a Python code block!")#include <stdio.h>
int main() {
printf("This is a C code block!\n\r");
}- also went over GitHub tutorial
- Went over this Linux tutorial.
- Skipped over more advanced sections such as the ones on Vi, sed, and grep/regex
- example of bash script that lists all zip files in Downloads and then deletes them
#!/bin/bash

ls ~/Downloads/*.zip
rm ~/Downloads/*.zip- Went over the different teams.
- ROS/HELICs - robotics hardware and software
- Device Modeling
- Device Security
- The Device Security team sounds like the most interesting to me.
- One of the subtasks for the Device Security team is to create an RO PUF on an FPGA.
- Spent some time researching FPGAs:
- reconfigurable hardware
- can be configured to implement any digital circuit.
- Programmed using HDL (hardware description languages).
- Faster and more efficient than a CPU, slower and less efficient than a specialized ASICs (Application Specific Integrated Circuits).
- Harder to program than a CPU, easier to implement than an ASIC design.
- Other advantages:
- Flexibility, can be reprogrammed with bug fixes or updated requirements
- High bandwidth, can process insane amount of data
- Very precise timing control (on the order of nanoseconds)
- Use cases:
- Networking
- High Frequency Trading
- Signal Processing
- Prototyping ASICs
- Security sensitive systems
- Aerospace/Defense
Did some research on RO PUFs:
- RO = Ring Oscillator
- a loop containing an odd number of inverters
- oscillates between
0and1as fast as the transistors will allow 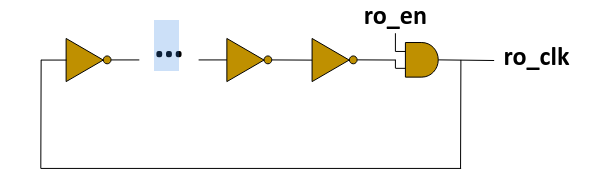
- PUF = Physical Unclonable Function
- Uses variations in transistor speed/strength (caused by the manufacturing process) to produce random numbers
- Random number can be used for device authentication
- Can also be used for cryptographic key generation/storage
- Can regenerate the same random key each time, so the need for storage is eliminated.
- Got into Device Security team!
- Going to work on the FPGA PUF subtask
- It's a new team so we had a meeting to discuss goals and a plan
- Use an FPGA to generate/store AES key for robot.
- Learn how to write HDL
- Figure out what FPGA we want to use
- Obtain said FPGA
- Learn how to program said FPGA.
Did some research on FPGAs. Our budget is $150 for a couple of dev boards.
- cmod a7-35t ($99)
- Cyclone IV E FPGA DE0-Nano ($119)
- The Go Board
- Worked on our team's Kickoff Presentation
- Did some a tutorial on verilog
- Learned about Modules, ports, and how to instantiate modules w/ ports.
- learned different data types like the
integer,wire,reg, and vectors (reg vector [15:0])
-
Discussed about which FPGA we wanted to chose. Decided to do the Xilinx one (the cmod a7), since it looks like the easiest to use.
-
Continued verilog tutorial
- Learned about arrays, always blocks, and assign statements
wire signal1;
reg reg1;
reg [15:0] vector1;

// assign statement
assign signal1 = in0 & in1;

//always block
always @posedge(clk) begin
    if (rst) begin
        reg1 <= 1'b0;
        vector1 <= 16'hFF;
    end
    else begin
        reg1 <=signal1;
        vector1 <= vector1 - signal1;
    end
end
- Told instructor about ordering cmod A7s in class today
- Started running simulations using eda playground.
- Installed Vivado (version 2026.1), which is the tool used to develop for and program the cmod A7. ([Vivado Download Link][https://www.amd.com/en/support/downloads/adaptive-socs-and-fpgas/development-tools/2026-1.html])
(Skipping for brevity. Of course, student notebooks are expected to have entries for each week.)
- Received FPGA boards
- created and ran a "hello world" demo where we blinked an LED for 1 second on 1 second off. (Normally this would link to the student's github repo for their demo).
- Planned out the architecture.
- ROs will be placed within a design that contains a RO controller, a UART module, and a MicroBlaze CPU
- RO controller will be in charge of turning RO off and on and counting oscillations
- MicroBlaze CPU will run C code that will be in charge of processing commands calculating the frequency of the ROs, and sending data to UART module
- UART will receive commands for CPU to process and send data from the CPU to the pi.
[Insert diagram of architecture here]
Sam: Working on Pi program to receive UART data from FPGA Will: Working on Hardware design Me: Working on the RO control/measurement software to run on MicroBlaze CPU
-
Planned out a simple handshake protocol for receiving commands:
- Read UART buffer until we get the ASCII
ACKcharacter (0x06) - Send the
ACKcharacter back to the Pi to confirm that we successfully received the message - If the Pi doesn't get the
ACKcharacter, it can assume that the message wasn't received and either throw an error or try again.
- Read UART buffer until we get the ASCII
-
Learned how to initialize the UART hardware in software insert link to code here:
#include "xil_printf.h"
#include "xparameters.h"
#include "xstatus.h"
#include "xuartlite.h"
#include "xuartlite_i.h"
#include "xil_io.h"
#include "xil_types.h"
#define UARTLITE_DEVICE_ID	XPAR_UARTLITE_0_DEVICE_ID
XUartLite UartLite;	// Instance of the UartLite Device


/*
 * This function initializes the command
 * structure such that commands can be
 * received from the UART line. It should
 * be called prior to any other command function.
 * Parameters:
 * 	None
 * Returns:
 * 	s32, XST_SUCCESS for success
 * 		 XST_FAILURE for error
 */
s32 command_init() {
	s32 status; // Error checking variable

	// Initialize the UARTLite device
	status = XUartLite_Initialize(&UartLite, UARTLITE_DEVICE_ID);
	if (status != XST_SUCCESS) {
		xil_printf("XUartLite_Initialize failed\r\n");
		return status;
	}

	return XST_SUCCESS;
}- Implemented handshake in the
command_getfunction (insert link to code here):
XUartLite UartLite;	// Instance of the UartLite Device
u8 next_char = DEFAULT_COMMAND;	// Variable to hold the next character
s32 recieved;		// Variable for checking if data was received
s32 count = 0;		// Variable to hold the current number of characters sent
char old_cmd[COMMAND_BUFFER_SIZE];

/*
 * This function returns the most recent
 * command received. This function also
 * performs handshaking across the UART
 * with the sender of the commands. As
 * such this function may not return
 * until the proper acknowledge signal
 * is received.
 * Parameters:
 *  char[BUFFER_SIZE] cmd: A char array that
 *  					   will contain the most
 *  					   recent command upon
 *  					   return.
 * Returns:
 * 	s32, XST_SUCCESS for success
 * 		 XST_FAILURE for error
 */
s32 command_get(char cmd[COMMAND_BUFFER_SIZE]) {
	// Get new data from the UART
	recieved = XUartLite_Recv(&UartLite, &next_char, sizeof(next_char));

	if(recieved) { // Check if anything new was received
		while(next_char != ACK_SYMBOL) { // wait for the return acknowledge signal
			if(recieved) {
				cmd[count] = next_char;
				count++;
			}
			if(count >= COMMAND_BUFFER_SIZE) {
				return XST_FAILURE;
			}
			recieved = XUartLite_Recv(&UartLite, &next_char, sizeof(next_char));
		}
		for(int i = count; i < COMMAND_BUFFER_SIZE; i++) {
			cmd[i] = '\0';
		}
		count = 0;
		next_char = DEFAULT_COMMAND; // reset the ack variable
		clear_input(); //clears the rx fifo
		xil_printf("%c", ACK_SYMBOL); // send the acknowledge signal

	}

	return XST_SUCCESS;
}- Waiting to meet with Sam to test the handshaking protocol with the python code he wrote for the pi (insert link to Sam's code here)
(Skipping for brevity)
- We realized a security flaw in our design. The AES key is sent over plaintext to the Pi. We need to instead send it over an encrypted channel to prevent potential wire snooping.
- In addition to generating an AES key, we also must generate a 4096 bit RSA key to establish a encrypted channel via diffie-hellman.
- This will require increasing the number of ROs in our PUF from 256+1 to 256+4096+1
-
Went through several tutorials to try and learn Diffie-Hellman:
- https://codesignal.com/learn/courses/foundations-of-encryption-for-tls/lessons/practical-diffie-hellman-key-exchange
- https://www.geeksforgeeks.org/computer-networks/implementation-diffie-hellman-algorithm/
- https://www.khanacademy.org/computing/computer-science/cryptography/modern-crypt/v/diffie-hellman-key-exchange-part-1
-
C implementation from geeksforgeeks:
/* This program calculates the Key for two persons
using the Diffie-Hellman Key exchange algorithm */
#include <math.h>
#include <stdio.h>

// Power function to return value of a ^ b mod P
long long int power(long long int a, long long int b,
                    long long int P)
{
    if (b == 1)
        return a;

    else
        return (((long long int)pow(a, b)) % P);
}

// Driver program
int main()
{
    long long int P, G, x, a, y, b, ka, kb;

    // Both the persons will be agreed upon the
    // public keys G and P
    P = 23; // A prime number P is taken
    printf("The value of P : %lld\n", P);

    G = 5; // A primitive root for P, G is taken
    printf("The value of G : %lld\n\n", G);

    // Alice will choose the private key a
    a = 4; // a is the chosen private key
    printf("The private key a for Alice : %lld\n", a);
    x = power(G, a, P); // gets the generated key

    // Bob will choose the private key b
    b = 3; // b is the chosen private key
    printf("The private key b for Bob : %lld\n\n", b);
    y = power(G, b, P); // gets the generated key

    // Generating the secret key after the exchange
    // of keys
    ka = power(y, a, P); // Secret key for Alice
    kb = power(x, b, P); // Secret key for Bob

    printf("Secret key for the Alice is : %lld\n", ka);
    printf("Secret Key for the Bob is : %lld\n", kb);

    return 0;
}
- Learned that ECDH is a secure implementation of DH
- An efficient implementation of ECDH in C: https://github.com/kokke/tiny-ECDH-c
- Worked on some slides for our upcoming presentation.
- Here's the RO PUF slide I worked on.
