User Guide - cncjs/cncjs GitHub Wiki
This widget visualizes a G-code file and simulates the tool path.
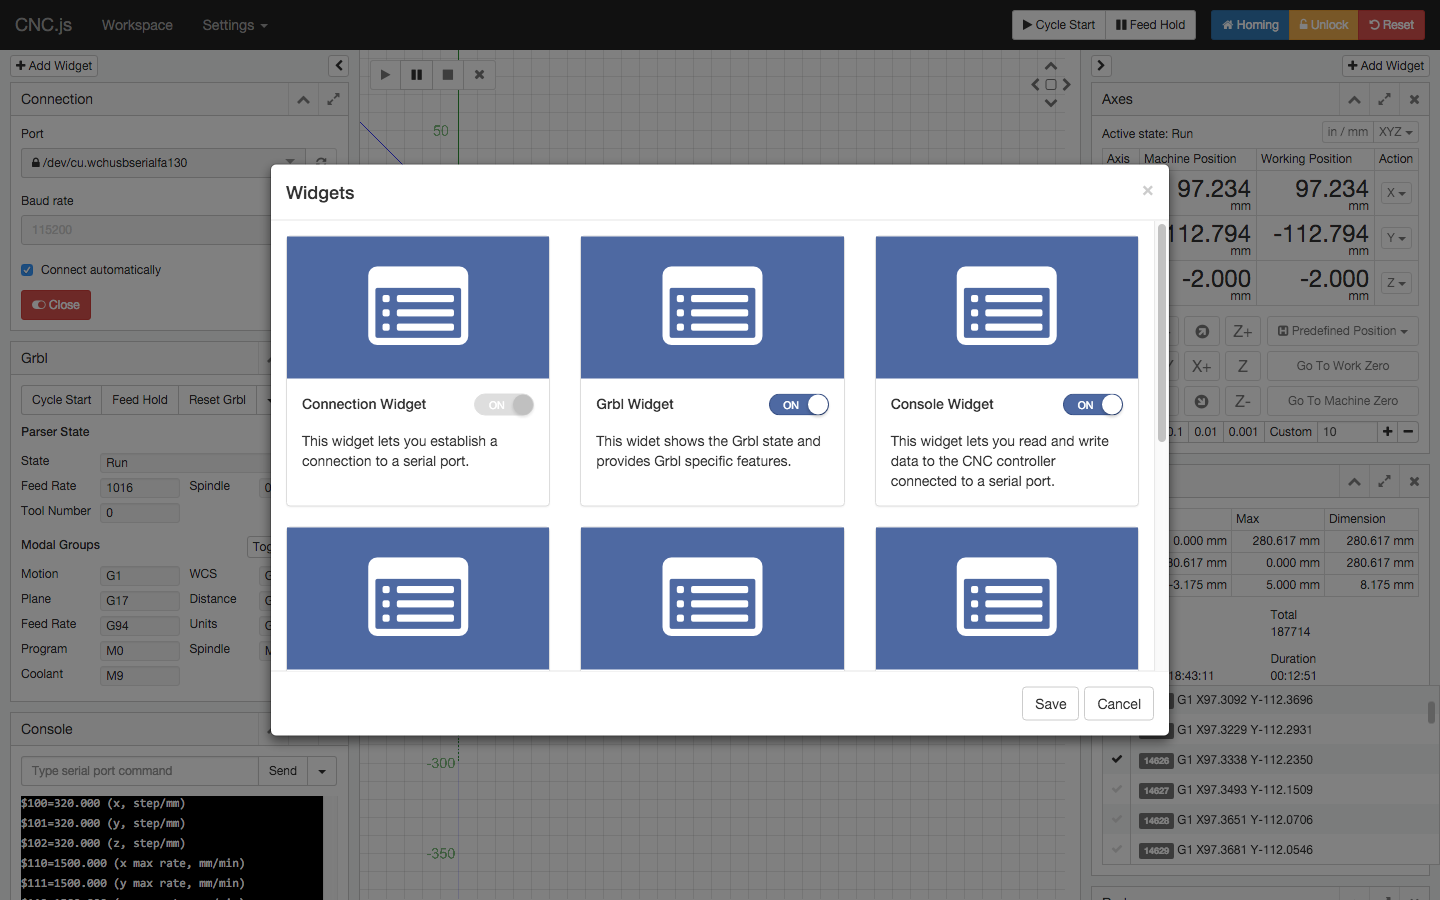
This widget lets you establish a connection to a serial port.
This widget shows the XYZ position. It includes jog controls, homing, and axis zeroing.
This widget lets you read and write data to the CNC controller connected to a serial port.
This widgets shows the current status of G-code commands.
This widet shows the Grbl state and provides Grbl specific features.
Set $10=2 for Grbl v1.1d (or $10=15 for Grbl v0.9) to see planner buffer and receive buffer in queue reports.

This widget shows the Smoothie state and provides Smoothie specific features.
This widget shows the TinyG state and provides TinyG specific features.
This widget allows you control laser intensity and turn the laser on/off.
This widget can use macros to automate routine tasks. The body of a macro is a GCode program, but you can replace parts of the GCode with calculated values. The calculations can be performed on literal numbers or on values representing current machine positions. You can create variables - names that represent values - and use them in calculations or replacements.
The characters that distinguish regular GCode from the extra CNCjs macro syntax are % , [ , and ] . Lines beginning with % are used to create variables for later use. Inside a GCode line, [ expression ] is replaced with the value of expression
The GCode program must be suitable for the controller (Grbl, TinyG, Marlin, etc) that you are using. There are subtle difference in the dialect of GCode that the different controllers support. For example, Marlin only accepts capital letters like G0, while Grbl will accept either G0 or g0.
The macro language can be used in GCode programs loaded from files too, not only from the Macro Widget.
Lines that start with % (except for the special case %wait) create variables that can be used later. You can set a variable to the value of an arithmetic expression. Inside an expression, you can use variables that you created earlier, and predefined system variables that report the state of the machine. The syntax of expressions is a subset of the JavaScript programming language expression syntax.
%p1x = posx
%p1y = posy
%p2x = posx
%p2y = posy
%p3x = posx
%p3y = posy
%ma = (p2y - p1y) / (p2x - p1x)
%mb = (p3y - p2y) / (p3x - p2x)
%cx = (ma * mb * (p1y - p3y) + mb * (p1x + p2x) - ma * (p2x + p3x)) / (2 * (mb - ma))
%cy = (-1 / ma) * (cx - (p1x + p2x) * 0.5) + (p1y + p2y) * 0.5
You can declare more than one variable on the same line by using comma to separate the variables, as with:
%p2x=posx, %p2y=posy
%wait is a special word. CNCjs replaces it with code to make the controller wait until it has finished all previous operations.
When CNCjs encounters a pair of square brackets [ expression ] in GCode, it replaces it with the value of expression. The following sequence:
%cx = 10
%cy = 10
G0 X[cx] Y[cy]
results in this being sent to the controller:
G0 X10 Y10
The text inside the brackets can be an expression, not just a simple variable. You could say, for example:
%scale = 0.4
%cx = 10
%cy = 10
G0 X[cx*scale] Y[cy*scale]
which would send this to the controller:
G0 X4 Y4
There are some predefined variables that report the current state of the machine and the GCode program.
xmin, xmax, ymin, ymax, zmin, zmax
mposx, mposy, mposz, mposa, mposb, mposc
posx, posy, posz, posa, posb, posc
The values of the following system variables are not numbers, but rather GCode words like G90. They can be used to save the current modal state of the controller and then later restore that state. For example, modal.units is either G20 for inches or G21 for millimeters. You could write a macro that works in inches, regardless of the current controller setting, then, at the end, restore the controller setting to whatever it was before.
modal.motion, modal.wcs, modal.plane, modal.units, modal.distance, modal.feedrate, modal.program, modal.spindle, modal.coolant
-
Wait until the planner queue is empty
%wait -
Print the value of a variable in the console
%X0=posx (X0=[X0]) ; Print the value in the inline comment G4 P0 (X0=[X0]) ; Print the value in the inline comment right after a G4 dwell command -
Save the current work position for later
%X0=posx, Y0=posy, Z0=posz, A0=posa, B0=posb, C0=posc -
Go to previous work position
G0 X[X0] Y[Y0] G0 Z[Z0] -
Saving and restoring modal state This would go at the beginning of the macro, to record the current modal state in variables:
%WCS=modal.wcs
%PLANE=modal.plane
%UNITS=modal.units
%DISTANCE=modal.distance
%FEEDRATE=modal.feedrate
%SPINDLE=modal.spindle
%COOLANT=modal.coolant
During the execution of the macro, the modal state (and the values of the modal special variables) might change as a result of GCode words inside the macro. At the end of the macro, you could write this to restore the modes to their saved values:
[WCS] [PLANE] [UNITS] [DISTANCE] [FEEDRATE] [SPINDLE] [COOLANT]
Note that Marlin does not permit multiple GCode words on the same line, so if you are using Marlin, you would have to put each of the above bracketed expressions on a separate line.
-
Set bounding box
%xmin=0,xmax=100,ymin=0,ymax=100,zmin=0,zmax=50 -
Traverse around the boundary
G90
G0 Z10 ; go to z-safe
G0 X[xmin] Y[ymin]
G0 X[xmax]
G0 Y[ymax]
G0 X[xmin]
G0 Y[ymin]
Once a G-code file is loaded, run the macro for perimeter tracing with respect to current G-code boundary.

This widget helps you use a touch plate to set your Z zero offset.
This widget provides the spindle control.
This widget lets you monitor a webcam.
Checkout FAQ to learn how to setup and configure webcam streaming with Raspberry Pi.

These are the current keys used in the cnc (from v0.15.3).
! - Feed Hold
~ - Resume
ctrl + alt + command + h - Homing
ctrl + alt + command + u - Unlock
ctrl + alt + command + r - Reset
ctrl + alt + command + x - Select/Deselect X Axis
ctrl + alt + command + y - Select/Deselect Y Axis
ctrl + alt + command + z - Select/Deselect Z Axis
ctrl + alt + command + a - Select/Deselect A Axis
ctrl + alt + command + b - Select/Deselect B Axis (Supported in v1.9.15)
ctrl + alt + command + c - Select/Deselect C Axis (Supported in v1.9.15)
ctrl + alt + command + = - Toggle Jog Distance
ctrl + alt + command + + - Increase Jog Distance (Supported in v1.9.15)
ctrl + alt + command + - - Decrease Jog Distance (Supported in v1.9.15)
ctrl + alt + command + ] or f - Jog Forward
ctrl + alt + command + [ or k - Jog Backward
ctrl + alt + shift + 7 - Shuttle Backward (Fastest)
ctrl + alt + shift + 6 - Shuttle Backward (Faster)
ctrl + alt + shift + 5 - Shuttle Backward (Fast)
ctrl + alt + shift + 4 - Shuttle Backward (Normal)
ctrl + alt + shift + 3 - Shuttle Backward (Slow)
ctrl + alt + shift + 2 - Shuttle Backward (Slower)
ctrl + alt + shift + 1 - Shuttle Backward (Slowest)
ctrl + alt + command + 0 - Shuttle Stop
ctrl + alt + command + 1 - Shuttle Forward (Slowest)
ctrl + alt + command + 2 - Shuttle Forward (Slower)
ctrl + alt + command + 3 - Shuttle Forward (Slow)
ctrl + alt + command + 4 - Shuttle Forward (Normal)
ctrl + alt + command + 5 - Shuttle Forward (Fast)
ctrl + alt + command + 6 - Shuttle Forward (Faster)
ctrl + alt + command + 7 - Shuttle Forward (Fastest)
You can use the ShuttleXpress jog dial to work with a CNC controller. The ShuttleXpress has five programmable buttons, a 10 counts jog dial (the inner wheel), and a 15-position shuttle wheel (the outer wheel) that returns to center when released.

To work with cnc, configure three buttons to select/deselect X/Y/Z axis, and another one button to switch the distance value. Set turn jog dial left (CCW) to jog backward/down, and set turn jog right (CW) to jog forward/up.
- Button 1 - Select/Deselect A Axis
ctrl + alt + command + a - Button 2 - Select/Deselect X Axis
ctrl + alt + command + x - Button 3 - Select/Deselect Y Axis
ctrl + alt + command + y - Button 4 - Select/Deselect Z Axis
ctrl + alt + command + z - Button 5 - Select Jog Distance (1, 0.1, 0.01, 0.001, or a custom value)
ctrl + alt + command + = or d
- Jog Forward
ctrl + alt + command + ] or f - Jog Backward
ctrl + alt + command + [ or k
Adjust the keystroke repeat rate to 10 times per second for all Shuttle Zones except the Shuttle Zone 0.
- Shuttle Zone -7
ctrl + alt + shift + 7 - Shuttle Zone -6
ctrl + alt + shift + 6 - Shuttle Zone -5
ctrl + alt + shift + 5 - Shuttle Zone -4
ctrl + alt + shift + 4 - Shuttle Zone -3
ctrl + alt + shift + 3 - Shuttle Zone -2
ctrl + alt + shift + 2 - Shuttle Zone -1
ctrl + alt + shift + 1 - Shuttle Zone 0
ctrl + alt + command + 0 - Shuttle Zone 1
ctrl + alt + command + 1 - Shuttle Zone 2
ctrl + alt + command + 2 - Shuttle Zone 3
ctrl + alt + command + 3 - Shuttle Zone 4
ctrl + alt + command + 4 - Shuttle Zone 5
ctrl + alt + command + 5 - Shuttle Zone 6
ctrl + alt + command + 6 - Shuttle Zone 7
ctrl + alt + command + 7
If you'd hear a strange humming noise during acceleration and deceleration, try to increase the max feed rate and the acceleration speed, and make sure it will not miss steps. Use '$'-commands to tweak Grbl system settings, like below:
> $$
   :    :
$110=2500.000 (x max rate, mm/min)
$111=2500.000 (y max rate, mm/min)
$112=500.000 (z max rate, mm/min)
$120=250.000 (x accel, mm/sec^2)
$121=250.000 (y accel, mm/sec^2)
$122=50.000 (z accel, mm/sec^2)
   :    :
ok
> $110=2500.000
ok
> $120=250.00
ok
In the general case, higher acceleration (mm/sec^2) can significantly reduce humming sound when accelerating and decelerating, but you may need to adjust various settings with your CNC machine. To adjust ShuttleXpress specific settings, click on the button at the top of the Axes widget.
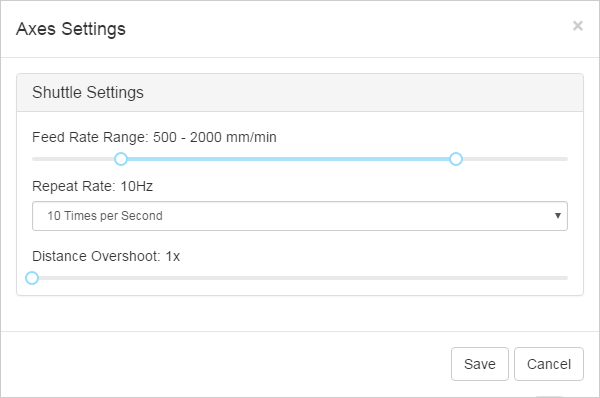
- Feed Rate Range: 100-2500 mm/min (default: 500-2000 mm/min)
- Defines the minimum feed rate for Shuttle Zone +1 and -1
- Defines the maximum feed rate for Shuttle Zone +7 and -7
- Repeat Rate: 60Hz - 1Hz (default: 10Hz)
- The repeat rate should be equal to your keystroke repeat rate for each Shuttle Zones.
- Distance Overshoot: 1x - 1.5x (default: 1x)
- Defines the overshoot of the travel distance