Image processing (Electron) - chung-leong/zigar GitHub Wiki
JavaScript | PHP
In this example we're going to build a dekstop app that resizes an image and applies a filter it. We'll first implement just the user interface and the image loading/saving functionalities. After getting the basics working, we'll bring in our Zig code.
We begin by initializing the project:
npm init electron-app@latest image
cd image
mkdir zig img
npm install node-zigar
Then we build a very simple UI in index.html:
<!doctype html>
<html lang="en">
  <head>
    <meta charset="UTF-8" />
    <title>Image filter</title>
    <link rel="stylesheet" href="index.css">
  </head>
  <body>
    <div class="App">
      <div class="contents">
        <div class="pane align-right">
          <canvas id="srcCanvas"></canvas>
          <div class="controls">
            Size: <input id="sizeInput" type="range" min="0.1" max="2" step="0.001" value="0.5">
          </div>
        </div>
        <div class="pane align-left">
          <canvas id="dstCanvas"></canvas>
        </div>
      </div>
    </div>
  </body>
  <script src="./renderer.js"></script>
</html>
Basically, we have two HTML canvases in our app, one for displaying the original image and the other the outcome. There's also a range input for changing the size of the resulting image.
We place our UI code in renderer.js:
const srcCanvas = document.getElementById('srcCanvas');
const dstCanvas = document.getElementById('dstCanvas');
const sizeInput = document.getElementById('sizeInput');

window.electronAPI.onLoadImage(loadImage);
window.electronAPI.onSaveImage(saveImage);

sizeInput.oninput = () => changeImage();

async function loadImage(url) {
  const img = new Image;
  img.src = url;
  await img.decode();
  const bitmap = await createImageBitmap(img);
  srcCanvas.width = bitmap.width;
  srcCanvas.height = bitmap.height;
  const ctx = srcCanvas.getContext('2d', { willReadFrequently: true });
  ctx.drawImage(bitmap, 0, 0);
  applyFilter();
}

function changeImage() {
  const srcCTX = srcCanvas.getContext('2d', { willReadFrequently: true });
  const params = { intensity: parseFloat(intensity.value) };
  const srcImageData = srcCTX.getImageData(0, 0, srcCanvas.width, srcCanvas.height);
  const dstImageData = srcImageData;
  dstCanvas.width = dstImageData.width;
  dstCanvas.height = dstImageData.height;
  const dstCTX = dstCanvas.getContext('2d');
  dstCTX.putImageData(dstImageData, 0, 0);
}

async function saveImage(path, type) {
  const blob = await new Promise((resolve, reject) => {
    const callback = (result) => {
      if (result) {
        resolve(result);
      } else {
        reject(new Error('Unable to encode image'));
      }
    };
    dstCanvas.toBlob(callback, type);
  });
  const buffer = await blob.arrayBuffer();
  await window.electronAPI.writeFile(path, buffer);
}
The code should be largely self-explanatory if you've worked with HTML canvas before. The following lines are Electron-specific:
window.electronAPI.onLoadImage(loadImage);
window.electronAPI.onSaveImage(saveImage);
These two lines enable us to initiate loading and saving from the application menu, something
handled by the Node side of our app. The following line, at the bottom of saveImage(), sends
data obtained from the canvas to index.js running in Node:
await window.electronAPI.writeFile(path, buffer);onLoadImage(), onSaveImage(), and writeFile() are defined in preload.js:
const { contextBridge, ipcRenderer } = require('electron')

contextBridge.exposeInMainWorld('electronAPI', {
  onLoadImage: (callback) => ipcRenderer.on('load-image', (_event, url) => callback(url)),
  onSaveImage: (callback) => ipcRenderer.on('save-image', (_event, path, type) => callback(path, type)),
  writeFile: (path, data) => ipcRenderer.invoke('write-file', path, data),
});
Consult the Electron documentation if you need a refresher on what a preload script does.
Let us move on to the Node side of things. In index.js we add our menu code at the bottom of
createWindow():
  // Open the DevTools.
  // mainWindow.webContents.openDevTools();

  const filters = [
    { name: 'Image files', extensions: [ 'gif', 'png', 'jpg', 'jpeg', 'jpe', 'webp' ] },
    { name: 'GIF files', extensions: [ 'gif' ], type: 'image/gif' },
    { name: 'PNG files', extensions: [ 'png' ], type: 'image/png' },
    { name: 'JPEG files', extensions: [ 'jpg', 'jpeg', 'jpe' ], type: 'image/jpeg' },
    { name: 'WebP files', extensions: [ 'webp' ], type: 'image/webp' },
  ];
  const onOpenClick = async () => {
    const { canceled, filePaths } = await dialog.showOpenDialog({ filters, properties: [ 'openFile' ] });
    if (!canceled) {
      const [ filePath ] = filePaths;
      const url = pathToFileURL(filePath);
      mainWindow.webContents.send('load-image', url.href);
    }
  };
  const onSaveClick = async () => {
    const { canceled, filePath } = await dialog.showSaveDialog({ filters });
    if (!canceled) {
      const { ext } = path.parse(filePath);
      const filter = filters.find(f => f.type && f.extensions.includes(ext.slice(1).toLowerCase()));
      const type = filter?.type ?? 'image/png';
      mainWindow.webContents.send('save-image', filePath, type);
    }
  };
  const isMac = process.platform === 'darwin'
  const menuTemplate = [
    (isMac) ? {
      label: app.name,
      submenu: [
        { role: 'quit' }
      ]
    } : null,
    {
      label: '&File',
      submenu: [
        { label: '&Open', click: onOpenClick },
        { label: '&Save', click: onSaveClick },
        { type: 'separator' },
        isMac ? { role: 'close' } : { role: 'quit' }
      ]
    },

  ].filter(Boolean);
  const menu = Menu.buildFromTemplate(menuTemplate)
  Menu.setApplicationMenu(menu);
};
In the whenReady handler, we connect writeFile() from the
fs module to Electron's
IPC mechanism:
app.whenReady().then(() => {
  ipcMain.handle('write-file', async (_event, path, buf) => writeFile(path, new DataView(buf)));
The code we added requires additional imports:
const { app, dialog, ipcMain, BrowserWindow, Menu } = require('electron');
const { writeFile } = require('fs/promises');
const path = require('node:path');
const { pathToFileURL } = require('url');
Finally, our app needs new CSS styles:
:root {
  font-family: Inter, system-ui, Avenir, Helvetica, Arial, sans-serif;
  line-height: 1.5;
  font-weight: 400;

  color-scheme: light dark;
  color: rgba(255, 255, 255, 0.87);
  background-color: #242424;

  font-synthesis: none;
  text-rendering: optimizeLegibility;
  -webkit-font-smoothing: antialiased;
  -moz-osx-font-smoothing: grayscale;
}

* {
  box-sizing: border-box;
}

body {
  margin: 0;
  display: flex;
  flex-direction: column;
  place-items: center;
  min-width: 320px;
  min-height: 100vh;
}

#root {
  flex: 1 1 100%;
  width: 100%;
}

.App {
  display: flex;
  position: relative;
  flex-direction: column;
  width: 100%;
  height: 100%;
}

.App .nav {
  position: fixed;
  width: 100%;
  color: #000000;
  background-color: #999999;
  font-weight: bold;
  flex: 0 0 auto;
  padding: 2px 2px 1px 2px;
}

.App .nav .button {
  padding: 2px;
  cursor: pointer;
}

.App .nav .button:hover {
  color: #ffffff;
  background-color: #000000;
  padding: 2px 10px 2px 10px;
}

.App .contents {
  display: flex;
  width: 100%;
  margin-top: 1em;
}

.App .contents .pane {
  flex: 1 1 50%;
  padding: 5px 5px 5px 5px;
}

.App .contents .pane CANVAS {
  border: 1px dotted rgba(255, 255, 255, 0.10);
  max-width: 100%;
  max-height: 90vh;
}

.App .contents .pane .controls INPUT {
  vertical-align: middle;
  width: 50%;
}

@media screen and (max-width: 600px) {
  .App .contents {
    flex-direction: column;
  }

  .App .contents .pane {
    padding: 1px 2px 1px 2px;
  }

  .App .contents .pane .controls {
    padding-left: 4px;
  }
}

.hidden {
  position: absolute;
  visibility: hidden;
  z-index: -1;
}

.align-left {
  text-align: left;
}

.align-right {
  text-align: right;
}
And a sample image. Either download the following or choose one of your own:

Save it in img. We'll load it after index.html is done loading:
  mainWindow.loadFile(path.join(__dirname, 'index.html')).then(() => {
    const url = pathToFileURL(path.join(__dirname, '../img/sample.png'));
    mainWindow.webContents.send('load-image', url.href);
  });
With everything in place, it's time to launch the app:
npm run startYou should see something like this:
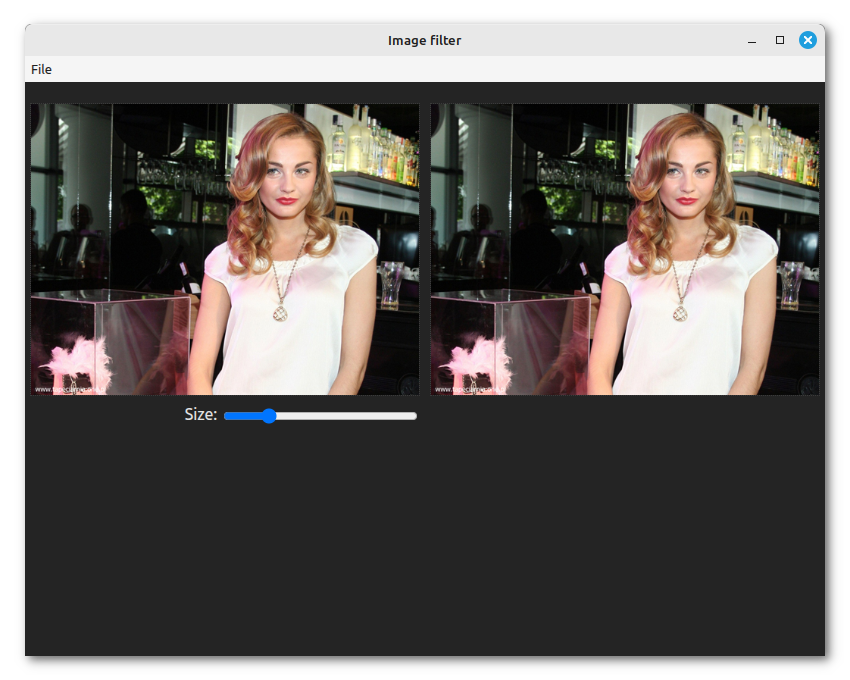
Moving the slider won't do anything but image loading and saving should work.
Okay, we'll now put in our Zig code. In the sub-directory zig, create process.zig:
const std = @import("std");

const zigar = @import("zigar");

pub fn scale(image_in: zigar.image.Any(.ro), image_out: zigar.image.Any(.rw)) void {
    const Pixel = @Vector(4, f32);
    inline for (zigar.image.formats) |tag| {
        if (image_in == tag and image_out == tag) {
            const in = image_in.getField(tag);
            const out = image_out.getField(tag);
            const x_adv: f32 = in.getWidthAsFloat() / out.getWidthAsFloat();
            const y_adv: f32 = in.getHeightAsFloat() / out.getHeightAsFloat();
            var coord: @Vector(2, f32) = undefined;
            coord[1] = 0.5;
            for (0..out.getHeight()) |y| {
                coord[0] = 0.5;
                for (0..out.getWidth()) |x| {
                    const pixel = in.sampleLinear(Pixel, coord);
                    out.setPixel(Pixel, x, y, pixel);
                    coord[0] += x_adv;
                }
                coord[1] += y_adv;
            }
        }
    }
}
The code above is a function that enlarges or shrinks an image. zigar.image.Any is a parametric union type that can accommodate either a PHP GD image or a JavaScript ImageData object. An inline loop is used here to generate different binaries for different formats from the same source code.
Now we go back to the JavaScript side. In index.js, add these require statements at the top:
require('node-zigar/cjs');
const { scale } = require('../zig/process.zig');
Add a handler for process-image in the whenReady handler:
  ipcMain.handle('process-image', (_event, src, params) => {
    const width = Math.round(src.width * params.size);
    const height = Math.round(src.height * params.size);
    const data = new Uint8ClampedArray(width * height * 4);
    const dst = { data, width, height };
    scale(src, dst);
    return dst;
  });
In preload.js we add in the needed plumbing:
contextBridge.exposeInMainWorld('electronAPI', {
  /* ... */
  processImage: (src, params) => ipcRenderer.invoke('process-image', src, params),
});
In renderer.js, we change changeImage() so that it uses the Node backend to create the output
image data:
async function changeImage() {
  const srcCTX = srcCanvas.getContext('2d', { willReadFrequently: true });
  const srcImageData = srcCTX.getImageData(0, 0, srcCanvas.width, srcCanvas.height);
  const params = {
    size: parseFloat(sizeInput.value),
  };
  // ImageData's width and height aren't enumerable for some reason and wouldn't appear
  // on the Node side if we pass srcImageData directly
  const src = {
    data: srcImageData.data,
    width: srcImageData.width,
    height: srcImageData.height,
  };
  const dst = await window.electronAPI.processImage(src, params);
  const dstImageData = new ImageData(dst.data, dst.width, dst.height);
  dstCanvas.width = dstImageData.width;
  dstCanvas.height = dstImageData.height;
  const dstCTX = dstCanvas.getContext('2d');
  dstCTX.putImageData(dstImageData, 0, 0);
}
The function needs to be async now since it has to wait for the backend.
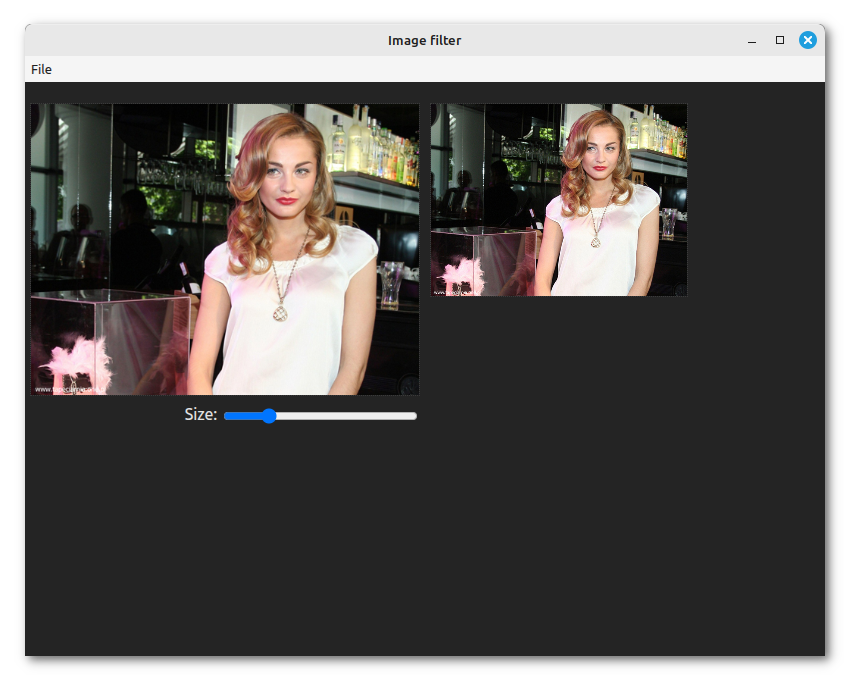
When you start the app again, a message will appear informing you that the Node-API addon and the module "process" are being built. After a minute or so you should see this:
In this section, we're going create a function that apply a sepia effect on an image. In the
process.zig, append the following code:
pub fn sepia(image_in: zigar.image.Any(.ro), image_out: zigar.image.Any(.rw), intensity: f32) void {
    const Pixel = @Vector(4, f32);
    inline for (zigar.image.formats) |tag| {
        if (image_in == tag and image_out == tag) {
            const in = image_in.getField(tag);
            const out = image_out.getField(tag);
            var coord: @Vector(2, f32) = undefined;
            coord[1] = 0.5;
            for (0..out.getHeight()) |y| {
                coord[0] = 0.5;
                for (0..out.getWidth()) |x| {
                    const yiq_matrix: [4]@Vector(4, f32) = .{
                        .{ 0.299, 0.596, 0.212, 0.0 },
                        .{ 0.587, -0.275, -0.523, 0.0 },
                        .{ 0.114, -0.321, 0.311, 0.0 },
                        .{ 0.0, 0.0, 0.0, 1.0 },
                    };
                    const inverse_yiq: [4]@Vector(4, f32) = .{
                        .{ 1.0, 1.0, 1.0, 0.0 },
                        .{ 0.956, -0.272, -1.1, 0.0 },
                        .{ 0.621, -0.647, 1.7, 0.0 },
                        .{ 0.0, 0.0, 0.0, 1.0 },
                    };
                    const rgba_color = in.sampleNearest(@Vector(4, f32), coord);
                    var yiqa_color = @"M * V"(yiq_matrix, rgba_color);
                    yiqa_color[1] = intensity;
                    yiqa_color[2] = 0.0;
                    const pixel = @"M * V"(inverse_yiq, yiqa_color);
                    out.setPixel(Pixel, x, y, pixel);
                    coord[0] += 1;
                }
                coord[1] += 1;
            }
        }
    }
}

fn @"M * V"(m1: anytype, v2: anytype) @TypeOf(v2) {
    const ar = @typeInfo(@TypeOf(m1)).array;
    var t1: @TypeOf(m1) = undefined;
    inline for (m1, 0..) |column, c| {
        inline for (0..ar.len) |r| {
            t1[r][c] = column[r];
        }
    }
    var result: @TypeOf(v2) = undefined;
    inline for (t1, 0..) |column, c| {
        result[c] = @reduce(.Add, column * v2);
    }
    return result;
}
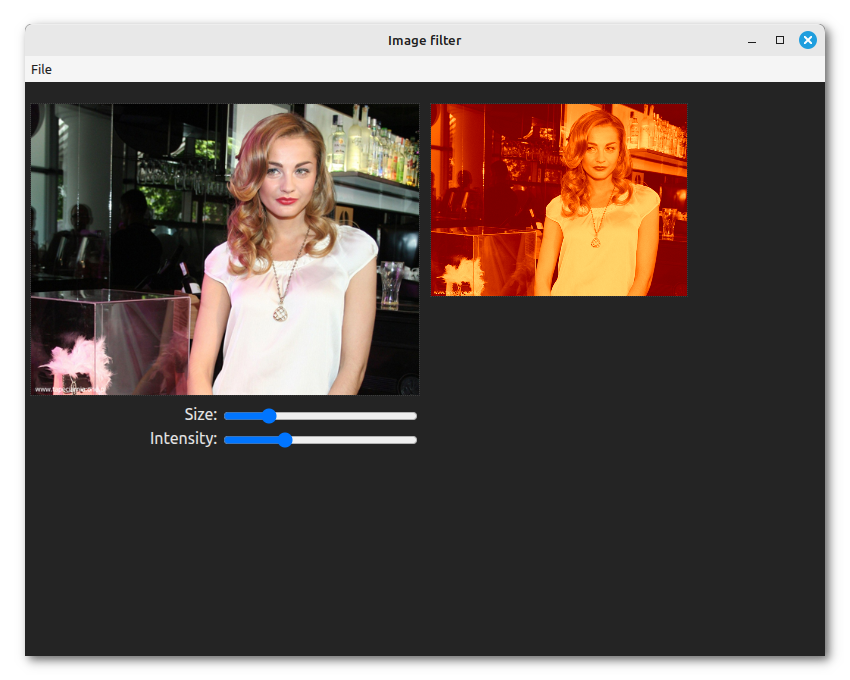
The working principle of the filter is quite simple. We transform each pixel of the image from RGB color space into YIQ, the color space used for NTSC broadcast. Acting like an old television set, we toss away the chromatic components (I and Q). Then we add a yellowish tint by assigning a specific value to I.

As you can see in the picture above depicting the YIQ color space at Y = 0.5, the I channel represents the reddish orange color:
The @"M * V" function might look odd to you. Zig allows identifiers to contain whitespaces and
special characters using the @"..." escape sequence. We're taking advantage of that here to
clearly indicate what the function does, namely multipling a matrix with a vector.
Loops are unrolled using the inline keyword to enhance performance.
In index.js, import the new function:
const { scale, sepia } = require('../zig/process.zig');And call it in the process-image handler:
sepia(dst, dst, params.intensity);On the UI side, add another slider in index.html
          <div class="controls">
            Intensity: <input id="intensityInput" type="range" min="0" max="1" step="0.0001" value="0.3">
          </div>
In renderer.js, attach a handler to the new input control:
const intensityInput = document.getElementById('intensityInput');
intensityInput.oninput = () => changeImage();
And retrieve its value in changeImage():
  const params = {
    size: parseFloat(sizeInput.value),
    intensity: parseFloat(intensityInput.value),
  };
Voila! The final result:
We're going to follow the same steps as described in the hello world tutorial. First, we'll alter the require statement so it references a node-zigar module instead of a Zig file:
const { scale, sepia } = require('../lib/process.zigar');Then we add node-zigar.config.json to the app's root directory:
{
  "optimize": "ReleaseSmall",
  "modules": {
    "lib/process.zigar": {
      "source": "zig/process.zig"
    }
  },
  "targets": [
    { "platform": "win32", "arch": "x64" },
    { "platform": "win32", "arch": "arm64" },
    { "platform": "win32", "arch": "ia32" },
    { "platform": "linux", "arch": "x64" },
    { "platform": "linux", "arch": "arm64" },
    { "platform": "darwin", "arch": "x64" },
    { "platform": "darwin", "arch": "arm64" }
  ]
}
We build the library files:
npx zigar buildAnd make necessary changes to forge.config.js:
const { FusesPlugin } = require('@electron-forge/plugin-fuses');
const { FuseV1Options, FuseVersion } = require('@electron/fuses');

module.exports = {
  packagerConfig: {
    asar: {
      unpack: '*.{dll,dylib,so}',
    },
    ignore: [
      /\/(zig|\.?zig-cache|\.?zigar-cache)(\/|$)/,
      /\/node-zigar\.config\.json$/,
    ],
  },
  rebuildConfig: {},
  makers: [
    {
      name: '@electron-forge/maker-squirrel',
      config: {},
    },
    {
      name: '@electron-forge/maker-zip',
      platforms: ['darwin'],
    },
    {
      name: '@electron-forge/maker-deb',
      config: {},
    },
    {
      name: '@electron-forge/maker-rpm',
      config: {},
    },
  ],
  plugins: [
    {
      name: '@electron-forge/plugin-auto-unpack-natives',
      config: {},
    },
    // Fuses are used to enable/disable various Electron functionality
    // at package time, before code signing the application
    new FusesPlugin({
      version: FuseVersion.V1,
      [FuseV1Options.RunAsNode]: false,
      [FuseV1Options.EnableCookieEncryption]: true,
      [FuseV1Options.EnableNodeOptionsEnvironmentVariable]: false,
      [FuseV1Options.EnableNodeCliInspectArguments]: false,
      [FuseV1Options.EnableEmbeddedAsarIntegrityValidation]: true,
      [FuseV1Options.OnlyLoadAppFromAsar]: true,
    }),
  ],
};
We're now ready to create the installation packages:
npm run make -- --platform linux --arch x64,arm64
npm run make -- --platform win32 --arch x64,ia32,arm64
npm run make -- --platform darwin --arch x64,arm64
The packages will be in the out/make directory:
📁 out
  📁 make
    📁 deb
      📁 arm64
        📦 image.0.0_arm64.deb
      📁 x64
        📦 image.0.0_amd64.deb
    📁 rpm
      📁 arm64
        📦 image-1.0.0-1.arm64.rpm
      📁 x64
        📦 image-1.0.0-1.x86_64.rpm
    📁 squirrel.windows
      📁 arm64
        📦 image-1.0.0-full.nupkg
        📦 image-1.0.0 Setup.exe
        📄 RELEASES
      📁 ia32
        📦 image-1.0.0-full.nupkg
        📦 image-1.0.0 Setup.exe
        📄 RELEASES
      📁 x64
        📦 image-1.0.0-full.nupkg
        📦 image-1.0.0 Setup.exe
        📄 RELEASES
    📁 zip
      📁 darwin
        📁 arm64
          📦 image-darwin-arm64-1.0.0.zip
        📁 x64
          📦 image-darwin-x64-1.0.0.zip
The app running in Windows 10:

And in MacOS:

You can find the complete source code for this example here.
The need to move data between the "browser-side" and "node-side" made this example somewhat complicated. It makes the app inefficient as well, since image data is unnecessarily copied. node-zigar might not actually be the best solution for an Electron app in this instance. Using rollup-zigar-plugin to transcode our Zig code to WebAssembly and running it on the browser side might make more sense. Consult the Vite version of this example to learn how to do that.
The image filter employed for this example is very rudimentary. Check out pb2zig's project page to see more advanced code.
That's it for now. I hope this tutorial is enough to get you started with using Zigar.