opencv 이미지 라벨링, 세그멘테이션, 영역분류 - chloe73/openCV GitHub Wiki
이미지에 커널(마스크)을 컨볼루션하여 블러닝(흐리게), 샤프닝(선명하게) 등의 처리를 할 수 있습니다
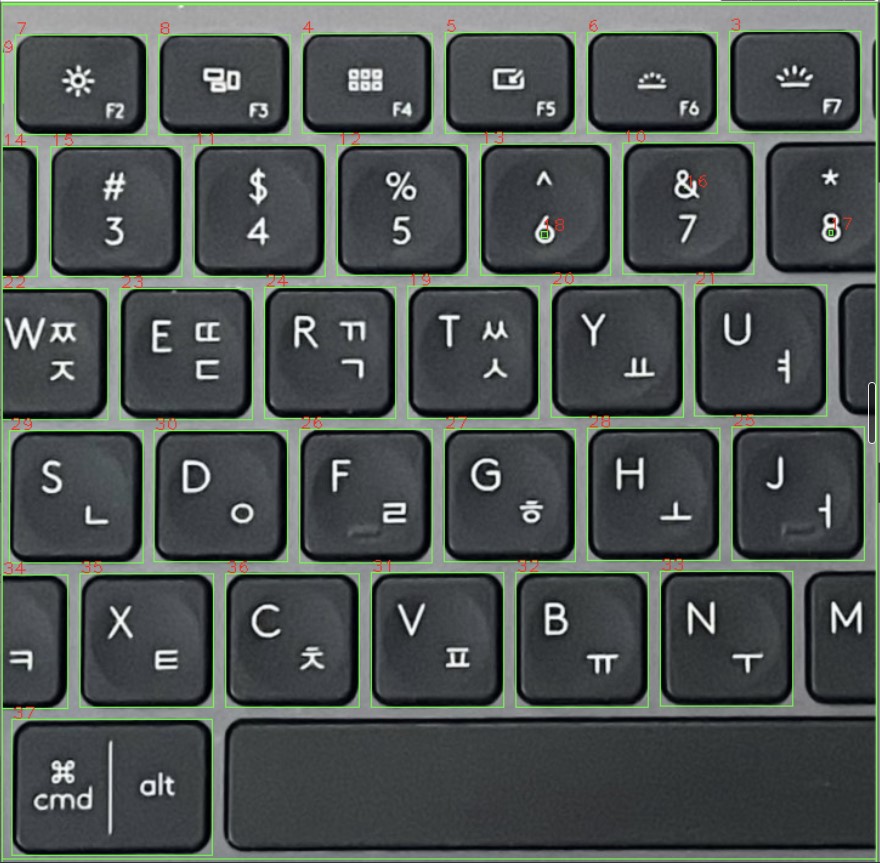
- 정확하지 않다.
- 엄청 흐리게 만들어서 버튼 안의 text를 못 보게 만든다는 생각으로 적용함
import numpy as np
import cv2

src = cv2.imread("C:/Users/ParkSangHoon/Desktop/OpenCV_ img_files/keybord.jpg")
src_me = cv2.medianBlur(src,9)
dst = cv2.cvtColor(src_me,cv2.COLOR_BGR2GRAY)

#이진화
_, th = cv2.threshold(dst, 0, 255, cv2.THRESH_OTSU + cv2.THRESH_BINARY_INV)

dst = cv2.cvtColor(th,cv2.COLOR_GRAY2BGR)
#stats가 번호가 지정된 객체이다
_, labels, stats, centroids = cv2.connectedComponentsWithStats(th)

count = 0
for x,y,w,h,area in stats: # 각각의 객체 정보에 들어가기 위해 반복문. 범위를 1부터 시작한 이유는 배경을 제외
    if (h,w) < dst.shape:
        cv2.rectangle(src, (x, y, w, h), (0, 255, 0),1)
    count += 1
    string = str(count)
    cv2.putText(src,string,(x,y),cv2.FONT_HERSHEY_PLAIN,1,(0,0,255),1)


cv2.imshow('src', src)
cv2.imshow('th', th)
cv2.imshow('dst', dst)
cv2.waitKey()
cv2.destroyAllWindows()
import numpy as np
import cv2


src = cv2.imread("C:/Users/ParkSangHoon/Desktop/OpenCV_ img_files/keybord.jpg")

dst = cv2.cvtColor(src,cv2.COLOR_BGR2GRAY)
dst = cv2.GaussianBlur(dst, (9, 9), 0)

#이진화
_, th = cv2.threshold(dst, 0, 255, cv2.THRESH_OTSU + cv2.THRESH_BINARY_INV)

dst = cv2.cvtColor(th,cv2.COLOR_GRAY2BGR)

#stats가 번호가 지정된 객체이다
cnt, labels, stats, centroids = cv2.connectedComponentsWithStats(th)

count = 0
# 배경까지 포함햇기에 1부터 시작해서 배경을 제외한다.
for i in range(1,cnt):
    (x,y,w,h,area) = stats[i]

    #면적이 200보다 작은 것은 넘긴다.
    if area< 200:
        continue

    count += 1
    cv2.rectangle(src, (x, y, w, h), (0, 255, 0))
    string = str(count)
    cv2.putText(src,string,(x-10,y),cv2.FONT_HERSHEY_PLAIN,1,(0,255,255),1)


cv2.imshow('src', src)
cv2.imshow('th', th)
cv2.imshow('dst', dst)
cv2.waitKey()
cv2.destroyAllWindows()
- 균일한 사진이 아니라서 키보드 라벨링에 실패함 → 그래서 adaptiveThreshold()함수를 이용하여 사진을 균일하게 만든 뒤 그 사진을 사용하여 키보드 라벨링에 시도함.
#include <opencv2/core/core.hpp>
#include <opencv2/highgui/highgui.hpp>
#include <opencv2/imgproc/imgproc.hpp>

#include <iostream>

using namespace cv;
using namespace std;

void labeling_stats()
{

	Mat src = imread("dddd.png", IMREAD_GRAYSCALE);
	resize(src, src, Size(500, 400));

	if (src.empty()) {
		cerr << "image load error" << endl;
		return;
	}

	Mat bin;
	threshold(src, bin, 0, 255, THRESH_BINARY | THRESH_OTSU);

	Mat labels, stats, centroid;
	int cnt = connectedComponentsWithStats(bin, labels, stats, centroid);

	Mat dst;
	cvtColor(src, dst, COLOR_GRAY2BGR);

	for (int i = 1; i < cnt; ++i) {
		int* label = stats.ptr<int>(i);

		if (label[4] < 20) continue;
		rectangle(dst, Rect(label[0], label[1], label[2], label[3]), Scalar(0, 255, 255));
	}

	imshow("src", src);
	imshow("dst", dst);

	waitKey();
	destroyAllWindows();
}

int main()
{
	Mat image = imread("keyboard.jpg", 0);
	if (!image.data)
		return 0;

	resize(image, image, Size(500,400));
	//namedWindow("original image");
	//imshow("original image", image);

	// 고정된 경계 값 사용
	Mat binaryFixed;
	Mat binaryAdaptive;
	threshold(image, binaryFixed, 160, 255, THRESH_BINARY);

	/*
	영상의 일부에서 텍스트가 누락되는 현상을 보임
	이러한 문제를 극복하기 위해서
	각 화소의 이웃으로 계산하는 지역 경계화를 사용
	즉, 적응적 경계화(Adaptive Threshold)를 적용
	*/
	//cv::namedWindow("Fixed Threshold");
	//cv::imshow("Fixed Threshold", binaryFixed);


	/* 적분 영상 계산
	모든 화소를 순회하면서 정방형 이웃의 평균을 계산
	*/

	/* 함수를 이용하여 적응적 경계화 */
	int blockSize = 21; // 이웃 크기
	int threshold = 10; //화소를 (평균-경계 값)과 비교

	adaptiveThreshold(image, // 입력영상
		binaryAdaptive, // 이진화 결과 영상
		255, // 최대 화소 값
		ADAPTIVE_THRESH_MEAN_C, // Adaptive 함수
		THRESH_BINARY, // 이진화 타입
		blockSize, // 이웃크기
		threshold); // threshold used

	cv::namedWindow("Adaptive Threshold");
	cv::imshow("Adaptive Threshold", binaryAdaptive);

	/* 함수를 이용하지 않고 직접 구현 */
	Mat binary = image.clone();
	int nl = binary.rows; // number of lines
	int nc = binary.cols; // total number of elements per line

	Mat iimage;
	integral(image, iimage, CV_32S);
	/*
	모든 화소를 순회하면서 정방형 이웃의 평균을 계산
	포인터를 이용하여 영상을 순회
	*/
	int halfSize = blockSize / 2;
	for (int j = halfSize; j<nl - halfSize - 1; j++) {

		// j행의 주소 얻기
		uchar* data = binary.ptr<uchar>(j);
		int* idata1 = iimage.ptr<int>(j - halfSize);
		int* idata2 = iimage.ptr<int>(j + halfSize + 1);

		// 행의 각 화소
		for (int i = halfSize; i<nc - halfSize - 1; i++) {

			// 합 계산
			int sum = (idata2[i + halfSize + 1] - idata2[i - halfSize] - idata1[i + halfSize + 1] + idata1[i - halfSize]) / (blockSize*blockSize);
			// 적응적 경계화 적용
			if (data[i]<(sum - threshold))
				data[i] = 0;
			else
				data[i] = 255;
		}
	}
	//cv::namedWindow("Adaptive Threshold (integral)");
	//cv::imshow("Adaptive Threshold (integral)", binary);


	/* 영상 연산자를 이용하여 적응적 경계화 */
	Mat filtered;
	Mat binaryFiltered;
	boxFilter(image, filtered, CV_8U, Size(blockSize, blockSize));
	filtered = filtered - threshold;
	binaryFiltered = image >= filtered;

	namedWindow("Adaptive Threshold (filtered)");
	imshow("Adaptive Threshold (filtered)", binaryFiltered);

	labeling_stats();

	waitKey(0);
	return 0;

}
#include "opencv2/opencv.hpp"
#include <time.h>
using namespace cv;
using namespace std;

//그레이레벨 영상인 마커 영상을 생성
//정수형 영상으로 변환
class WatershedSegmenter{
private:
		Mat markers;
public:
		void setMarkers(Mat&markerImage)
		{
			//정수형 영상 변환
			markerImage.convertTo(markers,CV_32S);
		}
		Mat process(Mat&image)
		{
			//워터쉐드 적용
			watershed(image, markers);
			markers.convertTo(markers, CV_8U);
			return markers;
		}
};

int main()
{
	clock_t begin, end;
	begin = clock();

	Mat image = imread("test111.jpg", -1);
	Mat binary;// = imread("umi.jpg", 0);
	cvtColor(image, binary, CV_BGR2GRAY);
	threshold(binary, binary, 100, 255, THRESH_BINARY);

	imshow("originalimage", image);
	imshow("originalbinary", binary);

//이진 영상은 영상의 여러부분에 속하는 흰색 화소를 많이 포함
//중요한 객체에 속하는 화소만 남기기 위해 영상을 여러 범 침식

	Mat fg;
	erode(binary,fg,MAt(),Point(-1,-1),2);
//침식 함수 시작점 인자인 cv::Point(-1,-1)은 행렬 중심에 있는 시작점을 의미하고
//구조 요소 안에서 임의로 정의할 수 있다. (5번째 인자는 반복횟수)
	imshow("fg", fg);

//Identify image pixels without objects
//원 이진 영상의 큰 팽창인 배경의 화소를 선택
	Mat bg;
	dilate(binary, bg, Mat(), Point(-1,-1), 3); //팽창 함수(5번째 인자는 반복 횟수)
	threshold(bg, bg, 1, 128, THRESH_BINARY_INV); //객체 없는 영상 화소 식별
	imshow("bg",bg);

//Create markers image //영상을 마커 영상과 조합
	Mat markers(binary,size(),CV_8U, Scalar(0));
	markers=fg+bg;
//워터쉐드 알고리즘에 입력하기 위해 사용하는 입력 영상
//영상 조합 시 오버로드 된 operator+ 사용
	imshow("markers", markers);

//Create watershed segmentation object //영상 분할
	WatershedSegmenter segmenter; //워터쉐드 분할 객체 생성
	segmenter.setMarkers(markers); //마커를 설정한 후 처리

	Mat result=segmenter.process(image);
	result.converTo(result, CV_8U);
	imshow("final_result", result); //워터쉐드 띄워보기
	end=clcok(); //시간 설정
	cout<<"수행시간 :"<<((double)(end-begin)/CLOCKS_PER_SEC)<<"sec"<<endl;
	waitKey(0);

	return 0;
}
