canvas绘制仪表盘 - childlabor/blog GitHub Wiki
最近项目中遇到个变更需求,需要绘制个仪表盘,但是因为样式比较定制化,现阶段使用的图表库并不能满足,因此考虑使用canvas原生api绘制。
首先,大概了解下什么是canvas:
元素可被用来通过脚本(通常是JavaScript)绘制图形。比如,它可以被用来绘制图形,制作图片集合,甚至用来实现动画效果。
// 在渲染的过程中<canvas>元素中的内容会根据情况缩放来适应需要的大小。如果您发现<canvas>元素中展示的内容变形可以通过<canvas>自带的height和width属性进行相关设置,而不要使用CSS。
// 不同于 <img> 元素,  <canvas>元素需要有闭合标签 (</canvas>).
<canvas id="canvas" width="300" height="300">
  Sorry, your browser doesn't support the canvas.
</canvas>Canvas API 提供了一个通过JavaScript 和 HTML的元素来绘制图形的方式。它可以用于动画、游戏画面、数据可视化、图片编辑以及实时视频处理等方面。
Canvas API主要聚焦于2D图形。而同样使用元素的 WebGL API 则用于绘制硬件加速的2D和3D图形。
下文只讨论实现上述需求过程中应用到的部分api,完整文档戳这里
要实现的是下图所示的一个简单的仪表盘:

拆分需要,可以看出,我需要渲染的是:
- 内环带刻度文字
- 外环轨道
- 外环轨迹(透明渐变)
- 圆点(双圆)
在开始前,我们先了解下必要的概念:
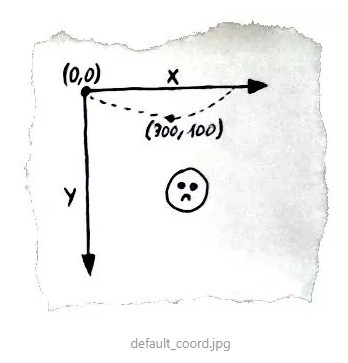
canvas是一整张画布,我们要在画布上渲染图像必须要有相对应的坐标标记点。canvas的原始坐标原点(0,0)位于元素的左上角,如图:
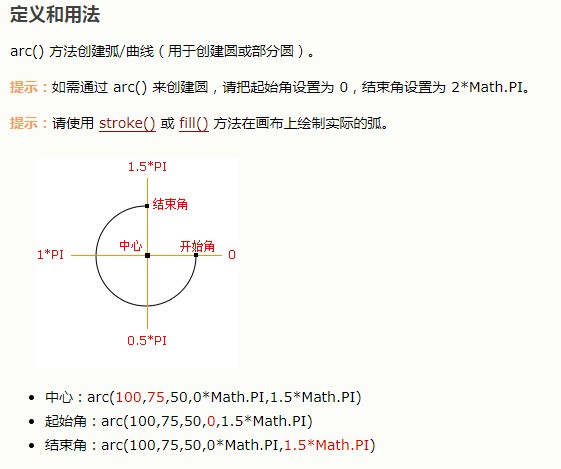
关于弧度的一些概念,最重要的是弄清楚起始角是在三点钟方向,Math.PI 表示一个圆的周长与直径的比例,约为 3.14159,Math.PI * 2 就是一个完整的弧度(360)。
下面根据代码逐段分解需求实现
- 挂载元素
<canvas id="canvas" width="310" height="310"></canvas>- 对象
CanvasRenderingContext2D 接口提供的 2D 渲染背景用来绘制元素,为了获得这个接口的对象,需要在 上调用 getContext() ,并提供一个 "2d" 的参数
class DashboardRender {
  constructor({
    id = 'canvas', // canvasId
    angle = 18, // 圆弧范围 圆弧终点与弧坐标起始点的夹角
    percent = 0, // 填充占比
    animated = true // 默认开启过渡动画
  }) {
    this.canvas = document.getElementById(id);
    this.width = this.canvas.width;
    this.height = this.canvas.height;
    this.ctx = this.canvas.getContext('2d');
    this.ctx.font = '14px serif';
    this.ctx.textAlign = 'center';
  }
}- 图形
获取到CanvasRenderingContext2D对象后,通过对象的属性和方法可以实现很多功能。
类似上述通过this.ctx.font设置字体等等。
现在我们可以绘制需要的图形了。
// 环
  drawCircle(circleObj) {
    const ctx = circleObj.ctx;
    ctx.beginPath();
    ctx.arc(circleObj.x, circleObj.y, circleObj.radius, circleObj.startAngle, circleObj.endAngle);
    // 设定曲线粗细度
    ctx.lineWidth = circleObj.lineWidth;
    // 给曲线着色
    ctx.strokeStyle = circleObj.color;
    // 连接处样式
    ctx.lineCap = circleObj.lineCap;
    // 给环着色
    ctx.stroke();
    ctx.closePath();
}-
CanvasRenderingContext2D.beginPath()是 Canvas 2D API 通过清空子路径列表开始一个新路径的方法。 当你想创建一个新的路径时,调用此方法。
因为会重复调用此方法,根据传入参数,绘制不同图形,因此在方法开始时,先清空路径。
-
CanvasRenderingContext2D.arc()是 Canvas 2D API 绘制圆弧路径的方法。
分别传入 圆弧中心(圆心)的 xy坐标、圆弧的半径、圆弧的起始点、终点。
还有个参数anticlockwise可选的Boolean值 ,如果为 true,逆时针绘制圆弧,反之,顺时针绘制(默认)。
-
CanvasRenderingContext2D.lineCap是 Canvas 2D API 指定如何绘制每一条线段末端的属性(圆形 方形)。有3个可能的值,分别是:round, butt and square。默认值是 butt。
需要注意的是: 如果设置square,会增加了一个宽度和线段相同,高度是线段厚度一半的矩形区域,也就是比实际的要长那么一点。
// 角度计算
class DashboardRender {
  constructor({
    id = 'canvas', // canvasId
    angle = 18, // 圆弧范围 圆弧终点与弧坐标起始点的夹角
    percent = 0, // 填充占比
    animated = true // 默认开启过渡动画
  }) {
  ...
    this.animatedFlag = animated;
    this.currentPercent = 0;
    this.percent = percent;

    this.initAngle = angle;
    this.startAngle = Math.PI * 0.5 + Math.PI * ((90 - this.initAngle) / 90 * 0.5);
    this.endAngle = Math.PI * 2 + Math.PI * (this.initAngle / 90 * 0.5);
    this.fullArc = ((180 + this.initAngle * 2) / 360) * 2 * Math.PI; // 全弧长
    this.moveAngle = (this.percent / 100) * this.fullArc; // 移动距离 占全弧长比例
  }
}
在调用时,我们需要将圆弧的起始点、终点弧度传入。因此需要先进行计算。
根据上图,圆弧起点在第三象限,终点在第四象限。
这里我们通过三角形计算器直接输入数值。根据边长,能计算出终点与x轴正方向的角度为18。
90度是0.5个Math * PI,所以顺时针计算得:
startAngle = Math.PI * 0.5 + Math.PI * 0.5 * ((90 - this.initAngle) / 90);
其它弧度同理。
// 白色圆点
  circlingPointer() {
    this.ctx.save();
    // 设置旋转原点为中心点 原点移动到画布中央
    this.ctx.translate(this.width / 2, this.height / 2);
    // 起始角度 + 角度差的占比
    let rotateAngle = null;
    if (this.animatedFlag) {
      const targetAnle = (this.currentPercent / 100) * this.fullArc;
      rotateAngle = this.startAngle + targetAnle;
    } else {
      rotateAngle = this.startAngle + this.moveAngle;
    }
    this.ctx.rotate(rotateAngle);

    // 外圈
    this.ctx.beginPath();
    this.ctx.arc(this.width / 2 - 20, 0, 12, 0, 2 * Math.PI, false);
    this.ctx.fillStyle = this.mainColor;
    this.ctx.fill();

    // 内圈
    this.ctx.beginPath();
    this.ctx.arc(this.width / 2 - 20, 0, 8, 0, 2 * Math.PI, false);
    this.ctx.fillStyle = '#fff';
    this.ctx.fill();

    // 可用图片替代
    // const drawImg = new Image();
    // drawImg.src = 'http://thirdwx.qlogo.cn/mmopen/IDoNBQkT16Ow0DSp22T5DAicYrnAcl5MmibptjPbUY9JAOxq8e4UXcicibGuEEntLiaIVMbqmDuET5F7FBA3vThpeDqAWmuibLZLWic/132';
    // drawImg.onload = () => {
    //   var imgContext = this.ctx.createPattern(drawImg, 'repeat');
    //   this.ctx.fillStyle = imgContext;
    //   this.ctx.fill();
    // };
    this.ctx.closePath();
    // 还原ctx状态
    this.ctx.restore();
  }

  // 刻度
  circlingTicks(i) {
    // 保存之前的状态
    this.ctx.save();
    // 设置旋转原点为中心点
    this.ctx.translate(this.width / 2, this.height / 2);
    // 每刻度增量
    const increment = i * (20 / 100) * this.fullArc;
    const rotateAngle = this.startAngle + increment;
    // 刻度
    // 根据角度改变来旋转
    this.ctx.rotate(rotateAngle);
    this.ctx.beginPath();
    this.ctx.fillStyle = 'hsla(0, 0%, 100%, 0.5)';
    // 旋转后 修正距离 长度/2(14/2)
    this.ctx.fillRect(this.width / 2 - 47, 0, 14, 2);

    // 文字
    this.ctx.beginPath();
    // 文字偏离刻度20px
    this.ctx.translate(this.width / 2 - 47 - 20, 0);
    this.ctx.rotate(0.5 * Math.PI);
    // 将中心旋转至文字中心 文字填充在当前(0, 0)
    this.ctx.fillText(20 * i, 0, 0);
    this.ctx.closePath();
    this.ctx.restore();
  }
先说圆点:
我们通过CanvasRenderingContext2D.translate() 将坐标轴的原点平移到了画布的中心点。我们将小圆点的中心坐标定在x轴上,也就是(width/2, 0),然后通过CanvasRenderingContext2D.rotate() 旋转canvas,使圆点定位在轨迹的末端。
刻度也一样,通过fillRect绘制一个矩形,然后旋转不同的角度,多次调用渲染,形成多个刻度。
接下来就渲染整个图形了:
draw() {
    // 清空画布
    this.ctx.clearRect(0, 0, this.width, this.height);
    const circleObj = {
      ctx: this.ctx,
      x: this.width / 2,
      y: this.height / 2,
      radius: this.width / 2 - 20, // 半径 留边20px
      lineWidth: 4,
      lineCap: 'round',
      startAngle: this.startAngle,
      endAngle: this.endAngle
    };
    // 轨道
    circleObj.color = this.mainColor;
    this.drawCircle(circleObj);

    // 内环 与外环间距20
    circleObj.radius = this.width / 2 - 20 - 20;
    circleObj.lineWidth = 14;
    circleObj.lineCap = 'butt';
    this.drawCircle(circleObj);

    // 轨迹
    // 环的终点在弧开始角(X正方向)顺时针18度
    let grd = null;
    if (this.percent <= 30) {
      grd = this.ctx.createLinearGradient(0, this.height / 2 + 40, 0, this.height / 2 - this.percent);
    } else {
      grd = this.ctx.createLinearGradient(0, this.height / 2 + 40, this.width / 2, 0);
    }
    grd.addColorStop(0, 'hsla(0, 0%, 100%, 0)');
    grd.addColorStop(1, 'hsla(0, 0%, 100%, 1)');
    circleObj.color = grd;
    circleObj.radius = this.width / 2 - 20;
    circleObj.lineWidth = 4;
    circleObj.lineCap = 'round';
    let rotateAngle = null;
    if (this.animatedFlag) {
      const targetAnle = (this.currentPercent / 100) * this.fullArc;
      rotateAngle = this.startAngle + targetAnle;
      // console.log(rotateAngle);
    } else {
      rotateAngle = this.startAngle + this.moveAngle;
    }
    circleObj.endAngle = rotateAngle;
    this.drawCircle(circleObj);

    // 圆点
    this.circlingPointer();

    // 内环刻度
    for (let i = 0; i < 6; i++) {
      this.circlingTicks(i);
    }
  }
通过改变传入对象,分别渲染内环、轨道、轨迹
CanvasRenderingContext2D.createLinearGradient() 方法创建一个沿参数坐标指定的直线的渐变对象。
因为轨迹是白色透明渐变,所以这边选择用hsla格式,也可以使用rgba。具体颜色值定义参考。
渐变这块其实讨巧了,由于createLinearGradient()是直线的渐变,并不完全是弧形。
通过for循环在渲染多个刻度。
这样一个静态的仪表盘就基本完成了。
最后添加一点动态:
...
const targetAnle = (this.currentPercent / 100) * this.fullArc;
rotateAngle = this.startAngle + targetAnle;

...
animated() {
    if (this.currentPercent < this.percent) {
      this.currentPercent += 5;
      this.draw();
      window.requestAnimationFrame(this.animated.bind(this));
    } else {
      this.draw();
    }
}
通过每帧动态改变轨迹的canvas旋转角度,达到从0到目标占比的动态填充。
- 调用
import DashboardRender from './CanvasDashboard';

...
const dashboradInstance = new DashboardRender({
    id: 'canvas',
    percent: percent
});
dashboradInstance.animated();- 优化
还有一些可以优化的点,比如在渲染内环、轨道、轨迹时,可以通过CanvasRenderingContext2D.save() 和 CanvasRenderingContext2D.restore() 来记录和还原ctx状态,减少对参数的重复赋值。圆弧真正渐变的方法封装等等。
完整代码如下:
class DashboardRender {
  constructor({
    id = 'canvas', // canvasId
    angle = 18, // 圆弧范围 圆弧终点与弧坐标起始点的夹角
    percent = 0, // 填充占比
    animated = true // 默认开启过渡动画
  }) {
    this.canvas = document.getElementById(id);
    this.width = this.canvas.width;
    this.height = this.canvas.height;
    this.ctx = this.canvas.getContext('2d');
    this.ctx.font = '14px serif';
    this.ctx.textAlign = 'center';
    this.mainColor = 'hsla(0, 0%, 100%, 0.4)';

    this.animatedFlag = animated;
    this.currentPercent = 0;
    this.percent = percent;

    this.initAngle = angle;
    this.startAngle = Math.PI * 0.5 + Math.PI * ((90 - this.initAngle) / 90 * 0.5);
    this.endAngle = Math.PI * 2 + Math.PI * (this.initAngle / 90 * 0.5);
    this.fullArc = ((180 + this.initAngle * 2) / 360) * 2 * Math.PI; // 全弧长
    this.moveAngle = (this.percent / 100) * this.fullArc; // 移动距离 占全弧长比例
  }

  animated() {
    if (this.currentPercent < this.percent) {
      this.currentPercent += 5;
      this.draw();
    } else {
      this.draw();
    }
    window.requestAnimationFrame(this.animated.bind(this));
  }

  draw() {
    this.ctx.clearRect(0, 0, this.width, this.height);
    const circleObj = {
      ctx: this.ctx,
      x: this.width / 2,
      y: this.height / 2,
      radius: this.width / 2 - 20, // 半径 留边20px
      lineWidth: 4,
      lineCap: 'round',
      startAngle: this.startAngle,
      endAngle: this.endAngle
    };
    // 轨道
    circleObj.color = this.mainColor;
    this.drawCircle(circleObj);

    // 内环 与外环间距20
    circleObj.radius = this.width / 2 - 20 - 20;
    circleObj.lineWidth = 14;
    circleObj.lineCap = 'butt';
    this.drawCircle(circleObj);

    // 轨迹
    // 环的终点在弧开始角(X正方向)顺时针18度
    let grd = null;
    if (this.percent <= 30) {
      grd = this.ctx.createLinearGradient(0, this.height / 2 + 40, 0, this.height / 2 - this.percent);
    } else {
      grd = this.ctx.createLinearGradient(0, this.height / 2 + 40, this.width / 2, 0);
    }
    grd.addColorStop(0, 'hsla(0, 0%, 100%, 0)');
    grd.addColorStop(1, 'hsla(0, 0%, 100%, 1)');
    circleObj.color = grd;
    circleObj.radius = this.width / 2 - 20;
    circleObj.lineWidth = 4;
    circleObj.lineCap = 'round';
    let rotateAngle = null;
    if (this.animatedFlag) {
      const targetAngle = (this.currentPercent / 100) * this.fullArc;
      rotateAngle = this.startAngle + targetAngle;
      // console.log(rotateAngle);
    } else {
      rotateAngle = this.startAngle + this.moveAngle;
    }
    circleObj.endAngle = rotateAngle;
    this.drawCircle(circleObj);

    // 圆点
    this.circlingPointer();

    // 内环刻度
    for (let i = 0; i < 6; i++) {
      this.circlingTicks(i);
    }
  }

  // 环
  drawCircle(circleObj) {
    const ctx = circleObj.ctx;
    ctx.beginPath();
    ctx.arc(circleObj.x, circleObj.y, circleObj.radius, circleObj.startAngle, circleObj.endAngle);
    // 设定曲线粗细度
    ctx.lineWidth = circleObj.lineWidth;
    // 给曲线着色
    ctx.strokeStyle = circleObj.color;
    // 连接处样式
    ctx.lineCap = circleObj.lineCap;
    // 给环着色
    ctx.stroke();
    ctx.closePath();
  }

  // 白色圆点
  circlingPointer() {
    this.ctx.save();
    // 设置旋转原点为中心点 原点移动到画布中央
    this.ctx.translate(this.width / 2, this.height / 2);
    // 起始角度 + 角度差的占比
    let rotateAngle = null;
    if (this.animatedFlag) {
      const targetAngle = (this.currentPercent / 100) * this.fullArc;
      rotateAngle = this.startAngle + targetAngle;
    } else {
      rotateAngle = this.startAngle + this.moveAngle;
    }
    this.ctx.rotate(rotateAngle);

    // 外圈
    this.ctx.beginPath();
    this.ctx.arc(this.width / 2 - 20, 0, 12, 0, 2 * Math.PI, false);
    this.ctx.fillStyle = this.mainColor;
    this.ctx.fill();

    // 内圈
    this.ctx.beginPath();
    this.ctx.arc(this.width / 2 - 20, 0, 8, 0, 2 * Math.PI, false);
    this.ctx.fillStyle = '#fff';
    this.ctx.fill();

    // 圆心向外扩散阴影
    this.ctx.beginPath();
    // this.ctx.shadowColor = 'red';
    // this.ctx.shadowBlur = 20;
    this.ctx.arc(this.width / 2 - 20, 0, 2, 0, 2 * Math.PI, false);
    // 径向渐变
    const grd = this.ctx.createRadialGradient(this.width / 2 - 20, 0, 12, this.width / 2 - 20, 0, 0);
    grd.addColorStop(0, 'hsla(0, 0%, 100%, 1)');
    grd.addColorStop(1, this.mainColor);
    this.ctx.fillStyle = grd;
    this.ctx.fillStyle = '#fff';
    this.ctx.fill();
    // 可用图片替代
    // const drawImg = new Image();
    // drawImg.src = 'http://thirdwx.qlogo.cn/mmopen/IDoNBQkT16Ow0DSp22T5DAicYrnAcl5MmibptjPbUY9JAOxq8e4UXcicibGuEEntLiaIVMbqmDuET5F7FBA3vThpeDqAWmuibLZLWic/132';
    // drawImg.onload = () => {
    //   var imgContext = this.ctx.createPattern(drawImg, 'repeat');
    //   this.ctx.fillStyle = imgContext;
    //   this.ctx.fill();
    // };
    this.ctx.closePath();
    // 还原ctx状态
    this.ctx.restore();
  }

  // 刻度
  circlingTicks(i) {
    // 保存之前的状态
    this.ctx.save();
    // 设置旋转原点为中心点
    this.ctx.translate(this.width / 2, this.height / 2);
    // 每刻度增量
    const increment = i * (20 / 100) * this.fullArc;
    const rotateAngle = this.startAngle + increment;
    // 刻度
    // 根据角度改变来旋转
    this.ctx.rotate(rotateAngle);
    this.ctx.beginPath();
    this.ctx.fillStyle = 'hsla(0, 0%, 100%, 0.5)';
    // 旋转后 修正距离 长度/2(14/2)
    this.ctx.fillRect(this.width / 2 - 47, 0, 14, 2);

    // 文字
    this.ctx.beginPath();
    // 文字偏离刻度20px
    this.ctx.translate(this.width / 2 - 47 - 20, 0);
    this.ctx.rotate(0.5 * Math.PI);
    // 将中心旋转至文字中心 文字填充在当前(0, 0)
    this.ctx.fillText(20 * i, 0, 0);
    this.ctx.closePath();
    this.ctx.restore();
  }
}

export default DashboardRender;