CxIAST Integration - checkmarx-ltd/cx-flow GitHub Wiki
CxIAST can be integrated within a CI/CD pipeline using CxFlow. CxIAST scans start automatically when an application with an attached CxIAST agent is being tested. To attach a CxIAST agent, refer to CxIAST documentation.
CxIAST scans can be stopped in two ways:
- Manually stopped via the CxIAST manager.
- By terminating the running application.
Once tests are completed, CxFlow is used to stop the running CxIAST scan.
CxFlow will then collect the results from CxIAST, analyze them, and open tasks/tickets in the configured Bug Tracker.
To make sure the correct scan is stopped by CxFlow, CxIAST scan tags are used:

The configuration must be added to application.yml or passed as command line arguments.
To view an example, refer to Main Properties.
To allow communication between CxFlow and CxIAST, the following iast section must be added to application.yml:
iast:
  url: http://xxxxx.iast.net
  # ssl-certificate-file-path: "/tmp/iast/certificate.cer"
  manager-port: 8380
  username: xxxx
  password: xxxx
  update-token-seconds: 250  # CxAccessControl token timeout
  filter-severity:
    - HIGH
    - MEDIUM
    - LOW
    - INFO
  thresholds-severity:
    HIGH: 1
    MEDIUM: 3
    LOW: 10
    INFO: -1
Note: To allow connection to CxIAST server using a self-signed certificate, uncomment ssl-certificate-file-path.
A certificate file for your CxIAST server can be found in an extracted CxIAST agent folder.
Alternatively, to get the certificate from a running CxIAST instance, you could use openssl.
On linux, for example:
# If you access CxIAST UI at https://my-iast.com:443
openssl s_client -showcerts -servername my-iast.com -connect my-iast.com:443 < /dev/null > iast.cer
CxFlow may filter CxIAST vulnerabilities according to the vulnerability severity before creating bug tracker tickets.
To allow severities, add the relevant severity to the filter-severity section in the iast section in the configuration file.
To ignore a severity, remove or comment that severity from the configuration file.
CxFlow returns a status the CI pipeline when called.
To control this, a threshold can be configured per vulnerability severity.
Each severity threshold is determined by the allowed vulnerability count with that severity.
To remove a threshold from a severity, set the relevant severity to -1. In the configuration example above, the threshold has been removed
from info. Thresholds are configured in the thresholds-severity section in the iast section.
When triggered in CLI mode, CxFlow returns status code 10, if a threshold has been exceeded.
When triggered in web mode, the /iast/stop-scan-and-create-jira-issue/{scanTag}
or /iast/stop-scan-and-create-github-issue/{scanTag} returns HTTP status 412.
For automatic create issue in Bug tracker need to configure CX-Flow for work with your bug tracker.
At present, CxFlow only supports Jira, Github and Gitlab issue as a bug tracker when used with CxIAST.
Refer to Jira Configuration for instructions on configuring CxFlow to work with Jira.
jira.url=https://xxxx.atlassian.netjira.username=emailjira.token=token-xxxjira.project=project-key
Refer to Github issue Configuration for instructions on configuring CxFlow to work with Github issues.
github.token=token-xxxx
Refer to Gitlab issue Configuration for instructions on configuring CxFlow to work with Gitlab issues.
gitlab.token=token-xxxx
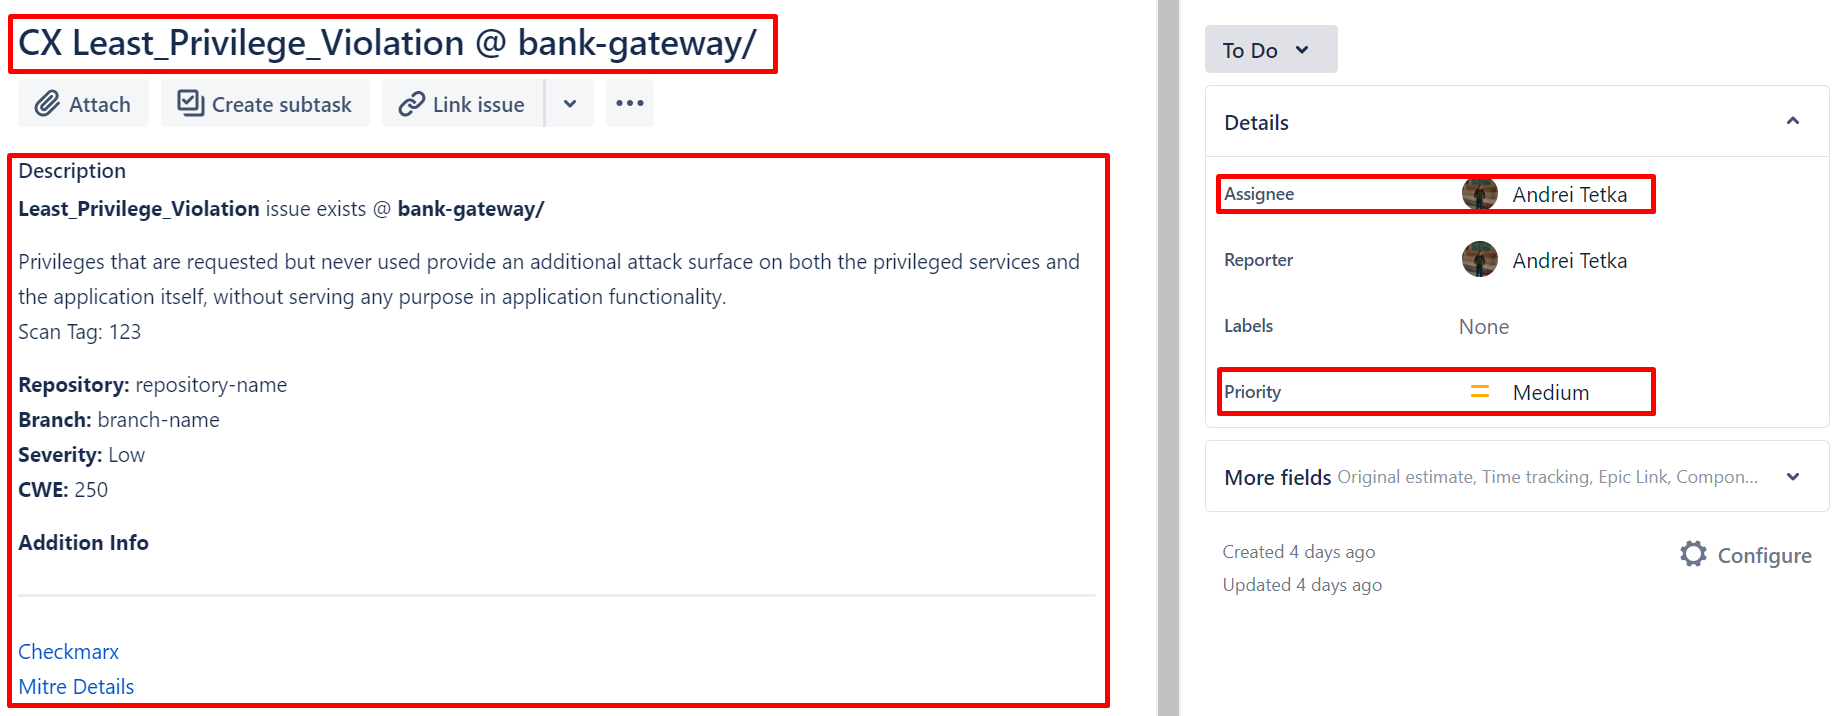
CxFlow can open Jira tickets according to the CxIAST scan results.
At present, CxFlow opens a separate Jira ticket for every new vulnerability of any severity discovered by CxIAST.
The ticket is structured as follows:
- The title field is set to
<CxIAST Vulnerability name> @ <Triggering API URL>. - The priority field is set based on the CxIAST vulnerability severity.
- The assignee field is set based on the
--assigneeargument that was passed to CxFlow, or based on the configured Jira. username. Refer to Jira Configuration for additional information. - The description field contains a link to the vulnerability in CxIAST Manager, scan tag, branch, repository name and severity of vulnerability.
- iast
- scan-tag=tag
- bug-tracker=jira
An example for a Jira ticket is available here:
CxFlow can open Github issues according to the CxIAST scan results. At present, CxFlow opens a separate github issue for every new vulnerability of any severity discovered by CxIAST.
The ticket is structured as follows:
- The title field is set to
<CxIAST Vulnerability name> @ <Triggering API URL>. - The description field contains a link to the vulnerability in CxIAST Manager, scan tag, branch, repository name and severity
- iast
- scan-tag=tag
- bug-tracker="custom"
- github
repo-name=repository-namenamespace=checkmarx-ltd
An example for a Jira ticket is available here:

CxFlow can open Gitlab issues according to the CxIAST scan results. At present, CxFlow opens a separate gitlab issue for every new vulnerability of any severity discovered by CxIAST.
The ticket is structured as follows:
- The title field is set to
<CxIAST Vulnerability name> @ <Triggering API URL>. - The description field contains a link to the vulnerability in CxIAST Manager, scan tag, branch, repository name and severity
-
iast
-
scan-tag=tag
-
bug-tracker="custom"
-
gitlab
-
project-id=xxxxxx
-
gitlab.token=token-xxxx -
project-id=xxxxxx
An example for a Jira ticket is available here:

CxFlow can open Azure DevOps issues according to the CxIAST scan results. At present, CxFlow opens a separate Azure DevOps issue for every new vulnerability of any severity discovered by CxIAST.
The ticket is structured as follows:
- The title field is set to
<CxIAST Vulnerability name> @ <END_POINT> / <BRANCH>. - Different from the other integrations, on azure if you want assignee a task to the user using CLI mode, you should use
the following argument:
--alt-fields=System.AssignedTo:<[email protected]>. - The description field contains a link to the vulnerability in CxIAST Manager, scan tag, branch, repository name and severity
An example for Azure DevOps ticket is available here:

java -jar cx-flow.jar
--spring.config.location=application.yml
--iast
--bug-tracker="jira"
--assignee="[email protected]"
--scan-tag="scanTag"
--repo-name="checkmarx-ltd/cx-flow"
--branch="develop"
You can also pass the jira parameters that you want to set in application.yml for example:
java -jar cx-flow.jar
--spring.config.location=application.yml
--iast
--bug-tracker="jira"
--assignee="[email protected]"
--scan-tag="scanTag"
--repo-name="checkmarx-ltd/cx-flow"
--branch="develop"

[email protected]
--jira.token=token-xxxx
--iast.username="user"
--iast.password="pass"
--jira.issue-type="Bug"
...
java -jar cx-flow.jar
--iast
--scan-tag="cx-scan-00"

--bug-tracker="custom"
--ado
--repo-name="myRepoName"
--branch="myBranchName"
--azure.token="AZURE_TOKEN"
--azure.project-name="AZURE_PROJECT_NAME"
--azure.namespace="AZURE_ORGANIZATION_NAME"
--alt-fields=System.AssignedTo:[email protected]
java -jar cx-flow.jar
--spring.config.location=application.yml
--iast
--scan-tag="scanTag"
--namespace="checkmarx-ltd"
--repo-name="cx-flow"
--branch="develop"

--bug-tracker="custom"
--github
--github.token=token-xxxx
...
java -jar cx-flow.jar
--spring.config.location=application.yml
--iast
--scan-tag="cx-scan-20"
--namespace="checkmarx-ltd"
--repo-name="cx-flow"
--branch="develop"
--project-id=xxxxxxxx

--bug-tracker="custom"
--gitlab
--gitlab.token=token-xxxx

...
As well as the Cx-Flow can be executed as CLI mode, it is possible to run it as web mode, allowing to the user perform create issues process via API calls.
This is the API request URL, followed by request body structure:
POST: /iast/stop-scan-and-create-{tracker}-issue/{scanTag}

Body
{
  "assignee": "<assignee>",
  "namespace": "<namespace>",
  "repoName": "<reponame>",
  "bugTrackerProject": "<project>"
}
URL parameters:
-
{tracker}replaced by issue tracker identifier -
{scanTag}replace by the scan tag
Body parameters
| Name | Type | Required | Description |
|---|---|---|---|
| assignee | String | No | Identifier to assign the issue on target bug tracker |
| namespace | String | Yes | ? |
| repoName | String | Yes | ? |
| bugTrackerProject | String | No | Information related to the target bug tracker |
{tracker} = azure
{scanTag} = <SCAN TAG>
In order to create issues on Azure DevOps, it is necessary to assign the organization name and also the project name.
The organization is defined by namespace body parameter, and the project name should be assigned on bugTrackerProject
variable:
{
    "assignee": "[email protected]",
    "namespace": "AZURE_ORGANIZATION_NAME",
    "repoName": "reponame",
    "bugTrackerProject": "AZURE_PROJECT_NAME"
}
So, regarding the values that was presented before, this is the expected URL:
/iast/stop-scan-and-create-azure-issue/<SCAN TAG>