Docker - chanandrew96/MyLearning GitHub Wiki

- Docker Hub / Docker Windows
To start using Docker, you must install the Docker first
You could find the installer on Docker offical website - WSL (WSL2)
Install WSL2 Linux Core Update Patch from Microsoft
Download MSI Installer
Or you can execute commandwsl --updateto install the WSL
Run Docker in WSL Without Docker Desktop
Install docker in WSL using command sudo apt install docker.io -y, then you can execute the docker command
- Include dependency, code
- Dockerfile that specific how the application run
- Using Command Line
Executedocker build --tag [YOUR TAG FOR THE IMAGE] - Visual Studio Code
Install the Docker extension
Then, right-click on the Dockerfile and select "Build Image..." option

Insert the Image Tag, and the build will be started

Execute the command docker images to show all available images
Then execute command docker run or docker run [IMAGE_NAME] to run the image
Options:
-
-d: Run in detached mode -
-p: Specify the port to be exposed
To allow docker container to use NVIDIA GPU, you can add --gpus [GPU SELECTION] in the run command
# Allow access to all GPUs
docker run -it --rm --gpus all [IMAGE_NAME]
# Specific GPU by ID
docker run -it --rm --gpus device=GPU-3a23c669-1f69-c64e-cf85-44e9b07e7a2a [IMAGE_NAME]
# Specific GPU by GPU order (Below selected first and third GPUs)
docker run -it --rm --gpus '"device=0,2"' [IMAGE_NAME]docker login -u "[USER_NAME]" -p "[PASSWORD]" docker.io
Login to docker
docker images
Show all docker images
docker ps
Shows all running containers
docker stop [CONTAINER_NAME]
Stop the specific container
docker container prune
Remove unused resources to free up space
docker tag [SOURCE_IMAGE_NAME]:[TAG_NAME] [USER_NAME]/[DEST_IMAGE_NAME]:[TAG_NAME]
Create tag for the image (Remember to include your username for you to push the image)
docker push [USER_NAME]/[IMAGE_NAME]:[TAG_NAME]
Push your docker image to hub (You need to tag the image before push)
Go to folder %USERPROFILE%\.docker and create/open daemon.json file
Add below json content into the file
{
  # Version before v17.05.0
  "graph": "/path/to/your/new/docker/root",
  # Version v17.05.0 or newer
  "data-root": "/path/to/your/new/docker/root",
  "experimental": false,
}
Then, restart the Docker service
You could execute PowerShell command for the restart
Restart-Service DockerLocate and add dockerd folder to your PATH parameter
The dockerd should locate at C:\Program Files\Docker\Docker\resources by default
# Stop your service:
sc stop docker

# Unregister your dockerd service:
dockerd --unregister-service

# Then re-register your service with the new data-file path:
# Remember don't access to dockerd folder in your command line, or it will failed to execute the command
dockerd --register-service --data-root e:\ProgramData\docker

# Then start your service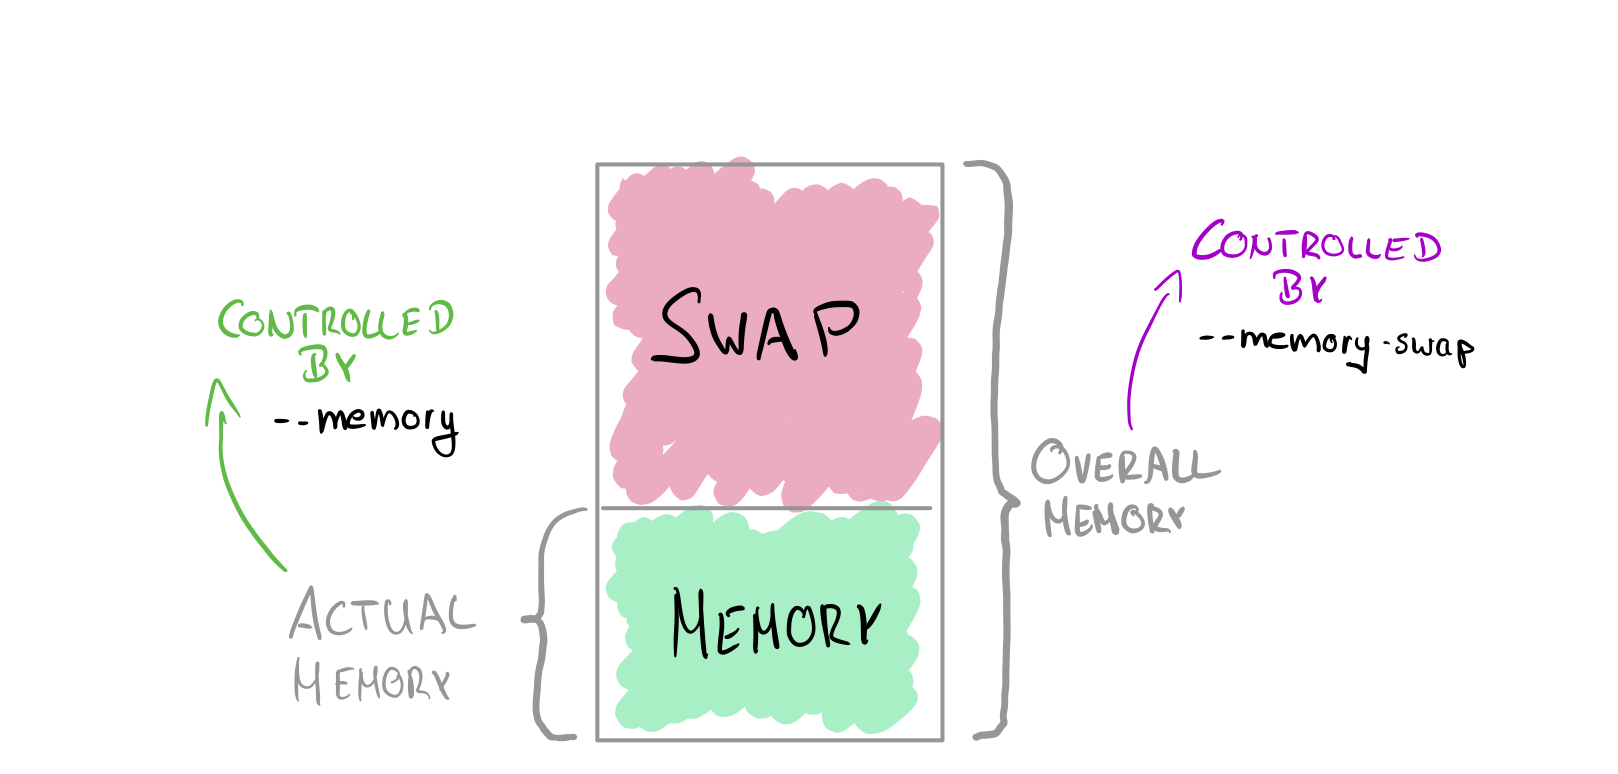
sc start dockerBefore moving to setting Memory limit in Docker, here are some concept about Swap Memory
If running out of physical memory (RAM), virtual memory can be used, which will store data in memory on disk
However, reading from disk will slows down the performance
It is important to set the memory limit for each container, since OOME (Out Of Memory Exception) will be throw and starts killing any processes (Include docker & system process)
It turns out may caused docker or system process killed
We can set memory limit that container can use (Maximum of memory)
The minumum allowed value is 6m (6MB)
In below sample command, we limited the nginx container only allow to use 512MB memory
docker run -m 512m nginx
If --memory-swap is not set, the container is allowed to use 2 times of the memory set in -m/--memory. In above sample, the nginx container will allowed to use in total 1024MB memory and swap
By setting a higher value in --memory-swap allow container to use (swap - memory) swap memory
To prevent container use memory swap, set --memory-swap with same value set in --memory
Setting swap memory can help to decrease the chances from throwing OOME
Or, we can set reservation for each container (Minimum of memory), it will works when the host machine detected with contention or low memory
In below sample command, we set 256MB memory reserved for nginx and 512MB memory for maximun
docker run -m 512m --memory-reservation=256m nginx
Docker Container Memory Limits Explained
We can set CPUs limit (Maximum of CPUs)
In below sample command, we limit 2 CPUs allowed for container to use
docker run --cpus=2 nginx
Or, we can set the priority for container
Defaul each container with 1024, higher number with higher priority
docker run --cpus=2 --cpu-shares=2000 nginx
For detail, you can reference to Baeldung tutorial
services:
  service:
    image: nginx
    deploy:
        resources:
            limits:
              cpus: 0.50
              memory: 512M
            reservations:
              cpus: 0.25
              memory: 128M
We can verify the limit we set by command docker stats
Docker Hub - MSSQL
awesome-compose
The MSSQL docker image is using Ubuntu, you may select and install the related Ubuntu OS in order to process
(Check the "Full Tag Listing" on Docker Hub for the Ubuntu Version you need)
Microsoft Learn - Copy and Restore database backup file into the container
- Copy the database backup image into the container and place to the Database Backup folder
- Use sqlcmd command to restore the backup file to the container
# Base image
FROM mcr.microsoft.com/mssql/server:2019-GA-ubuntu-16.04

# Use SQL Server Express Edition
ENV ACCEPT_EULA=Y MSSQL_PID=Express

# Enable SA account
ENV ACCEPT_EULA=Y
ENV SA_PASSWORD=YourStrong@Passw0rd

# Copy backup file from Windows mount location
COPY ./[DATABASE].bak /var/opt/mssql/backup/

# Restore database
RUN /opt/mssql/bin/sqlservr & sleep 30 && /opt/mssql-tools/bin/sqlcmd -S localhost -U SA -P $SA_PASSWORD -Q "RESTORE DATABASE [DATABASE]FROM DISK='/var/opt/mssql/backup/[DATABASE].bak' WITH MOVE '[DATABASE]' TO '/var/opt/mssql/data/[DATABASE].mdf', MOVE '[DATABASE]_log' TO '/var/opt/mssql/data/[DATABASE].ldf'"

# Expose port 1433
EXPOSE 1433

# Run SQL Server
CMD ["/opt/mssql/bin/sqlservr"]實作 Dockerfile + flask 教學 (附GitHub完整程式)
Below sample based on .Net Framework 4.7.2 and reference from Running a simple ASP.NET 4.7.2 Framework Web application on Docker
- Create dockerfile
FROM microsoft/dotnet-framework:4.7.2-sdk-windowsservercore-1803 AS build
WORKDIR /app

# copy csproj and restore as distinct layers
COPY *.sln .
COPY <path-to>/*.csproj ./<path-to>/
COPY <path-to>/*.config ./<path-to>/
RUN nuget restore

# copy everything else and build app
COPY <path-to>/. ./<path-to>/
WORKDIR /app/<path-to>
RUN msbuild /p:Configuration=Release

FROM microsoft/aspnet:4.7.2-windowsservercore-1803 AS runtime
WORKDIR /inetpub/wwwroot
COPY --from=build /app/<path-to>/. ./- Run docker build & run command
Docker Compose allowed us to start and connect multiple container
We can start multiple container, which marked in the yaml file by using the command docker compose up
Or we can stop all container in yaml file by docker compose down, even delete all related container by docker compose rm
You can use Docker Compose file to pack multiple application together
Reference for the docker-compose-file
Using the yaml file below will build current folder for web application and host on port 8000 (mapping with default port 5000 for Flask application), also start redis using the image redis:alpine
version: '2'
services:
  web:
    build: .
    ports:
      - "8000:5000:
    redis:
      image: "redis:alpine"
The sample above copied from Docker Docs
Execute command with specific yaml file
docker compose -f <yaml-file> up
docker compose -f <yaml-file> down
Docker 學習筆記 docker-compose.yml
Docker — 从入门到实践 - 使用 compose 文件
If you are using Docker Swarm, you may use Docker Stack besides from Docker-compose (docker stack deploy)
Using Docker Stack can set the number of instances and replicas for the containers
Since build command is not supported in Docker Stack (the build in yaml file cannot be processed using Docker Stack), docker build is needed for building the image before passing into Docker Stack. And update the yaml file to include the image image: <image-name>
Reference for converting the yaml file from Docker Compose to Docker Stack
Nerdctl is a docker-compatible CLI for containerd
Support docker command
Azure allow user to run Docker container on-demand in a managed and serverless environment
Check Kubernetes for more information about how to work Kubernetes with Docker
When you are using WSL on Windows for building the docker image, you may need check the disk space assigned to WSL (vhd file)
Reference to Microsoft Document, follow step below to expand the size of WSL2 Virtual Hard Disk
- Shutdown all WSL instance
wsl.exe --shutdown - Find the path of your vhdx file
- Start diskpart
diskpart - Select your vhdx file
Select vdisk file="<pathToVHD>" - Check assigned disk space for VHD
detail vdisk - Expand the disk space
expand vdisk maximum=<sizeInMegaBytes> - Exit Diskpart
exit
- Try to reinstall Docker & WSL (Tested worked)
# Uninstall Docker Desktop via Command
"<Docker-Desktop-Installer>" "uninstall"
# Execute after uninstalled Docker Desktop to clean up
wsl --unregister docker-desktop
wsl --unregister docker-desktop-data- Switch to Windows Container in Docker Desktop and switch back after Docker Engine started
- Delete
%appdata%\Docker\settings.jsonfile, or check if any syntax error in the Json file (Reference)
How to Dockerize a Flask Application
Push error - requested access to the resource is denied
Install Docker on Windows Server 2019
How to change docker root data directory
How to Change Docker Data Root Path on Windows 10
Change Docker Data Root on command line
Re-register the docker service
Access an NVIDIA GPU
Dockerize .Net Framework Application
Azure Container Instances documentation
Session 1: Docker : Instructor-led Live Training on Docker Container | Basic to Expert
Docker内存资源限制
Docker 启动
《Docker —— 從入門到實踐》正體中文版
Docker 入门 到部署Web 程序- (阿里面试常用的docker命令和优点)
docker-compose、docker stack前世今生
docker-compose是个好东西,越用越香
- docker events
- The Docker Container Lifecycle | Docker made easy #3
- What is Docker Container Lifecycle? A Complete Guide