Deploy free5GC using Helm Charts - caprivm/virtualization GitHub Wiki
caprivm ([email protected])
Updated: February 14, 2023
The contents of the page are:
This page explains all the steps required to deploy free5GC using Helm Charts. As it says in the official page (https://www.free5gc.org/), "The free5GC is an open-source project for 5th generation (5G) mobile core networks. The ultimate goal of this project is to implement the 5G core network (5GC) defined in 3GPP Release 15 (R15) and beyond". The software it was tested on is:
| Feature | Value |
|---|---|
| Kubernetes Cluster | Kubespray (single node) |
| free5GC deployment | Helm Charts |
| free5GC version | towards5gs-helm (master) |
| OS Used | Ubuntu 20.04.3 LTS |
| vCPU | 8 |
| RAM (GB) | 16 |
| Disk (GB) | 150 |
| Home User | ubuntu |
| Kubernetes Version | Client: v1.22.1, Server: v1.21.2 |
| Helm Version | v3.8.2+g6e3701e |
| Number of NICs | 2 (ens160, ens192) |
Before executing the step-by-step of this guide, it is important to install the next tools:
Install make on each Kubernetes node:
sudo apt update
sudo apt install makeFirst check that the Linux kernel version on each Kubernetes worker node is 5.0.0-23-generic or 5.4.x:
uname -r
# 5.4.0-109-generic
NOTE: If you have multiple Kubernetes worker nodes you will need to install it on each node.
Install the gtp5g kernel module:
git clone https://github.com/free5gc/gtp5g.git
cd gtp5g && git checkout v0.3.1
make
sudo make install
NOTE: Other prerequisites that are necessary for this guide can be found at this link. The Kubernetes cluster installation considers the rest of the prerequisites that are not present in this guide.
The list of environment variables used for this implementation are summarized in the following exports:
export NODE_USER="ubuntu"
export KUBERNETES_SINGLE_NODE_IP="10.1.3.152"
NOTE: Replace or configure each of the variables according to your environment.
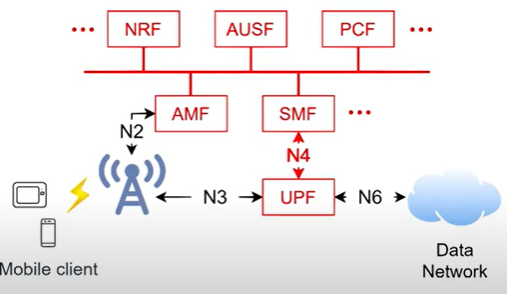
To install free5GC with Helm Charts, you have to follow an official documentation from the Orange-OpenSource project. The result of this step-by-step guide is the installation of a 5GC based on free5GC with the following architecture:
Download the repository where the Helm Charts are available:
git clone https://github.com/Orange-OpenSource/towards5gs-helm.git ~/free5gc-chartsModify the values.yaml:
vim ~/free5gc-charts/charts/free5gc/values.yamlConsider the next values file:
global:
  name: free5gc
  userPlaneArchitecture: single  # possible values are "single" and "ulcl"
  nrf:
    service:
      name: nrf-nnrf
      type: ClusterIP
      port: "8000"
      nodePort: "30800"
  sbi:
    scheme: http
  amf:
    n2if:  # NGAP
      ipAddress: 10.100.50.249
    service:
      ngap:
        enabled: true
        name: amf-n2
        port: 38412
        nodeport: 31412
        protocol: SCTP
        type: NodePort
  smf:
    n4if:
      ipAddress: 10.100.50.244

# Global network parametes
  n2network:
    name: n2network
    masterIf: ens160
    subnetIP: 10.100.50.248
    cidr: 29
    gatewayIP: 10.100.50.254
    excludeIP: 10.100.50.254
  n3network:
    name: n3network
    masterIf: ens160
    subnetIP: 10.100.50.232
    cidr: 29
    gatewayIP: 10.100.50.238
    excludeIP: 10.100.50.238
  n4network:
    name: n4network
    masterIf: ens160
    subnetIP: 10.100.50.240
    cidr: 29
    gatewayIP: 10.100.50.246
    excludeIP: 10.100.50.246
  n6network:
    name: n6network
    masterIf: ens192
    subnetIP: 10.100.100.0
    cidr: 24
    gatewayIP: 10.100.100.1
    excludeIP: 10.100.100.254
  n9network:
    name: n9network
    masterIf: ens160
    subnetIP: 10.100.50.224
    cidr: 29
    gatewayIP: 10.100.50.230
    excludeIP: 10.100.50.230

# These parameters can be used to enable/disable deployment of subcharts
deployMongoDB: true
deployAMF: true
deployAUSF: true
deployN3IWF: false
deployNRF: true
deployNSSF: true
deployPCF: true
deploySMF: true
deployUDM: true
deployUDR: true
deployUPF: true
deployWEBUI: true

# Disable the deployment of mongodb as an NRF subchart
free5gc-nrf:
  db:
    enabled: false

# This section can be used to override the default values in the MongoDB chart (remember MongoDB is a subchart of the free5gcControlplane chart since control plane NFs rely on it.
mongodb:
  fullnameOverride: "mongodb"
  useStatefulSet: true
  auth:
    enabled: false
  persistence:
    size: 6Gi
    mountPath: /bitnami/mongodb/data/db/
  service:
    name: mongodb
    type: ClusterIP
    port: 27017
    nodePort: "30017"
Install the free5GC:
cd ~/free5gc-charts/charts/
helm -n free5gc install free5gc-deployment ./free5gc/ --values free5gc/values.yaml
Wait until free5GC is fully installed. Validate the installation with the status of pods:
kubectl -n free5gc get pods
# NAME                                                      READY   STATUS    RESTARTS   AGE
# free5gc-deployment-free5gc-amf-amf-78c8c96f6b-jszxq       1/1     Running   0          11d
# free5gc-deployment-free5gc-ausf-ausf-b65798449-gkdnq      1/1     Running   0          11d
# free5gc-deployment-free5gc-nrf-nrf-7b69bf6f5-kx586        1/1     Running   0          11d
# free5gc-deployment-free5gc-nssf-nssf-6b498f6496-jgpfx     1/1     Running   0          11d
# free5gc-deployment-free5gc-pcf-pcf-64997f8657-zpspg       1/1     Running   0          11d
# free5gc-deployment-free5gc-smf-smf-7977c79c77-647nk       1/1     Running   0          11d
# free5gc-deployment-free5gc-udm-udm-58d784c49b-zjwjn       1/1     Running   0          11d
# free5gc-deployment-free5gc-udr-udr-df7c5b7dc-pxg84        1/1     Running   0          11d
# free5gc-deployment-free5gc-upf-upf-77c6f7fc65-bj4hx       1/1     Running   0          11d
# free5gc-deployment-free5gc-webui-webui-55947dd9c9-gz6w7   1/1     Running   0          11d
# mongodb-0 1/1 Running 0 11dCheck the status of the free5gc-webui pod and service:
kubectl -n free5gc get pods free5gc-deployment-free5gc-webui-webui-55947dd9c9-gz6w7
# NAME                                                      READY   STATUS    RESTARTS   AGE
# free5gc-deployment-free5gc-webui-webui-55947dd9c9-gz6w7   1/1     Running   0          11d
kubectl -n free5gc get svc webui-service
# NAME            TYPE       CLUSTER-IP     EXTERNAL-IP   PORT(S)          AGE
# webui-service   NodePort   10.233.27.29   <none>        5000:30500/TCP   11d
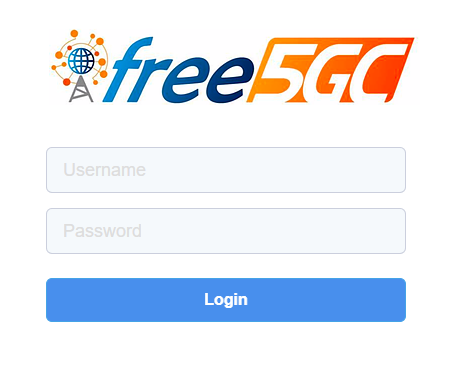
Now, on an external server that has connectivity to the Kubernetes node, enter the Free5GC Web-UI through the browser using http://$KUBERNETES_SINGLE_NODE_IP:30500. You can see an interface like the following:
The credentials for accessing the Web-UI are admin:free5gc. When the interface is accessed, the following interface is displayed on the screen:
NOTE: The use of NodePort is not a recommended practice within Kubernetes due to the security implications that it can bring.
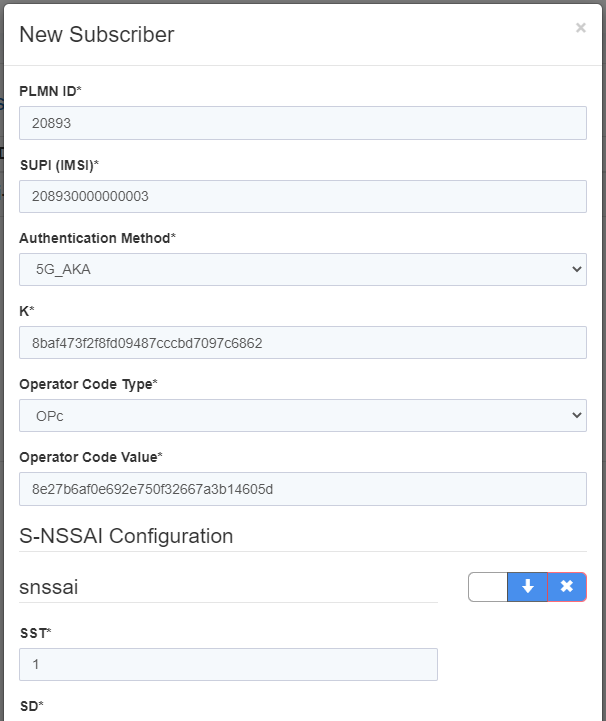
To add a user to Free5GC, go to the SUBSCRIBERS tab and click the New Subscriber button:
A form appears on the screen with values already filled out. Keep those default values and then go to the bottom Submit option to add the new user:
You can see in the SUBSCRIBERS tab that a new user was created.
Enjoy Free5GC!


