Section 0: Getting Set Up - calisley/dpi-681 GitHub Wiki
Welcome to Your Programming Setup Guide!
This guide is intended for people with varying degrees of coding experience. Feel free to skip ahead past any steps you’ve already completed.
Step 0: Getting comfortable with the terminal/command prompt
To start any programming project, you have to be comfortable navigating and using your terminal. The terminal (or command prompt on Windows) is a powerful tool that lets you interact directly with your computer, manage files, and run commands. Mastering these basics will not only streamline your workflow but also give you greater control over your development environment.
How to Open the Terminal/Command Prompt
-
On Mac:
- Open Finder > Applications > Utilities > Terminal.
- Or use Spotlight (press
Cmd + Space), type “Terminal,” and hit Enter.
-
On Windows:
- Click the Start menu, type “Command Prompt,” and press Enter.
- Alternatively, press
Win + R, typecmd, and hit Enter.
Basic Command Line Commands
Familiarity with the basic commands is necessary for any programming project. I would suggest practicing moving around your system with cd, looking at files with ls or dir to get a feel for navigating your computer using the command prompt instead of your File Explorer.
-
Changing Directories:
Usecdto navigate to a different directory.
Example:
cd DocumentsNOTE: If you are navigating to a folder that has a space in the name (for example :
Documents\Class Files) you must surround that file path in quotation marks. Navigating to that folder would look like:cd "Documents\Class Files" -
Listing Files and Folders:
- Mac/Linux: Use
lsto list files and directories.
ls - Windows: Use
dirto list files and directories.
dir
- Mac/Linux: Use
-
Creating Directories:
Usemkdirto create a new folder.
Example:mkdir new_folder -
Viewing the Current Directory:
- Mac/Linux:
pwd - Windows:
cd
- Mac/Linux:
Before moving on to Step 1, be sure you are comfortable navigating your computer with Terminal. The instructions below frequently say "open terminal", which you should be comfortable doing before moving on.
Step 1: Install Python
-
Download Python:
Visit python.org/downloads and download the latest version for your operating system. -
Installation:
- Run the Installer:
After downloading, click through the installer. Make sure to check the box for "Add Python to PATH" before clicking "Install Now."

- Follow the remaining on-screen instructions to complete the installation.
- Run the Installer:
-
Verify Installation:
-
For Mac/Linux:
Open your Terminal application (see instructions below) and run:
python3 --version -
For Windows:
Open your Command Prompt (instructions provided below) and run:
python --version
If you encounter errors, always try quitting out of your terminal and reopening it. Whenever you download a new software, it is best practice to restart your terminal. If that still does not work, it is likely because Python was not added to your system's PATH as shown in the image above. Rerun the installer, and select Modify Installation. Click through the installer and select "Add Python to PATH."
-
Step 2: Install Git & Create a GitHub Account
-
Download Git:
Go to git-scm.com/downloads and download the installer. Be sure to click through each step of the installer to complete the installation. -
Set Up Your GitHub Account:
Visit github.com to sign up for an account if you don’t already have one. -
Once again, restart your terminal and verify your git installation:
-
For Mac/Linux:
Open your Terminal application and run:git --version -
For Windows:
Open your Command Prompt and run:git --version
-
Step 3: Set Up an Integrated Development Environment (IDE)
I recommend Visual Studio Code (VSCode) because of its robust features. Other IDEs like Cursor or Windsurf also offer integrated Generative AI support, but note that their free tier service might have limitations.
-
Download VSCode:
Download Visual Studio Code from code.visualstudio.com. -
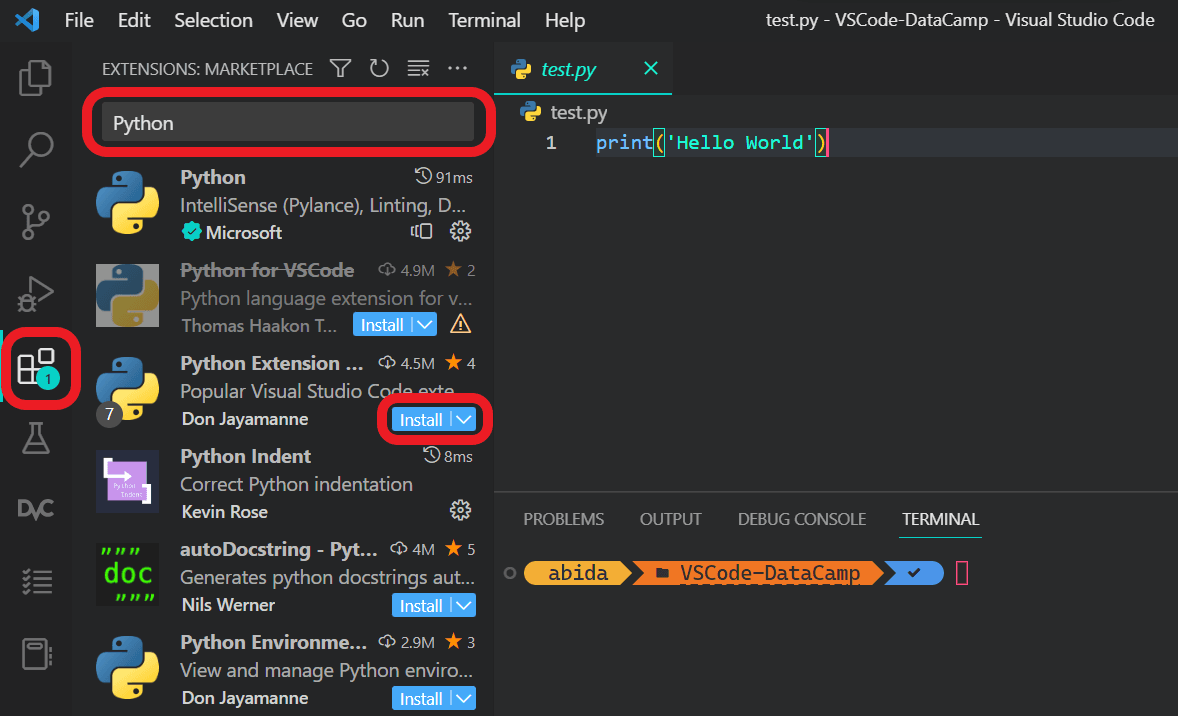
Install Python Extensions in VSCode:
Open VSCode, navigate to the Extensions pane, search for “Python,” and install the Python extension. This will enable features such as IntelliSense, debugging, and code navigation. Select the Icon with the four boxes, which should open the "Extension Marketplace". Type "python" and install the extension just called "Python"
- Alternative Options:
You may use any IDE or text editor you prefer, but VSCode is highly recommended for its integrated features.
Step 4: Get an OpenAI API Key
-
Sign Up for OpenAI:
Visit OpenAI to create an account. After logging in, follow the on-screen instructions or click "Get Started" to generate an API key. -
Important Security Note:
Your API key is shown only once. Save it in a secure location. Sharing your API key can lead to unauthorized usage and charges. -
Billing Information:
You will need to add a small amount (approximately $5–$10) to your account to activate API usage. If this is an issue, please reach out to Professor Svoronos.
Step 5: Prepare Your Workspace and Clone the Repository.
Open up terminal (again!).
-
Create a Folder:
Create a folder on your computer calledDPI-681to keep everything organized.-
On Mac/Linux:
Open your Terminal (see below) and run:mkdir DPI-681 -
On Windows:
Open your Command Prompt (see below) and run:mkdir DPI-681
-
-
Navigate into the folder:
You should know how to do this if you've completed step 0. As a reminder, you can run:-
On Mac/Linux:
cd DPI-681 -
On Windows:
cd DPI-681
-
-
Clone the Repository:
'Clone' the repository into your newly created folder:git clone https://github.com/calisley/dpi-681.git'Cloning' will create a local copy of the repository. Then, navigate into the cloned directory:
-
On Mac/Linux:
cd dpi-681 -
On Windows:
cd dpi-681
-
Step 6: Install the OpenAI Package
-
Install the Package:
Again open up terminal, and run the following command.- For Mac/Linux:
pip3 install openai- For Windows:
Open your Command Prompt (instructions provided below) and run:pip install openai
-
Other Useful Packages:
You might also find packages likenumpy,pandas, andmatplotlibuseful. Install them by running:- For Mac/Linux:
pip3 install [package name]- For Windows:
Open your Command Prompt (instructions provided below) and run:pip install [package name]
You may run into problems running this command if you installed Python using brew on Mac. Handling them appropriately is beyond the scope of this class. You should be able to resolve the error by copy pasting the error into ChatGPT, and asking it to "force install" the package. Your first taste of vibe coding!
Pre-section Activity: Getting your section password!
If you have not already, complete the steps above. You are now ready to run your first Python script and get your section password!
Steps to Run the File:
-
Get the latest changes to the
dpi-681repository:- Navigate to the folder that contains the files we used in section last week. That should be something like
your/path/to/DPI-681/dpi-681 - Run:
git pullThis ensures you will have the files necessary for completing this pre-section assignment.
- Navigate to the folder that contains the files we used in section last week. That should be something like
-
Navigate to the File’s Directory: (challenge 1)
- There will now be multiple folders in your
dpi-681folder. Navigate intopre-section. If you are having trouble doing so or can't find the folder, refer to the instructions above.
- There will now be multiple folders in your
-
Run the Python File: (challenge 2) Running a Python script is a fundamental skill that you'll use for every project. Here’s how:
- Open Your Terminal:
Ensure your terminal (or command prompt) is open and you're in the correct directory (see Step 2). - Execute the Command:
Type the following command to run the script and then press Enter:- On Mac/Linux:
python3 get_password.py - On Windows:
python get_password.py
- On Mac/Linux:
- What Happens Next:
This command tells your computer to launch the Python interpreter and execute the code inget_password.py. Every time you want to run a Python file, you'll use a similar command in the terminal.
- Open Your Terminal:
-
Retrieve the Password:
- After running the command, the script will execute and display the password in the terminal. Carefully note down the password; you'll need it for the section survey and access the next section!
This exercise not only shows you how to run a Python file but also demonstrates the practical aspect of using the command line to execute code and interact with your projects. Comfort with navigating the terminal and running Python files is necessary for future section attendance, so we can keep the lectures moving without stopping to debug.