Custom Clans - brandonandzeus/Trainworks2 GitHub Wiki
Custom Clans
That's right. It's finally time.
A word of warning: this tutorial is quite long, and it assumes you've gone through all the previous tutorials. We need things to put in the clan, which is what all the previous tutorials were for. Plus, the knowledge they gained is essential for understanding what happens here.
If you get lost, a working example with this code is available in this repo
Test Clan
For this tutorial, we will create the fantastically named "Test Clan." We're not doing it all in one step this time, though. First, we're going to establish the absolute basics, and once that's up and running, we'll come back to fill in the details.
The first thing we need to do is make some sprites for the clan icon. Or rather, we would need to... if I hadn't already done it! Acquire the clan icon here and the silhouette icon here. There are three different clan icon sizes, but the large one alone is sufficient; the game will handle the downsizing for us.
Usually, when I post code examples, I post the builder alone and let you figure out how you want to organize it, but this time, it is essential that we set the ID aside.
class TestClan
{
    public static readonly string ID = TestPlugin.GUID + "_TestClan";

    public static void BuildAndRegister()
    {
        new ClassDataBuilder
        {
            ClassID = ID,
            Name = "Test Clan",
            Description = "Test Clan Description",
            SubclassDescription = "Test Clan Sub Description",
            CardStyle = ClassCardStyle.Stygian,
            IconAssetPaths =
            {
                "assets/testclan-large.png",
                "assets/testclan-large.png",
                "assets/testclan-large.png",
                "assets/testclan-silhouette.png"
            },
            UiColor = new Color(0.1f, 0.8f, 0.8f, 1f),
            UiColorDark = new Color(0.05f, 0.5f, 0.5f, 1f),
        }.BuildAndRegister();
    }
}
Notice how before the builder, we create a static readonly string ID. As I said, we're setting it aside; we'll want to use it later. Onto the ClassDataBuilder! Let's go through it one line at a time.
ClassID: Like the ID field of most of the other builders, this must be unique.Name: Like the name field of every other builder, this sets it for all languages.Description: Displayed on the clan select screen if selected as your main clan.SubclassDescription: Displayed on the clan select screen if selected as your allied clan.CardStyle: Choose who you want your clan's cards to look like. We'll change this later, but let's make our cards look like Stygian.IconAssetPaths: Always a list of size four. In order: small icon, medium icon, large icon, silhouette icon. As I said, for this example, we're only using the large and silhouette icons.UiColorandUiColorDark: Used in a few places to highlight certain UI elements with a clan-specific flair.
And that's it! Clans sure are straightforward, right? So let's boot up the game, start a run, and CRASH. Unfortunately, clans require a bit more than just this to work. Let's move on to the next step.
Test Clan Banner
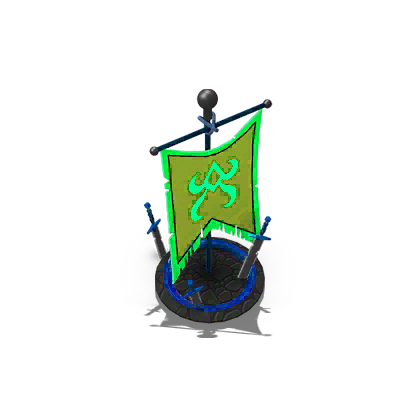
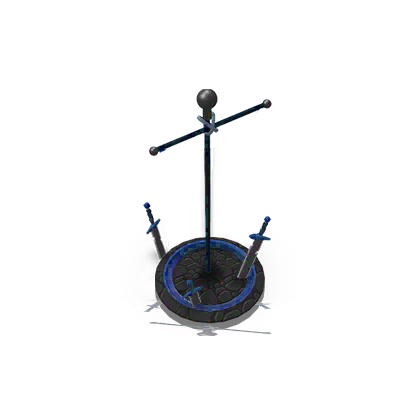
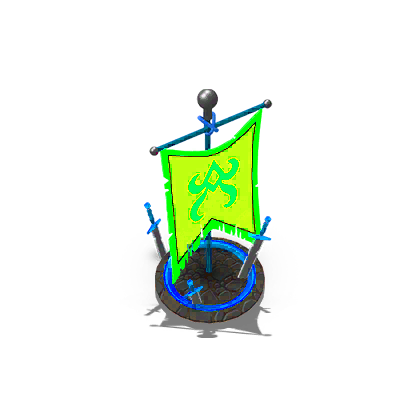
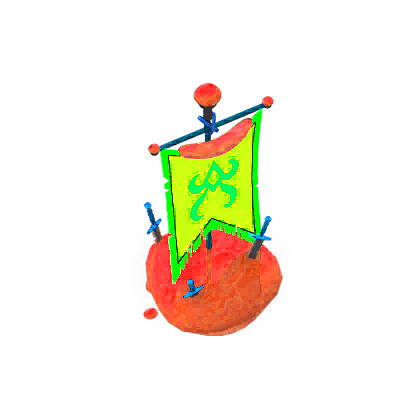
If your clan has no associated banner, it will crash when you click the play button, so we need to add one. That means more art assets! Prepare your eyes for the most hideous banner you'll hopefully ever see:
Disabled sprite
Disabled + Visited
Enabled
Frozen
Glow
Minimap
First, we'll make a card pool for our banner:
CardPool cardPool = new CardPoolBuilder
{
    CardPoolID = TestPlugin.GUID + "_BannerUnits",
    CardIDs =
    {
        BlueEyesWhiteDragon.ID,
        DragonCostume.ID,
    },
}.BuildAndRegister();
You can add any number of cards to this Pool, and they'll get added to the pool for your banner.
A banner is an example of a Reward Node. Reward Nodes hold RewardData, which will be the "pick a unit from this pool" reward.
new RewardNodeDataBuilder()
{
    RewardNodeID = TestPlugin.GUID + "_Banner",
    MapNodePoolIDs =
    {
        VanillaMapNodePoolIDs.RandomChosenMainClassUnit,
        VanillaMapNodePoolIDs.RandomChosenSubClassUnit
    },
    Name = "Test Clan Banner",
    Description = "Offers units from the illustrious Test Clan",
    RequiredClassID = TestClan.ID,
    ControllerSelectedOutline = "assets/TestClanBanner_ControllerSelectedOutline.png",
    FrozenSpritePath = "assets/TestClanBanner_Frozen.png",
    EnabledSpritePath = "assets/TestClanBanner_Enabled.png",
    EnabledVisitedSpritePath = "assets/TestClanBanner_Enabled_Visited.png",
    DisabledSpritePath = "assets/TestClanBanner_Disabled.png",
    DisabledVisitedSpritePath = "assets/TestClanBanner_Disabled_Visited.png",
    GlowSpritePath = "assets/TestClanBanner_Glow.png",
    MapIconPath = "assets/TestClanBanner_Enabled.png",
    MinimapIconPath = "assets/TestClanBanner_Minimap.png",
    SkipCheckInBattleMode = true,
    OverrideTooltipTitleBody = false,
    NodeSelectedSfxCue = "Node_Banner",
    RewardBuilders =
    {
        new DraftRewardDataBuilder()
        {
            DraftRewardID = RewardID,
            AssetPath = "assets/TestClanBanner_Enabled.png",
            Name = "Test Clan Banner",
            Description = "Choose a card!",
            Costs = new int[] { 100 },
            IsServiceMerchantReward = false,
            DraftPool = cardPool,
            ClassType = RunState.ClassType.MainClass | RunState.ClassType.SubClass | RunState.ClassType.NonClass,
            DraftOptionsCount = 2,
            RarityFloorOverride = CollectableRarity.Uncommon
        }
    }
}.BuildAndRegister();
I am skipping the obvious fields this time since there are a lot of them.
MapNodePoolIDs: The game pulls reward nodes from node pools. How it works is slightly different, but from our perspective, it's easiest to think of it like that. These pools hold all the game's banners, and when the game goes to pick one, it chooses the one matching the current clan. If you were to register multiple banners for a single clan, they'd both be able to show up at these banner nodes.RequiredClassID: Remember how I made a big deal out of us setting asideTestClan.IDearlier? This is only the first of many times we'll use it.___SpritePath: Banners have a ton of sprites to fill in. Frozen is for banners in future zones, enabled is for banners in your current zone, disabled is for when you choose the other path (at that point, you can no longer choose it), and DisabledVisited is after you pick a unit from it. The glow's the highlight you get for hovering over it; the map icon is for the main map, and the minimap icon is for the minimap.SkipCheckInBattleMode: When you click to start a battle, if you haven't yet visited this node, the game will bother you with a "Hey, you haven't visited here yet" alert. If this is set to true, it won't display that in Hell Rush. If you're unsure what to put, know that this should be true for banners. There's also aSkipCheckIfFullHealth, but since we want it to be false and it defaults to false, we left it off here.- For the other (non-textual) fields, what we set is the same across all banners.
Indeed, now we'll be able to start a run with our new clan, right? WRONG. Of course not. We don't have a champion yet!
Test Clan Champion
For this tutorial, we will create the minimum champion necessary to get us into a run. We'll flesh out its abilities more in the next one.
Champions are just monster cards with a few extra whistles. We're going to create this in two steps. First, the CharacterData:
var championCharacterBuilder = new CharacterDataBuilder
{
    CharacterID = CharID,
    Name = "Slimeboy",
    Size = 1,
    Health = 10,
    AttackDamage = 5,
    AssetPath = "assets/slimeboy-character.png"
};
As I said, it is as simple as we can make it. Notice how we aren't calling BuildAndRegister() on it. No harm if you do, but that'll happen implicitly when we build the next step, so there is no point in repeating work. Next, let's do the hard part of it. For champions, we use a special ChampionCardDataBuilder:
new ChampionCardDataBuilder()
{
    Champion = championCharacterBuilder,
    ChampionIconPath = "assets/slimeboy-character.png",
    StarterCardID = VanillaCardIDs.Torch,
    CardID = ID,
    Name = "Slimeboy",
    ClanID = TestClan.ID,
    AssetPath = "assets/slimeboy.png"
}.BuildAndRegister(0);
Here are a few things to point here.
Champion: This is a builder, not a full character. Specifically, it's the CharacterDataBuilder for your champion's character, which we made two minutes ago.ChampionIconPath: Regular CardDataBuilders didn't have this field! Like all other asset paths, it's relative to your plugin dll.StarterCardID: The name says it all. Fun fact: As you can see in this example, the card doesn't need to be marked with a starter card rarity, and the clan doesn't matter.- You may notice the omission of several fields. "Why, this is much simpler than Blue-Eyes White Dragon was!", you may exclaim. Because champion cards are guaranteed to be monster cards, the ChampionCardDataBuilder can handle the obvious parts for us. This is all that's needed to put our champion in the game.
This time, if you build, boot up the game, and start a run, you'll actually make it in! Don't visit any champ upgrade stations, though. We didn't give our champion any upgrade paths, so it'll break the game. Again, we'll fill in that stuff next tutorial.
Filling our clan with content
The clan's looking a tad empty right now. For our last act, we will go through the following pieces of content from past tutorials and change their clan ID to TestClan.ID:
- Not Horn Break
- Give Everyone Armor
- Play Other Cards
- Blue-Eyes White Dragon
- Dragon Costume
- Wimp-cicle
It's not nearly enough to fill out a clan, but we should get some options for card rewards now. One small gotcha: make sure to register the clan before any of these things. Can't have them relying on an ID that doesn't exist yet! At this point my plugin's Initialize() method looks like this:
public void Initialize()
{
            // Start with the clan.
            Clan.BuildAndRegister();
            // Then Starter cards if using custom-made cards.
            // Then Champions
            Champion.BuildAndRegister();
            ExiledChampion.BuildAndRegister();
            // Subtypes
            Subtypes.BuildAndRegister();
            // Cards
            ModifyFrozenLance.Modify();
            NotHornBreak.BuildAndRegister();
            GiveEveryoneArmor.BuildAndRegister();
            PlayOtherCards.BuildAndRegister();
            IcyBoost.BuildAndRegister();
            PyreSharpener.BuildAndRegister();
            FrostFury.BuildAndRegister();
            BlueEyesWhiteDragon.BuildAndRegister();
            DragonCostume.BuildAndRegister();
            AppleMorsel.BuildAndRegister();
            // Relics
            Wimpcicle.BuildAndRegister();
            EmberRefunder.BuildAndRegister();
            // Enhancers
            StealthyStone.BuildAndRegister();
            // Banner
            ClanBanner.BuildAndRegister();
}
There's much more to do with clans, but that's better for a future tutorial. The next one will discuss making our champion do things!
Next: Fleshing Out a Champion