localrepo_task - brainchildservices/curriculum GitHub Wiki
SLIDE-1
- Create a repository locally and push to Github repo.
SLIDE-2
- Create a new repository on GitHub. To avoid errors, do not initialize the new repository with README, license, or gitignore files. You can add these files after your project has been pushed to GitHub.
SLIDE-3
-
Create a local git repository
-
When creating a new project on your local machine using git, you'll first create a new repository (or often, 'repo', for short). Use these commands from a specific project storing folder.
F:\project>md myproject OR F:\project>mkdir myproject F:\project>cd myproject -
To initialize a git repository in the root of the folder, run the git init command:
git init -b main
-
SLIDE-4
-
Add a new file to the repo - Go ahead and add a new file to the project, using any text editor you like or running a Notepad command. - New file should have the contents you have created in HT003APT and HT004Apt -
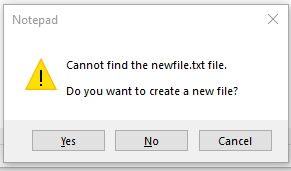
Notepad newfile.txtjust creates and saves a blank file named newfile.F:\project\myproject>Notepad newfile.txt
-
press yes if the below popup
-
   OR
   $ git add .
   # Adds the files in the local repository and stages them for commit. To unstage a file, use 'git reset HEAD YOUR-FILE'.
-
Commit the files that you've staged in your local repository.
  $ git commit -m "First commit"
  # Commits the tracked changes and prepares them to be pushed to a remote repository. To remove this commit and modify the file, use 'git reset --soft HEAD~1' and commit and add the file again.
SLIDE-5
-
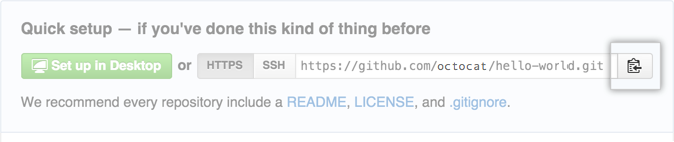
At the top of your GitHub repository's Quick Setup page, click to copy the remote repository URL. -
-
In the Command prompt, add the URL for the remote repository where your local repository will be pushed.
$ git remote add origin <REMOTE_URL> # Sets the new remote $ git remote -v # Verifies the new remote URL -
Push the changes in your local repository to GitHub.
  $ git push origin main
  # Pushes the changes in your local repository up to the remote repository you specified as the origin