DatabaseMVC.md - brainchildservices/curriculum GitHub Wiki
Use .NET Core Command List Interface to execute entity framework core commands. To use .NET CLI, add
<DotNetCliToolReference Include="Microsoft.EntityFrameworkCore.Tools.DotNet" Version="2.0.0" />
under <ItemGroup> node by editing your .NET Core project's .csproj file.
Open command prompt and navigate to your project's root folder and enter dotnet ef --help to list EF Core commands, as shown below.
C:> dotnet ef --help
Usage: dotnet ef [options] [command]
Options:
   --version          Show version information
   -h|--help        Show help information
   -v|--verbose     Show verbose output.
   --no-color       Don't colorize output.
   --prefix-output  Prefix output with level.
Commands:
 database    Commands to manage the database.
 dbcontext   Commands to manage DbContext types.
 migrations  Commands to manage migrations.
Use "dotnet ef [command] --help" for more information about a command.
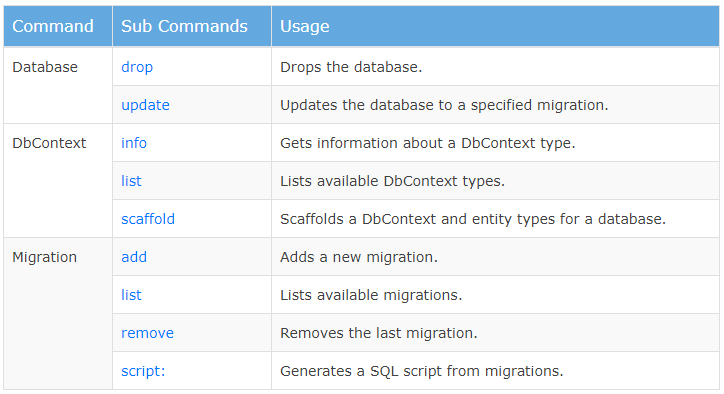
As you can see above, there are three main EF commands available: database, dbcontext and migrations. The following table lists all EF commands and sub commands.
Let's see available options for each command.
dotnet ef database update
Usage: dotnet ef database update [arguments] [options]
Arguments:
<MIGRATION> The target migration. If '0', all migrations will be reverted. Defaults to the last migration.
Options:
  -c|--context <DBCONTEXT>               The DbContext to use.
  -p|--project <PROJECT>                 The project to use.
  -s|--startup-project <PROJECT>         The startup project to use.
  --framework <FRAMEWORK>                The target framework.
  --configuration <CONFIGURATION>        The configuration to use.
  --runtime <RUNTIME_IDENTIFIER>         The runtime to use.
  --msbuildprojectextensionspath <PATH>  The MSBuild project extensions path. Defaults to "obj".
  --no-build                             Don't build the project. Only use this when
                                     the build is up-to-date.
dotnet ef migrations add
Usage: dotnet ef migrations add [arguments] [options]
Arguments:
The name of the migration.
Options:
 -o|--output-dir <PATH>                 The directory (and sub-namespace) to use. Paths are relative to the project directory. Defaults to "Migrations".
   --json                                 Show JSON output.
   -c|--context <DBCONTEXT>               The DbContext to use.
   -p|--project <PROJECT>                 The project to use.
   -s|--startup-project <PROJECT>         The startup project to use.
   --framework <FRAMEWORK>                The target framework.
   --configuration <CONFIGURATION>        The configuration to use.
   --runtime <RUNTIME_IDENTIFIER>         The runtime to use.
   --msbuildprojectextensionspath <PATH>  The MSBuild project extensions path. Defaults to "obj".
   --no-build                             Don't build the project. Only use this
                                     when the build is up-to-date.
For More Visit CLI Commands For Migration
Data access is an important part of almost any software application. ASP.NET Core supports a variety of data access options, including Entity Framework Core (and Entity Framework 6 as well), and can work with any .NET data access framework. The choice of which data access framework to use depends on the application's needs. Abstracting these choices from the ApplicationCore and UI projects, and encapsulating implementation details in Infrastructure, helps to produce loosely coupled, testable software.
If you're writing a new ASP.NET Core application that needs to work with relational data, then Entity Framework Core (EF Core) is the recommended way for your application to access its data. EF Core is an object-relational mapper (O/RM) that enables .NET developers to persist objects to and from a data source. It eliminates the need for most of the data access code developers would typically need to write. Like ASP.NET Core, EF Core has been rewritten from the ground up to support modular cross-platform applications. You add it to your application as a NuGet package, configure it in Startup, and request it through dependency injection wherever you need it
To use EF Core with a SQL Server database, run the following dotnet CLI command:
dotnet add package Microsoft.EntityFrameworkCore.SqlServer
To add support for an InMemory data source, for testing:
dotnet add package Microsoft.EntityFrameworkCore.InMemory
To work with EF Core, you need a subclass of DbContext. This class holds properties representing collections of the entities your application will work with. The eShopOnWeb sample includes a CatalogContext with collections for items, brands, and types:
 public class CatalogContext : DbContext
 {
     public CatalogContext(DbContextOptions<CatalogContext> options) : base(options)
     {

     }

     public DbSet<CatalogItem> CatalogItems { get; set; }

     public DbSet<CatalogBrand> CatalogBrands { get; set; }

     public DbSet<CatalogType> CatalogTypes { get; set; }
 }
Your DbContext must have a constructor that accepts DbContextOptions and pass this argument to the base DbContext constructor. If you have only one DbContext in your application, you can pass an instance of DbContextOptions, but if you have more than one you must use the generic DbContextOptions type, passing in your DbContext type as the generic parameter.
In your ASP.NET Core application, you'll typically configure EF Core in your ConfigureServices method. EF Core uses a DbContextOptionsBuilder, which supports several helpful extension methods to streamline its configuration. To configure CatalogContext to use a SQL Server database with a connection string defined in Configuration, you would add the following code to ConfigureServices:
services.AddDbContext<CatalogContext>(options => options.UseSqlServer (Configuration.GetConnectionString("DefaultConnection")));
To use the in-memory database:
 services.AddDbContext<CatalogContext>(options =>
     options.UseInMemoryDatabase());
Once you have installed EF Core, created a DbContext child type, and configured it in ConfigureServices, you are ready to use EF Core.
For More Visit Working With Data
learn about Database
I hope the new application is running fine. Therefore, next, we will install some of the required Entity Framework Core packages from the NuGet Package Manager for performing database operations from the code. First, we will install the package like Microsoft.EntityFrameworkCore.SqlServer which will provide classes to connect with SQL Server for CRUD Operation to Entity Framework Core.

The second required NuGet package is Microsoft.EntityFrameworkCore.Tools, which will help us to work with database related activity like add migration, script migration, get dbcontext, update database etc.

So far, we have created one Asp.Net Core MVC application and installed some required Entity Framework Core packages which are required for Code First migration or we can say, these will help us to use Entity Framework Core functionality for working with SQL Server.
So, let’s move and create a folder name as ‘Context’ and create a Model class as ‘Movie’ in this with the following properties as follows.
 namespace CodeFirstMigration.Context
 {
     public class Movie
     {
         public int MovieId { get; set; }
         public string MovieName { get; set; }
         public string MovieDesciption { get; set; }
     }
 }
We will create another class inside the Context folder as MovieDbContext that will inherit to DbContext class. This class will contain all the model's information which are responsible for creating the tables in the databae. Here we will define our Movie class as DbSet.
 using Microsoft.EntityFrameworkCore;

 namespace CodeFirstMigration.Context
 {
     public class MovieDbContext : DbContext
     {
         public MovieDbContext(DbContextOptions options) : base(options)
         {
         }
         DbSet<Movie> Movies { get; set; }
     }
 }
As w, all know that in the Code First approach, we first write the code, which means Model classes, and on the basis of these classes our tables are auto-generated inside the database. However, to create these tables in the database we have to define our connection string where we will define our server and database name. For this demonstration, we are not using SQL Windows Authentication but you can use Mixed Authentication and pass the username and password with the connection string. So, you can write connection string inside the appsetting.json file as follows.
 {
   "Logging": {
     "IncludeScopes": false,
     "LogLevel": {
       "Default": "Warning"
     }
   },
   "ConnectionStrings": {
     "myconn": "server=ABC\\SQLEXPRESS2012; database=MovieDB;Trusted_Connection=True;"
   }
 }
To use this connection string, first, we will change the ConfigureServices method in Startup.cs class as follows.
 public void ConfigureServices(IServiceCollection services)
 {
     services.AddMvc();
     services.AddDbContext<MovieDbContext>(item => item.UseSqlServer(Configuration.GetConnectionString("myconn")));
 }
So far, we have done most of the things, like project creation, installing NuGet packages, creating Model classes and setting connection string. So, let's generate the database using Entity Framework Core Migrations.
Open Package Manager Console from the Tools Menu and select the Default project for which you would like to generate migrations code. For this demonstration, we have only a single project as CodeFirstMigration. Therefore, by default, it is a default project.
For creating the migration code, we use add-migration MigrationName command. So, let’s perform this operation and see what happens. Therefore, in the Package Manager Console, just type add-migration initialMigration command and press Enter.

Once the add migration command executes successfully, it creates a folder name as ‘Migration’ in the project and creates the class with the same name [MigrationName] as we have provided while executing add migration command with some name. Here you can see the table structure based on your Model (Movie), which is ready to generate the database
 using Microsoft.EntityFrameworkCore.Metadata;
 using Microsoft.EntityFrameworkCore.Migrations;

 namespace CodeFirstMigration.Migrations
 {
     public partial class initialmigration : Migration
     {
         protected override void Up(MigrationBuilder migrationBuilder)
         {
             migrationBuilder.CreateTable(
                 name: "Movies",
                 columns: table => new
                 {
                     MovieId = table.Column<int>(nullable: false)
                         .Annotation("SqlServer:ValueGenerationStrategy", SqlServerValueGenerationStrategy.IdentityColumn),
                     MovieName = table.Column<string>(nullable: true),
                     MovieDescription = table.Column<string>(nullable: true),
                 },
                 constraints: table =>
                 {
                     table.PrimaryKey("PK_Movies", x => x.MovieId);
                 });
         }

         protected override void Down(MigrationBuilder migrationBuilder)
         {
             migrationBuilder.DropTable(
                 name: "Movie");
         }
     }
 }
We have only created the migration script which is responsible for creating the database and its table. But we've not created the actual database and tables. So, let's execute the migration script and generate the database and tables. Therefore, executing the migration scripts we have to execute update-database command. So, let's perform it as follows.
For now, we have only one migration script available that is why we are not providing the name of the migration. If we have multiple migration scripts, then we have to provide the name along with command as follows.

Once the above command executes successfully, we just need to go to SQL Server Management Studio and login with Windows Authentication and see the Database. You will find the database, table and Entity Framework Migration history table as follows.
