NodeMCU Arduino Framework Arduino IDE - borq79/cs.edu GitHub Wiki
Many makers are already familiar with the Arduino language (based on C/C++) and the Arduino IDE. The NodeMCU comes pre-flashed with the Lua Programming Language Interpreter and there are many images based on the Lua Interpreter. But what if you won't want to use Lua or you are writing an application that needs more memory than is available when the Lua Interpreter is loaded. Whatever the case may be, the Arduino/NodeMCU community has you covered. This section discusses how to use the Arduino Framework and IDE to program your NodeMCU.
In the NodeMCU Overview, we learned that the NodeMCU is based on the ESP8266, so when interacting with libraries or tools you may see the two used interchangeably.
Images courtesy of SparkFun
- Open the Arduino IDE (version 1.6.4 or higher)
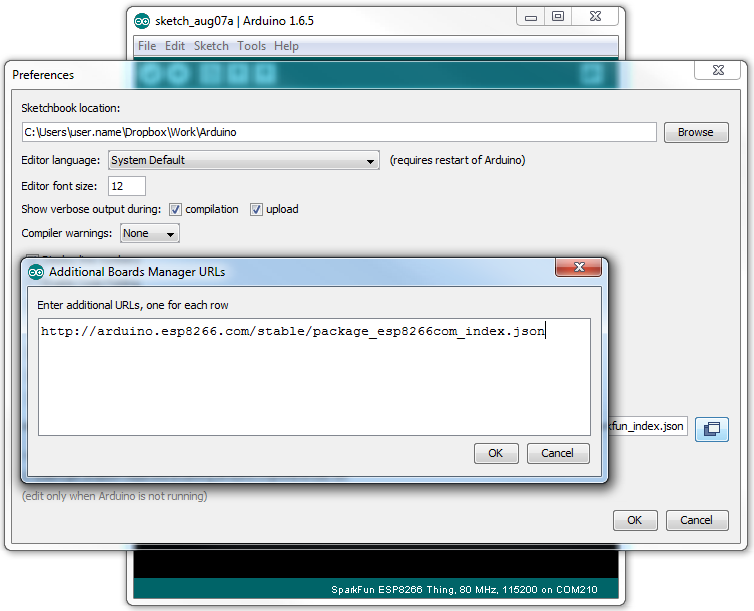
- Go to File -> Preferences and in the Additional Board Manager URLs enter the following URL:
http://arduino.esp8266.com/stable/package_esp8266com_index.json
- Go to *Tools->Boards->Boards Manager *and search for ESP8266. The ESP8266 by the ESP8266 Community should come up. Install the latest version.
- Now that the board is installed, go to Tools->Boards and select NodeMCU 1.0 (ESP-12E Module)
- Ensure that the settings for the port, etc. are as depicted in this image:

- Now create a sketch called HelloWorld and paste the following:

#include <Arduino.h>
#include <SoftwareSerial.h>

void setup() {
  Serial.begin(115200);
  Serial.println("Starting ...");
}

void loop() {
  Serial.println("Hello World");
  delay(2000);
}
- Verify and Upload the code to the NodeMCU (make sure it is plugged in via the USB port and the correct port in Tools->Port is selected)
- Go to Tools->Serial Monitor and verify that the 'Hello World' phrase is printed every 2 seconds.
- Download the ESP8266 File System Upload Tool (Source: https://github.com/esp8266/Arduino/blob/master/doc/filesystem.md)
- Go to the Arduino installation directory and create (if it doesn't already exist) a directory named 'tools'
- Unzip the ESP8266 zip from step 1 and copy it to the tools directory so that it looks like this:
[Arduino install Dir]/tools/ESP8266FS/tool/esp8266fs.jar
- Restart the Arduino IDE
- Verify that Tools->ESP8266 Sketch Data Upload exists
