Components:Tutorial: Paginate with GetAll - bettyblocks/cli GitHub Wiki
In this tutorial we will create a component which contains a list of data which is paginated. This tutorial assumes that you've gone ahead and set up your own Component Set.
Skip to the end the see the end result and full Component code.
Our goal is to show a list of data. To start of we need a Prefab and a Component.
The Prefab configures two Options:
- model: to select a Betty Model to load data from;
- take: to let the user decide how many records our data list should show per page.
(() => ({
  name: 'List',
  icon: 'UnorderedListIcon',
  category: 'CONTENT',
  structure: [
    {
      name: 'List',
      options: [
        {
          value: '',
          label: 'Model',
          key: 'model',
          type: 'MODEL',
        },
        {
          value: 15,
          label: 'Rows per page (max 50)',
          key: 'take',
          type: 'NUMBER',
        },
      ],
      descendants: [],
    },
  ],
}))();The Component contains a simple HTML unordered list.
(() => ({
name: 'List',
type: 'CONTENT_COMPONENT',
allowedTypes: [],
orientation: 'HORIZONTAL',
jsx: (
<ul>
<li>List item</li>
</ul>
),
styles: () => () => ({}),
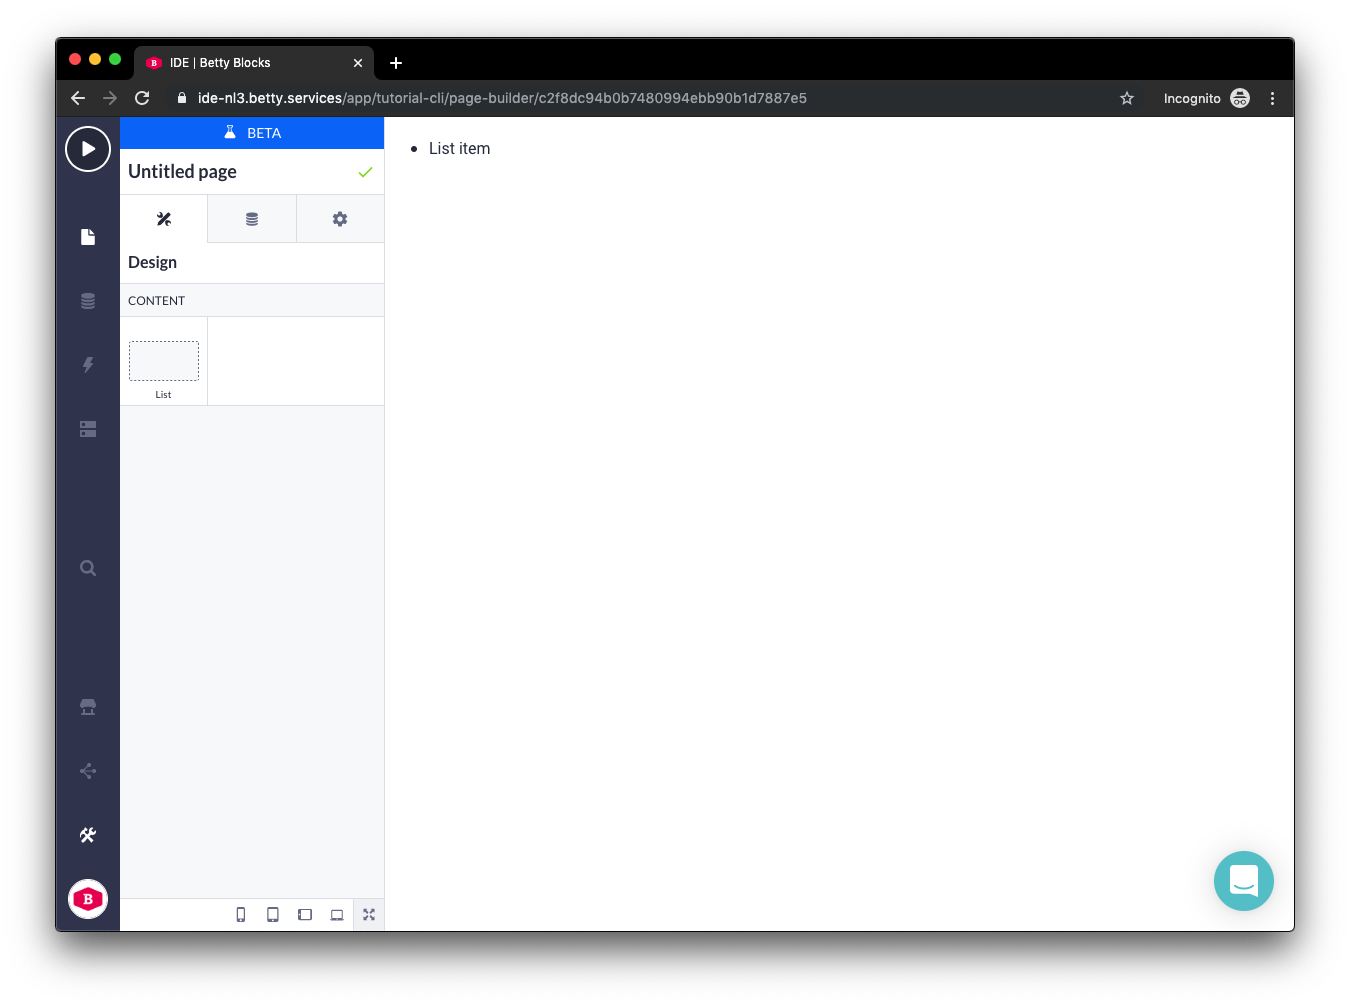
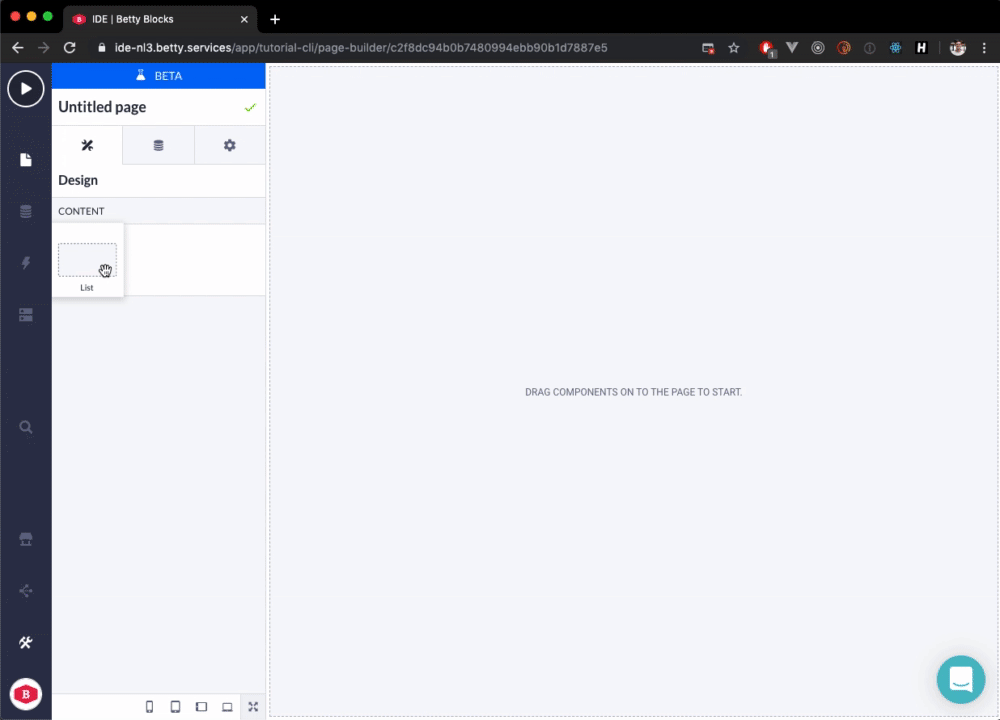
}))();If we use this Prefab in the Page Builder we should see something like the following:
For more info about Prefabs and Components checkout this tutorial and these pages: prefab and component.
To show data using the data API we provide a Component helper: GetAll. Replace the jsx in the Component for the following piece of code:
<div>
  <B.GetAll modelId={options.model}>
    {({ loading, error, data, refetch }) => {
      if (B.env === 'dev') {
        return (
          <ul>
            {[1, 2, 3, 4, 5].map(() => (
              <li>Data item</li>
            ))}
          </ul>
        );
      }

      if (loading) {
        return (
          <ul>
            <li>Loading...</li>
          </ul>
        );
      }

      if (error) {
        return (
          <ul>
            <li>Error...</li>
          </ul>
        );
      }

      const { results } = data;

      return (
        <ul>
          {results.map(result => (
            <li>{result.name}</li>
          ))}
        </ul>
      );
    }}
  </B.GetAll>
</div>
Let's break this apart.
<B.GetAll modelId={options.model}>
  {({ loading, error, data }) => {}}
</B.GetAll>
We use the GetAll component to retrieve a list of data. All the GetAll component needs is a Betty model id provided to its modelId prop. We can use the model option we set up in the prefab by doing: modelId={options.model}.
In the background the GetAll component will use ApolloClient to setup a GraphQL query and send it to our data API. In the progress of doing a request, the GetAll component provides us with three variabels:
-
loading: eithertrueorfalse; -
error: eitherundefinedor contains an error object; -
data: eitherundefinedor contains a data object.
We can use these variables to handle states in our interface of our Component.
if (B.env === 'dev') {
  return (
    <ul>
      {[1, 2, 3, 4, 5].map(() => (
        <li>Data item</li>
      ))}
    </ul>
  );
}
We are only able to request data in the runtime environment. The data API is not available in the Page Builder. We can use the B.env helper to check the current environment and show some dummy content.
if (loading) {
  return (
    <ul>
      <li>Loading...</li>
    </ul>
  );
}
As loading data can take some time we can use the loading variable to return a custom piece of JSX which will represent our loading state. Right now we're using simple text, but this will be the place to create a nice animating loading spinner for example.
if (error) {
  return (
    <ul>
      <li>Error...</li>
    </ul>
  );
}
A request either succeeds or fails. In the latter case we can use the error variable and its contents to show a custom error message.
const { results } = data;

return (
  <ul>
    {results.map(result => (
      <li>{result.name}</li>
    ))}
  </ul>
);
When the request succeeds we get a data object which contains the data of our model. The data object returned from the GetAll helper is structured as follows:
{
  results: [],
  totalCount
}
In this example we destructure the results from the data object and use the JavaScript map method to loop over our results.
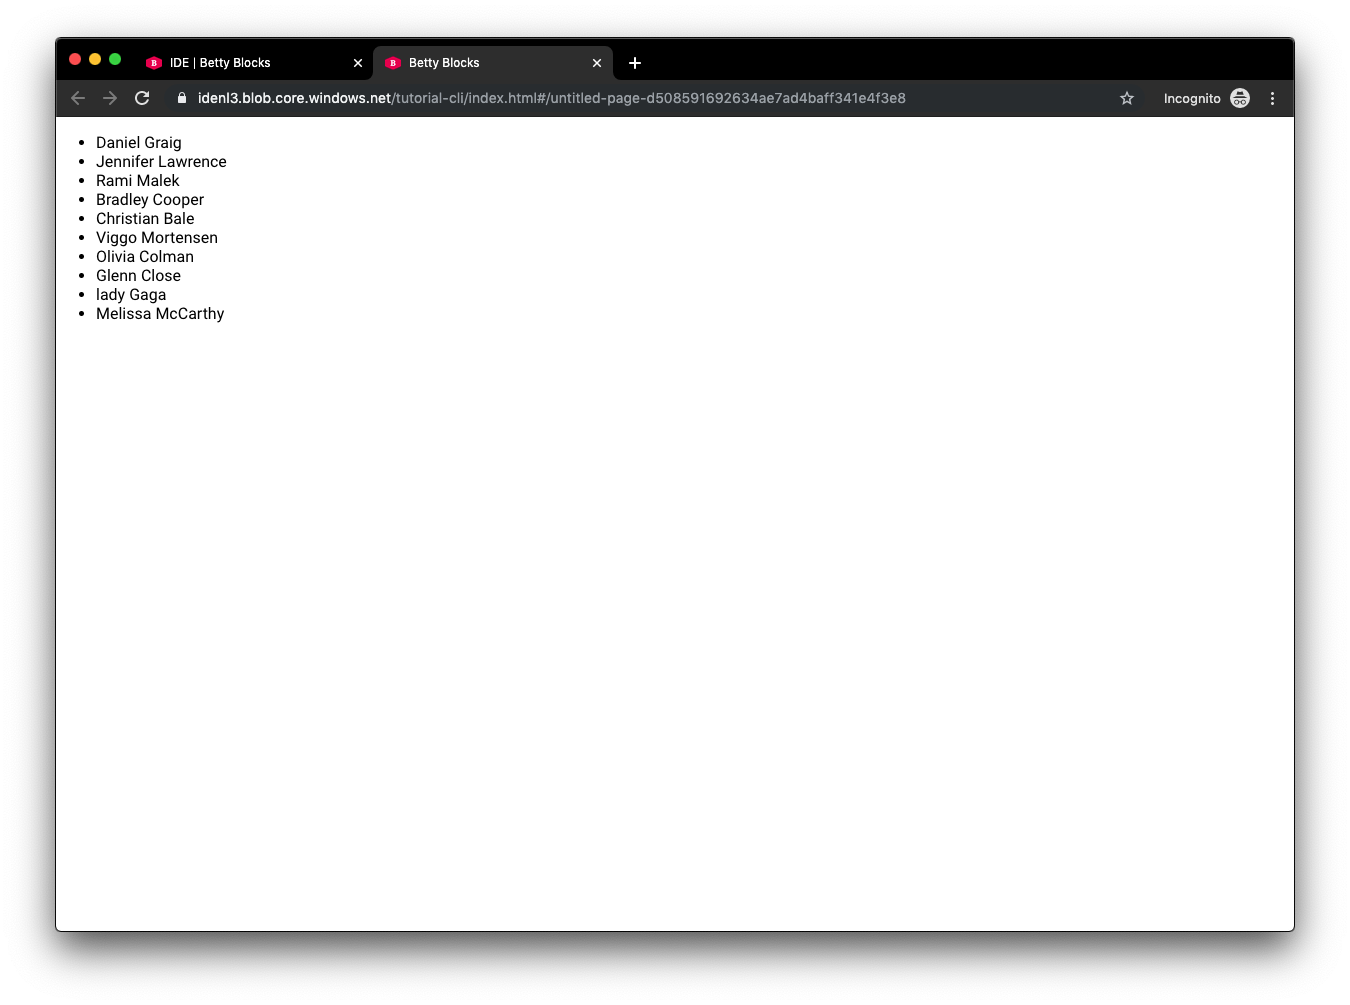
Now, when we use the Prefab in the Page Builder it looks something like this:

And in runtime:
NOTE: When your data is not loading make sure you set up authentication correctly. Follow this tutorial to find out how.
For pagination we'll build some interface elements which we'll use to trigger functions which will send a new request with new variables to the server. In this case we will use skip, take and totalCount variables to keep track of the page we're currently at and use the refetch function provided by the GetAll component to send the new request and re-render our list.
What we will build
- Previous and next buttons.
- Total amount of records indicator.
- Page indicator (e.g. 1 of 5)
Besides loading, error and data, the GetAll component hands us a refetch variable as well. refetch is a function which we can use to re-fetch our request where we can optionally provide new variables. Let's add a button which calls the refetch function after the ul which contains the data in our Component:
const { results } = data;

return (
  <>
    <ul>
      {results.map(result => (
        <li>{result.name}</li>
      ))}
    </ul>
    <button
      type="button"
      onClick={() => {
        refetch({ skip: 5 });
      }}
    >
      Refetch
    </button>
  </>
);
In this case when someone clicks the button, it will update the variables used in the last request, overwrite the skip variable, and call the refetch function with the variables object. By default the variables object contains skip and take like this:
{
  skip: 0,
  take: 15
}
In our case the variables object will be updated like this:
{
  skip: 5,
  take: 15
}
Now when a user clicks the refetch button, a request will be sent with the new variable object and the interface will re-render and show our updated list of data.
Read more about the refetch function here.
Now that we now how the refetch function works we can start creating pagination. To be able to create pagination we need to learn about the following concepts:
skiptaketotalCount
skip represents the number of records which need to be skipped when returning our data. For example this list of data lives in our database: [1, 2, 3, 4, 5]. Now we request data with skip: 2 in our variables object. The response we will get on our request will be: [3, 4, 5].
When a user triggers a page change we want to update the skip value and use it to request new data. We will keep track of this value in state like this:
const [skip, setSkip] = useState(0);take represents the number of records returned in the response of a request. take can be a number between 0 and 50. For example again this list of data lives in our database: [1, 2, 3, 4, 5]. Now we request data with take: 2 in our variables object. The response we will get on our request will be: [1, 2].
We use the value of take to determine how many records we want to show on our pages. In the first section of this tutorial we created an Option for this. We will use this Option to read value for take.
const take = parseInt(options.take, 10);totalCount is a value we get in the response of a request with the GetAll component. It is a number which represents the total amound of records attached to our model in the database.
We use the value of totalCount to determine if there will be another page available for our user to navigate to and to calculate the current page our user is currently at.
Now we understand all the concepts, let's create the pagination. We will create the following elements:
- previous button;
- next button;
- total count text;
- current page text.
There's three things we need to do to make the previous button work:
- When the button is clicked, the
skipvariable in the state should be updated. - When the button is clicked, the
refetchfunction should be called. - When
skip - take < 0the button should be disabled.
<button
  type="button"
  disabled={skip - take < 0}
  onClick={() => {
    refetch({ skip: skip - take });
    setSkip(prevSkip => prevSkip - take);
  }}
>
  Previous
</button>The next button is pretty much the same as the previous button. The only differences are that we should add take to the skip variable and we should check skip + take >= totalCount for the buttons disabled state.
<button
  type="button"
  disabled={skip + take >= totalCount}
  onClick={() => {
    refetch({ skip: skip + take });
    setSkip(prevSkip => prevSkip + take);
  }}
>
  Next
</button>We want to show our users how many records are available in total. We use the totalCount value for this.
<span className={classes.totalCount}>
  {totalCount} Item{totalCount !== 1 ? 's' : ''}
</span>We want to show our users on which page they currently are and how many pages there are in total. We use skip, take and totalCount for this.
<span className={classes.spacingRight}>
  {skip / take + 1} of {Math.ceil(totalCount / take)}
</span>When you have followed all previous steps, your Component should look something like this:
(() => ({
  name: 'List',
  type: 'DATALIST',
  allowedTypes: [],
  orientation: 'HORIZONTAL',
  jsx: (
    <div>
      {(() => {
        const [skip, setSkip] = useState(0);
        const take = parseInt(options.take, 10);

        return (
          <B.GetAll modelId={options.model} skip={0} take={take}>
            {({ loading, error, data, refetch }) => {
              if (B.env === 'dev') {
                return (
                  <>
                    <ul>
                      {[1, 2, 3, 4, 5].map(() => (
                        <li>Data item</li>
                      ))}
                    </ul>
                    <span className={classes.spacingRight}>x Items</span>
                    <span className={classes.spacingRight}>x of x</span>
                    <button type="button">Previous</button>
                    <button type="button">Next</button>
                  </>
                );
              }

              if (loading) {
                return (
                  <ul>
                    <li>Loading...</li>
                  </ul>
                );
              }

              if (error) {
                return (
                  <ul>
                    <li>Error...</li>
                  </ul>
                );
              }

              const { results, totalCount } = data;

              return (
                <>
                  <ul>
                    {results.map(result => (
                      <li>{result.name}</li>
                    ))}
                  </ul>
                  <span className={classes.spacingRight}>
                    {totalCount} Item{totalCount !== 1 ? 's' : ''}
                  </span>
                  <span className={classes.spacingRight}>
                    {skip / take + 1} of {Math.ceil(totalCount / take)}
                  </span>
                  <button
                    type="button"
                    disabled={skip - take < 0}
                    onClick={() => {
                      refetch({ skip: skip - take });
                      setSkip(prevSkip => prevSkip - take);
                    }}
                  >
                    Previous
                  </button>
                  <button
                    type="button"
                    disabled={skip + take >= totalCount}
                    onClick={() => {
                      refetch({ skip: skip + take });
                      setSkip(prevSkip => prevSkip + take);
                    }}
                  >
                    Next
                  </button>
                </>
              );
            }}
          </B.GetAll>
        );
      })()}
    </div>
  ),
  styles: () => () => ({
    spacingRight: {
      marginRight: 10,
    },
  }),
}))();
The following GIF shows the result in the Page Builder:
The result in the runtime:

Will be added later...