Modern Dashboard Lite Part 1 - berkansezer77/home-assistant GitHub Wiki

Part 1 is the topbar section. This where the person and the light cards exist.
Person cards design belongs to Rhysb from the community. I just tweaked it a bit. Rhysb has many designs and codes based on css on the mushroom page at the community.
You can check his work at:
https://community.home-assistant.io/t/mushroom-cards-build-a-beautiful-dashboard-easily/388590/6334
Okay lets start with the code.
Topbar has two main screens. First visible one is where the chips exist. The second part is the light control page. You can swipe from right to left navigate between pages.
Line 7 is the part where two pages are clarified with swiper card code. Line 19 is where the first visible part starts. Line 1850 is the part where the second page(Light control page) starts.
Line 23 is where the menu chip exist. This chip activates the kiosk mode with a single tap feature. Kiosk mode simply disables the sidebar and topbar of home assistant to give the user a complete full page experience. When you tap menu icon page displays as full screen. To exist just double tap the menu icon.

To activate the kiosk mode certain code should be written into the configuration raw. To do that

CLick on the three dots and choose Raw Configuration Editor.
Your configuration sample should be like for Kiosk mode to function properly.

Line 38 is the place where person card starts. First card is for myself. I used browser mode to display this card. When you click the person chip a browser mode popup appear and person card will be inside of that popup.

Pop up cards are inserted into tap action. You can also change this with double_tap_action or hold_action as well. So our person card starts at line 42.
                    tap_action:
                      action: fire-dom-event
                      browser_mod:
                        service: browser_mod.popup
                        data:
                          title: Berkan
                          content:
This code has to be well placed in order for popup to run properly. The content of the card starts at line 49 under "content" section.

This is my person card. Starting at line 49.
You can change person.berkan_sezer fields to your name. If you are using home assistant companion app and get the location details there won't be a problem.
There are a few things you should be careful at this person cards. I have added "Places" integration into the card so that I can see the open address of the person. You can download "Places" integration from Hacs. After you download it restart your home assistant. When everything is up go to integrations page and search for "Places". Now you have to setup places information for the people you want to display. My configuration is down below.

After submitting you should now have a new sensor named "sensor.berkan_konum". Now go to the developer tools and look for the attributes of this card.

After selecting it attributes should appear.

What I need from those attributes is "Formatted Address". That is what I used in my design.
The places part at the persons card starts at line 207. At line 210 I Used formatted address from the "Places" integration.
Line 245 is where I took work and home distance data from Google Maps integration. I am not going to go deeply on this but I can say alternatively you can use wize integration here as well. There are many youtube vıdeos on waze and google maps installations to Home Assistant.
Line 486 is where I sent my mobile phone(iOS) a emergency sms to make sound on phone and locate it. For this message I use notify service of Home Assistant.
                                    tap_action:
                                      action: call-service
                                      service: notify.mobile_app_berkan
                                      data:
                                        message: I'im here you idiot
                                        data:
                                          push:
                                            sound:
                                              name: default
                                              critical: 1
                                              volume: 1
With the above code starting at line 489 I can use this service to notify my companion app at my phone. Rhysb also added some little information to the css code explaining what the line is for.

Secon person card starts at line 680 and the 3rd is at 1061. As you can see 2. and 3.rd person cards holds less information then the first one. That is because they don't have Home Assistant companion app. Location information comes directlu from life360 app. That means I can not access to their phone battery and other stuff as entites in ha. Overall less fields are placed on their person card.
Netflix Card
Line 1442 is the place where you can find Netflix movie or show posters. Okay how we set this up ? Let's explain through the code.
                                          - type: picture
                                            image: >-
                                              https://m.media-amazon.com/images/M/MV5BZTgyYjZjMzktNjk1OC00ZDdmLThmODEtNzUxMzcyY2Y1YzBmXkEyXkFqcGdeQXVyMjMzNTEyMzk@._V1_.jpg
                                            tap_action:
                                              action: call-service
                                              service: script.turn_on
                                              service_data: {}
                                              target:
                                                entity_id: script.start_raising_dion
                                            hold_action:
                                              action: none
                                            alignment: justify
So as you can see I have created a simple script for this show. The script code is :
alias: Start Raising Dion
sequence:
  - service: androidtv.adb_command
    data:
      command: >-
        am start -n com.netflix.ninja/.MainActivity -a
        android.intent.action.VIEW -e amzn_deeplink_data 255824129
    target:
      entity_id: media_player.fire_tv_192_168_1_86
mode: single
icon: mdi:television
This is a sample script.
Edit: You don't actually need a seperate script to start the show. Script code can also be implemented to the dashboard code. All you have to do is copy from service: androidtv.adb_command part.
I have used an adb command for my android tv to start the show. But how do I find the code for the specific show ? Well it is easy.
- Go to Netflix on your browser.
- Search for your favorite show. In my example raising dion.
- Click on the show to start.
- When the show started the address bar will change and will display the shows id. Every content has its unique id.

255824129 is this shows id.
All you have left is to find show poster from the net. Just search on Google and when you find it place it to the code.

Now you are set. With a single click your show will start or resume on your Android TV.
Line 1698 is the place where I have my Google Maps chips. You have to install Google Maps integration for that. There are lots of videos on youtube. Just be cautious because Google Maps only lets you to query 20000 traffic info. After that you are being charged. Google asks for credit card information before you enroll for developers account. So the only way to guarentee for not exceeding is to put a limitation to developers account settings. A daily barrier will be useful.
More info can be found at here :
https://www.home-assistant.io/integrations/google_travel_time/
I used a 2 conditional cards here to display seperately.

The first one displays a traffic history bar. And the second one is iframe showing from home to work.

Line 1802 is the last chip consisting of all my light entries. I grouped them under "sensor.open_light_total". It displays the total number of open lights at home. If no lights is on then the icon turns into grey.
- platform: template
  sensors:
    open_light_total:
      value_template: >
        {% set lights = ['light.all_house_lights',] %}
        {{ expand(lights) | selectattr('state','eq','on') | list | count }}
Enter this into your sensor.yaml. And after that refresh your template entites at developers tool.

You should now have the new sensor named "sensor.open_light_total". Beware that this code is for only lights that are on, but not the switches. If you like you can also create one for switches too.
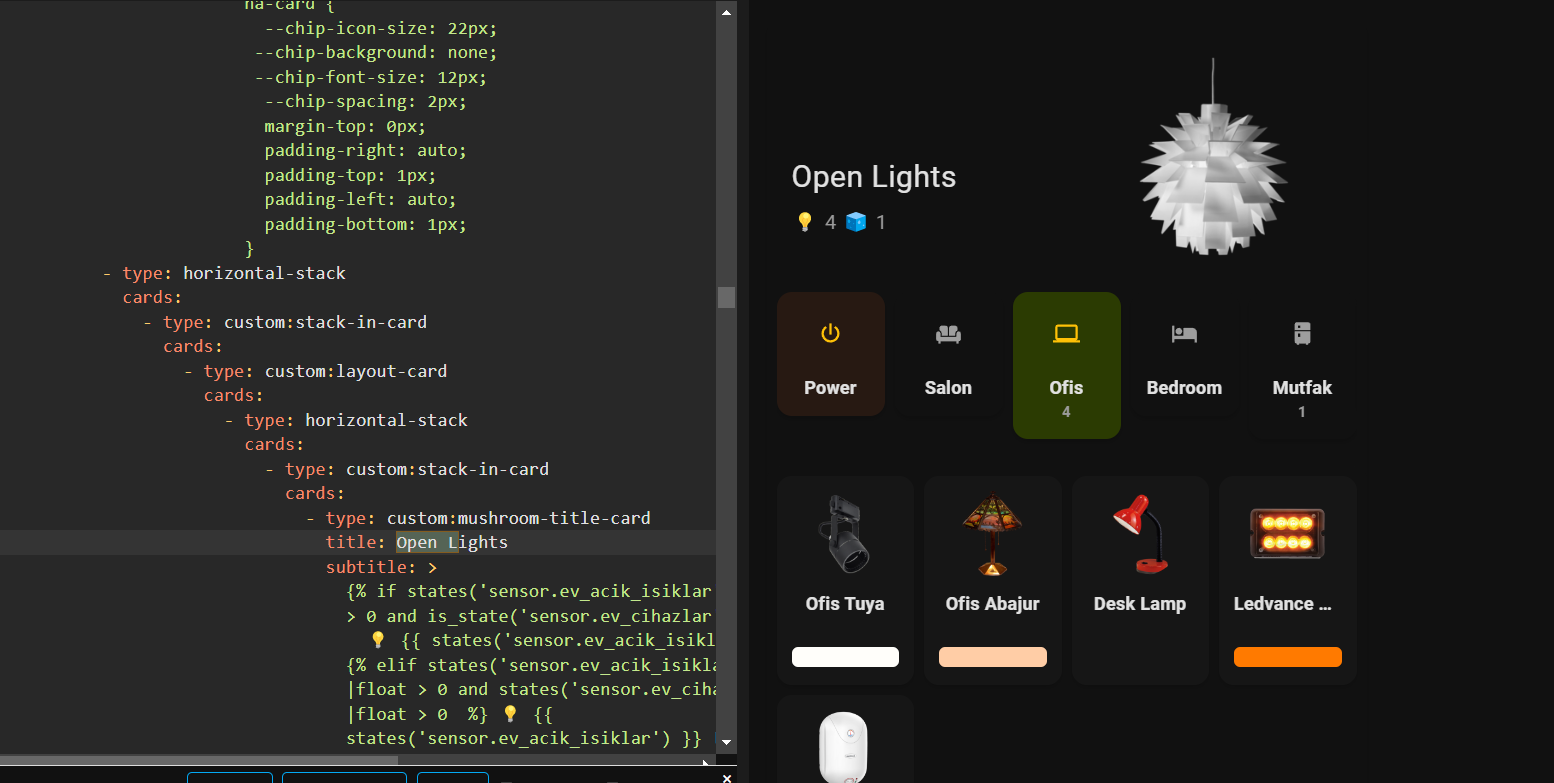
Line 1850. Now we go into the second page where the light controls exist.

I have seperated the lights and devices. So as seen in the example I have 4 lights and 1 device(water heater) that are currently on.
So 2 seperate sensors is what I need. "sensor.ev_acik_isiklar" and "sensor.ev_cihazlar" are the sensor names.
Sensor.ev_cihazlar's sensor.yaml code is :
- platform: template
  sensors:
    ev_cihazlar:
      value_template: >-
        {% set total = 0 %}
        {% if is_state('switch.termosifon_plug', 'on') %}
          {% set total = total + 1 %}
        {% endif %}
        {% if is_state('input_boolean.bedroom_klima', 'on') %}
          {% set total = total + 1 %}
        {% endif %}
        {% if not is_state('media_player.fire_tv_192_168_1_86', 'off') %}
          {% set total = total + 1 %}
        {% endif %}
        {{total}}
I wanted to list 3 of my devices seperately. Air condition, water heater and my fire tv.
"sensor.ev_acik_isiklar" is
- platform: template
  sensors:
    ev_acik_isiklar:
      value_template: >-
        {% set lights = ['light.all_house_lights',],
        ['switch.all_house_switches',],
        %} {{ expand(lights) | selectattr('state','eq','on') | list |
        count }}
Now I have also added the swithces to the code above. So you can group your ligh and switches together and use them in this code to get the exact number of open lights at your house. In my example I have grouped lights under "light.all_house_lights" and switches under "switch.all_house_switches". From the UI.

Line 1908 is the place where the light picture stands.

On line 1909 I used a boolean named "input_boolean.advanced_mode_stats". This boolean has no function. It is only used because the picture entity card asks for an entity in order the card to function. But if you like you can group all your house lights and switches from the sensor.yaml. With the new sensor when all lights are off this boolean will go off and the light picture will turn into grey as of the nature of the picture entity card.

I didn't used that function in my setup, instead I went with a disfunctional boolean. So the light picture will always be colorful.
Line 1941 is where room cards start. These card will turn on and off the lights all around the house. It will also give you the number of the open lights in that room if there is any.

Room Presence
First button is the power button (Line 1953). This button, when tapped, checks which room you are in and turns off the lights at other rooms. It won't do anything for the room where you are present. The button will check the presence from the motion sensors with the help of an automation. First we have to create the sensor which tells the last room we entered.
- platform: template
  sensors:
    last_motion:
      friendly_name: 'Last Motion'
      value_template: >
        {% set t = expand('binary_sensor.hue_motion_sensor') | map(attribute='last_changed') | max %}
        {% set s = (expand('binary_sensor.hue_motion_sensor') | selectattr('last_changed', 'eq', t) | list)[0] %}
        {% if( s | selectattr('state', 'eq', 'on') ) -%}
        {{s.name}}
        {%- endif %}
Enter this code into your sensors.yaml. This is made for hue sensors. If you have seperate sensor from different brands then I have another solution for you.
You can group your sensors from the ui. Go to the helpers section and choose group then select binary sensors. Select your motion sensors and name them. After saving you should have a new sensor. In my example the sensor name is "binary_sensor.hue_motion_sensors"
After that put it into this code.
- platform: template
  sensors:
    recent_motion1:
      friendly_name: 'Recent Motion'
      value_template: >-
        {% set x = expand('binary_sensor.hue_motion_sensors')
                    | selectattr('state', 'eq', 'on')
                    | sort(reverse=true, attribute='last_changed')
                    | list %}
        {% if (x | count > 0) and (((as_timestamp(now()) - as_timestamp(x[0].last_changed)) | int) < 1) %}
          {% if (area_name(x[0].entity_id) != None) %}
            {{ area_name(x[0].entity_id) }}
          {% else %}
            {{ x[0].name }}
          {% endif %}
        {% else %}
          {{ states('sensor.recent_motion1') }}
        {% endif %}
Now after updating the template entites from developer tools you should have a new sensor called "sensor.recent_motion1"
Now all you have to do is create a button to function and ofcourse an automation. From helpers section create your button. In my example the button name is "input_button.modern_dashboard_turn_off_lights_in_other_rooms". After creating replace it in the below automation.
Room Presence Lights Off Automation
In the automation I used areas to turn off lights. If you like you can use each light seperately or use light groups. It is up to you.
Line 2007 is the place where I start room cards. First is my livingroom with the name "Salon". As in line 2010 I used a template sensor to count lights that are on in my living room. The code is :
- platform: template
  sensors:
    open_light_salon:
      value_template: >
        {% set lights = ['light.light_group_salon',] %}
        {{ expand(lights) | selectattr('state','eq','on') | list | count }}
Again I used a light group which I created from UI. The light group name "light.light_group_salon". It consist of all my 15 lights at the living room. And when any of them are open the card shows the number.

The remaining cards are cretaed with the same method and divided with a swiper card. The second line of cards starts at Line 2171.
There is a hidden scenes section in this part. Line 2341 is the place where this section starts. It is being used with a conditional card.

I created an input boolean named "input_boolean.modern_dashboard_lights_scenes" on Line 2343 to hide this section. And to activate this code I placed this input boolean to the first "Power" card with a double tap feature.

As you can see double tapping the power button will show the secret scenes part and double tapping again will hide it.
So starting from Line 2356 scenes specific to the rooms will start. On Line 2356 is the first section for my office. I used a conditional card here to display the scenes ONLY WHEN LIGHTS AT OFFICE ARE ON. Even a single light can activate and show scene section but the lights are off at the office scenes will disappear.
You can swipe between open rooms scenes options.
Line 2608 is where my light cards start. I used a grid option here. In my example 4 lights are displayed side by side. To lower that value for example to frop that to 3 just change the number at line 2615.
Remember I used a conditional card here. The light cards will only show if they are turned on. Otherwise they will disappear from the list. Lets examine a sample card.
Starting from Line 2618
                                  - type: conditional
                                    conditions:
                                      - entity: light.hue_color_lamp_1
                                        state: 'on'
                                    card:
                                      type: custom:stack-in-card
                                      cards:
                                        - type: custom:mushroom-template-card
                                          primary: Sarkıt Sağ
                                          picture: /local/png/md-lite/sarkitsag.png
                                          entity: light.hue_color_lamp_1
                                          tap_action:
                                            action: toggle
                                          double_tap_action:
                                            action: more-info
                                          fill_container: false
                                          layout: vertical
                                          multiline_secondary: false
                                          card_mod:
                                            style: |
                                              ha-card {
                                                background: none;
                                                --icon-size: 68px;
                                                background-size: 55px 40px;
                                                {% if is_state(config.entity, 'on') %}
                                                {% else %}
                                                  filter: grayscale(100%);
                                                {% endif %}
                                              }
                                        - type: custom:mushroom-light-card
                                          entity: light.hue_color_lamp_1
                                          use_light_color: true
                                          show_brightness_control: true
                                          icon_type: none
                                          primary_info: none
                                          secondary_info: none
                                          layout: vertical
                                          tap_action:
                                            action: none
                                          hold_action:
                                            action: none
                                          double_tap_action:
                                            action: none
                                          card_mod:
                                            style: |
                                              ha-card {
                                                background: none;
                                                padding: 0px 11px 11px;
                                                --mush-rgb-disabled: 189,189,189;
                                                --mush-rgb-state-light: 255, 152, 0;
                                                --control-height: 16px;
                                                --control-top: 16px;
                                                --control-border-radius: 5px;
                                      card_mod:
                                        style: |
                                          ha-card {
                                            background: rgba(var(--rgb-primary-text-color), 0.025);
                                            height: 167px !important;
                                            {% if is_state('input_boolean.modern_dashboard_lights_background_light', 'on') %}
                                              background: rgba(17, 2, 59, 2.85);
                                            {% endif %}
                                          }

The light name is "Sarkıt Sağ", a light in my living room. Tapping action(Line 2629) will turn it off. Double tap will show you more-info screen.

One important thing!!! The light card shown above is a native Home Assistant Card introduced with version 2023.03. So if you have a older version then this you won't see this card instead you will see the old light card information.
Line 2647 is where the light bar stands. You can change the light power from 0 to 100 from here.
Line 2671 is where the css magic happens. As you can see my cards have no background. They are all transparent.

So when you have multiple room lights turned on you may have some difficulties to identify which light belongs to which room. Don't worry I have also implemented a secret boolean to prevent this. As you can see on line 2676 a boolean will change the color of the light to the color of the specific room. The boolean I used here is named "input_boolean.modern_dashboard_lights_background_light" and this is being activated through a single click to the light picture.

Now the light cards are colored.

I used specific colors for different rooms. The color for the living room is blue.

You can change the color from Line 2684. The rgba color code is easy to find. Just write color picker to Google and replace the first three lines to color picker at google.


On Line 4199 I created a light card for my switch. If you can notice, this card has no light card because it is a switch.
I also created cards for my devices like water heating. Line 4119 represents my water heater.

this line shows the device when water heater is not boiling water. But Line 4159 will be shown if the heater is boiling water and the water heater picture will turn into red from white.
So this is the part one. Part 2 is also coming soon.