D7 to D9 - ben600324/wiki GitHub Wiki
This article explains the steps needed for migrating a Drupal 7 site to Drupal 9.
Instructions Before doing any D7->D9 migration
This guide provides a helpful walkthrough of the process with screenshots of the key stages. https://www.drupal.org/docs/upgrading-drupal/upgrade-using-web-browser
As you prepare your D7 and D9 sites, make database backups of both sites so that you can keep snapshots of your progress. Making backups will allow you to roll back either site to an earlier database version if necessary.
Drupal 7 Setup
Develop a plan for controlling change on your live D7 site. You typically cannot repeat a second migration with the same Drupal 8 or 9 database once your initial migration has occurred, so if possible, it is best to move over all your database essentials in one go. If you expect your D7 site’s content to continue evolving, talk with your team about when the best time to migrate the site is — as well as whether configuration, content, users, and other aspects of your D7 site should be frozen at a particular time. If content updates do need to cease, discuss when and for how long.
Identify the status of each Drupal 7 module. Research the modules your D7 site has and categorize them. Some may be compatible with Drupal 9, some may have been moved to Drupal core, and some may not be compatible. Additionally, some modules that are compatible with Drupal 9 may still be in alpha and beta states, in which case they are likely not to have upgrade paths.
Create a pre-migration instance of your Drupal 7 site. While you may have a working local copy of your D7 site, it is best to create a new instance that can be more streamlined with fewer modules turned on. It will likely look different from your fully-functioning local version, and that’s usually fine — as ultimately, it is just a place from which the D9 instance will pull data and files.
It is best to turn off Drupal 7 modules that do not have upgrade paths. Doing so will simplify your upgrade and prevent errors, though it may also mean having to delete the associated fields, configurations, or other site assets to prevent migration errors. In these cases, you will need to take additional steps to make sure the Drupal 9 site ends up with these fields and configurations, either by manually re-adding them or by using custom code to support their migration.
Clear the Drupal 7 database log before importing it locally. Before making your local migration website instance, I recommend going to /admin/reports/dblogand clearing the database log. For me, it made my database dump smaller and easier to import into my pre-migration D7 site instance — as the watchdog table, which initially had been unreasonably large, ended up being far smaller after I had cleared the logs. Just back up up your D7 database before clearing the logs in case you want to check them for some reason.
Drupal 9 Setup
Become familiar with Drupal 9’s environment requirements. This will help you make sure your local production environment and remote server are set up properly. For instance, you will see from the Environment requirements of Drupal 9 that D9 requires PHP 7.3 and Apache 2.4.7. On local sites.
Use a fresh Drupal 9 database with no content or configuration. Refrain from adding any content or content types, and do not configure anything. Only turn on the modules you think you will need, such the migration modules that come bundled with Drupal: Migrate, Migrate Drupal, and Migrate UI. Besides enabling the migration modules, I also turned on the Entity module.
Be careful about Drupal 9 modules that are not yet stable. Sometimes, turning on modules in their alpha or beta states can cause issues with your database that interfere with the migration. You can ensure that you only download stable modules by keeping your composer.json minimum version set to stable, but this may not always be practical if your site will rely heavily on modules that do not yet have stable releases. If it is important for your site to use a module that only has an alpha or beta release for Drupal 9, downloading it and keeping it disabled should not affect your database. If you need to enable it, make a database backup before doing so in case enabling it adversely affects your site’s database. Once you think you have the necessary modules enabled, go to /upgrade to begin the migration.
Learn to export and import database configurations. So let’s say two weeks go by after you run the database migration. As you are admiring your wonderful new D9 views, you find out that despite your best efforts to control change, numerous content updates have occurred on your D7 site. And you quickly begin to realize that all these D7 updates now require you to wipe out your D9 database and re-run the migration to import all that new content. Fortunately, Drupal 8 and 9 allow you to export database configurations to config files using either a Drush workflow or a Drupal UI workflow. And once you have those config files sitting comfortably in their sync directory, you can import them back into a different version of your site’s database — either one in a different environment (such as dev, stage, or production) or one in the same environment but at a different state. So before you drop all those tables and start that migration over again, try exporting your D8 or D9 configuration. Then you can start up with a fresh Drupal site, re-run the migration, and import the configurations you exported — which should contain those views you built — back into your database. That way, you can bring in your new content while resurrecting those lovely Drupal 9 views.
Troubleshooting Issues
Check the list of modules that will not be upgraded. After you connect to your D7 database, you will likely still see a list of D7 modules that will not be upgraded. Once you see the list, you may want to turn off additional modules and restart the migration.
Take notes during and after the migration. During the migration, you will see messages conveying both progress and any errors. The messages will change quickly, so if you see errors, I recommend copying and pasting representative ones into a text editor. After the migration, check the database logs on your D9 site at /admin/reports/dblog to study errors, warnings, and other messages further.
Develop strategies for content that may not automatically move over. For me, this included content handled by the Field Collection and Video modules, which were not upgraded. This is where you may want to either manually re-add the content on your D9 site or try running custom scripts.
If necessary, consider more complex approaches. If you have a complex site, or if you have stubborn upgrade errors produced by parts of your site that you really need, there are more complex migration approaches that offer more options and flexibility while also requiring additional coding, additional modules, and a more complex Lando configuration.
One method involves using two additional modules: Migrate Plus and Migrate Tools, using Drush. While figuring out the order of steps can be a learning curve, it enables more granular control of your migration
Source
Clone down source D7 site on your local
Check core & contrib updates. Update in case there are updates with
ddev drush up ddev drush updb Destination
Setup on your local for development using DDEV
Enable Migrate modules+Migrate Upgrade module
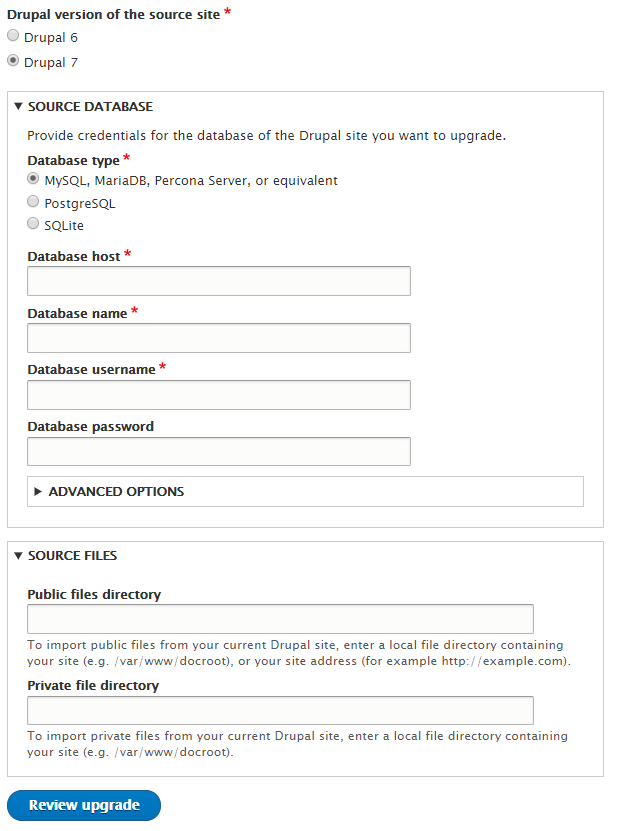
Hit /upgrade
Provide source DB connection details https://www.drupal.org/files/d8-upgrade-source-site.png
Save it & check the module upgrade status.
List down the modules those don’t have upgrade paths, discuss them with team. In case we don’t need/can’t fix the upgrade, good to disable them in source site.
Migration Steps [Mostly UI]
To match all D7 modules in D9, list down all enabled modules
ddev drush pm-list --pipe --status=enable Prepare the module list in terms of composer.json file or write a bash script to install all of them in Drupal 9
ddev composer require drupal/$1
ddev drush en
For ECK entities/bundles https://www.drupal.org/project/eck , install https://www.drupal.org/project/eck/releases/8.x-1.x-dev (June 2021) module
For views install https://www.drupal.org/project/views_migration
Recreate the migration entities using /upgrade
Run
ddev drush mim --group=default --all --continue-on-failure --force -v -d Please check/test the migrated contents
CLI
Start with enabled Migrate Upgrade+Migrate Plus+Migrate Tools UI
For ECK entities/bundles https://www.drupal.org/project/eck , install https://www.drupal.org/project/eck/releases/8.x-1.x-dev (June 2021) module
For views install https://www.drupal.org/project/views_migration
Run
ddev drush migrate-upgrade --legacy-db-url=mysql://user:pass@server/db --configure-only Above command will configure not migrate the D7 contents
Check /admin/structure/migrations
You may also export all migration entities in a separate folder for record
ddev drush cex Run
ddev drush mim --group=drupal7 --all --continue-on-failure --force -v -d
UI/CLI options have been mentioned separately here just because of ECK entities. So being a developer you will always choose the CLI option with debugging. While experimenting with CLI ECK entities didn’t have the migration entities created except ECK types/bundles. UI option did work well for that.