How to set up pywal with dusk - bakkeby/dusk GitHub Wiki
This guide gives an introduction to using pywal with dusk and other programs.
Pywal is a tool that generates a palette from the dominant colours in an image.
It then applies the colours system-wide and on-the-fly to all of your favourite programs, provided it is set up correctly.
You can get pywal from:
- https://github.com/dylanaraps/pywal (no longer maintained)
- https://github.com/eylles/pywal16 (fork of pywal)
- Arch - package
python-pywal
For manual installation refer to the project's installation wiki page.
The first thing that we are going to try is to find a desired wallpaper and run the following command:
$ wal -i wallpaper.jpgYou may notice some changes like the wallpaper and terminal colours changing (if your terminal emulator supports) it.
The help output (for reference):
$ wal --help
usage: wal [-h] [-a "alpha"] [-b background] [--backend [backend]]
           [--theme [/path/to/file or theme_name]] [--iterative]
           [--saturate 0.0-1.0] [--preview] [--vte] [-c] [-i "/path/to/img.jpg"]
           [-l] [-n] [-o "script_name"] [-q] [-r] [-R] [-s] [-t] [-v] [-e]

wal - Generate colorschemes on the fly

options:
  -h, --help            show this help message and exit
  -a "alpha"            Set terminal background transparency. *Only works in URxvt*
  -b background         Custom background color to use.
  --backend [backend]   Which color backend to use. Use 'wal --backend' to list
                        backends.
  --theme [/path/to/file or theme_name], -f [/path/to/file or theme_name]
                        Which colorscheme file to use. Use 'wal --theme' to list
                        builtin themes.
  --iterative           When pywal is given a directory as input and this flag is
                        used: Go through the images in order instead of shuffled.
  --saturate 0.0-1.0    Set the color saturation.
  --preview             Print the current color palette.
  --vte                 Fix text-artifacts printed in VTE terminals.
  -c                    Delete all cached colorschemes.
  -i "/path/to/img.jpg"
                        Which image or directory to use.
  -l                    Generate a light colorscheme.
  -n                    Skip setting the wallpaper.
  -o "script_name"      External script to run after "wal".
  -q                    Quiet mode, don't print anything.
  -r                    'wal -r' is deprecated: Use (cat ~/.cache/wal/sequences &)
                        instead.
  -R                    Restore previous colorscheme.
  -s                    Skip changing colors in terminals.
  -t                    Skip changing colors in tty.
  -v                    Print "wal" version.
  -e                    Skip reloading gtk/xrdb/i3/sway/polybar
There is a lot of things that is happening when you run this command.
Some of the things that are of interest are:
- it sets the wallpaper
- it generates configuration based on templates
- it sends shell escape codes to running terminals
- it saves shell escape codes in ~/.cache/wal/sequences
We are going to have a closer look at these in the following sections.
In dusk you can use Xresources to control the colour scheme. You can make pywal generate Xresources by using templates.
The question then becomes how do I get pywal to generate Xresources for dusk?
You can have a look at existing templates in the repository:
You can store your personal templates in the following directory:
- ~/.config/wal/templates/
When you run wal -i wallpaper.jpg then the generated files are placed under:
- ~/.cache/wal/
Note that if you add a file like colors.Xresources in your config directory then that will
override the predefined (default) template. As such it is better to add files in there rather
than trying to hack the predefined templates.
In the case of dusk you have two main options when it comes to setting up your template:
- you can either have the template set up all the resources or
- you can generate a dusk theme resource file
The latter has the benefit that many colours cascade down which means that there are less resources to control.
We will run through both options to compare.
The available resources for dusk can be found on the Xresources wiki page.
We will create a file ~/.config/wal/templates/dusk.Xresources that contains the following:
dusk.norm.bg.color: {color1}
dusk.norm.border.color: {color0}
dusk.titlenorm.bg.color: {color1}
dusk.titlesel.bg.color: {color2}
dusk.scratchnorm.bg.color: {color1}
dusk.scratchsel.bg.color: {color9}
dusk.hidnorm.bg.color: {color1}
dusk.hidsel.bg.color: {color2}
dusk.urg.bg.color: {color5}
dusk.marked.bg.color: {color6}
dusk.wsnorm.bg.color: {color1}
dusk.wsvis.bg.color: {color4}
dusk.wssel.bg.color: {color2}
dusk.wsocc.bg.color: {color1}

dmenu.norm.bg.color: {color1}
dmenu.sel.bg.color: {color2}
dmenu.border.bg.color: {color0}
Note that we do not define all foreground and border colours here. We are assuming that pywal is generating a dark theme and that the default foreground colours are sufficient.
You may want to add more resource strings depending on your needs.
After running wal -i wallpaper.jpg you should now have a file ~/.cache/wal/dusk.Xresources that
looks something like this:
dusk.norm.bg.color: #693D42
dusk.norm.border.color: #0A0A0D
dusk.titlenorm.bg.color: #693D42
dusk.titlesel.bg.color: #3E444F
dusk.scratchnorm.bg.color: #693D42
dusk.scratchsel.bg.color: #693D42
dusk.hidnorm.bg.color: #693D42
dusk.hidsel.bg.color: #3E444F
dusk.urg.bg.color: #946865
dusk.marked.bg.color: #798379
dusk.wsnorm.bg.color: #693D42
dusk.wsvis.bg.color: #B86A5D
dusk.wssel.bg.color: #3E444F
dusk.wsocc.bg.color: #693D42

dmenu.norm.bg.color: #693D42
dmenu.sel.bg.color: #3E444F
dmenu.border.bg.color: #0A0A0D
Now we need to include the above in our ~/.Xresources file.
The easiest way to do that is to add a line to include the generated file.
#include "/home/username/.cache/wal/dusk.Xresources"
After that we need to reload resources with the following command:
$ xrdb ~/.Xresourcesand trigger dusk to to update the resouces:
$ duskc run_command xrdbWe are running the commands manually for now to get a feel for what is needed. We will place these in a script later.
Next we will look into doing the same using the dusk resource templates.
For general information on how to set up and use dusk theme templates I would recommend that you have a read over the following page:
We will create a file ~/.config/wal/templates/dusk.res that contains the following:
#define COLOR0 {color0}
#define COLOR1 {color1}
#define COLOR2 {color2}
#define COLOR3 {color3}
#define COLOR4 {color4}
#define COLOR5 {color5}
#define COLOR6 {color6}
#define COLOR7 {color7}
#define COLOR8 {color8}
#define COLOR9 {color9}
#define COLOR10 {color10}
#define COLOR11 {color11}
#define COLOR12 {color12}
#define COLOR13 {color13}
#define COLOR14 {color14}
#define COLOR15 {color15}
#define BASE_BACKGROUND {color1}
#define BASE_FOREGROUND #bababa
#define CURSOR #bababa

#define SELECTED_FOREGROUND #dadada
#define SELECTED_BACKGROUND COLOR2
#define SCRATCHNORM COLOR3
#define SCRATCHSEL COLOR9
#define HID_NORM_FG_COLOR BASE_FOREGROUND
#define HID_NORM_BG_COLOR BASE_BACKGROUND
#define HID_SEL_FG_COLOR COLOR3
#define HID_SEL_BG_COLOR BASE_BACKGROUND
#define WS_NORM_FG_COLOR BASE_FOREGROUND
#define WS_NORM_BG_COLOR BASE_BACKGROUND
#define WS_SEL_FG_COLOR SELECTED_FOREGROUND
#define WS_SEL_BG_COLOR SELECTED_BACKGROUND
#define MARKED_FG_COLOR COLOR7
#define MARKED_BG_COLOR COLOR6
#define BORDER COLOR0
#define WARNING_FG_COLOR #dadada
#define WARNING_BG_COLOR COLOR5
#define URGENT_FG_COLOR COLOR0
#define URGENT_BG_COLOR COLOR5
After running wal -i wallpaper.jpg you should now have a file ~/.cache/wal/dusk.res that
looks something like this:
#define COLOR0 #0A0A0D
#define COLOR1 #693D42
#define COLOR2 #3E444F
#define COLOR3 #635057
#define COLOR4 #B86A5D
#define COLOR5 #946865
#define COLOR6 #798379
#define COLOR7 #d9beb3
#define COLOR8 #97857d
#define COLOR9 #693D42
#define COLOR10 #3E444F
#define COLOR11 #635057
#define COLOR12 #B86A5D
#define COLOR13 #946865
#define COLOR14 #798379
#define COLOR15 #d9beb3
#define BASE_BACKGROUND #693D42
#define BASE_FOREGROUND #bababa
#define CURSOR #bababa

#define SELECTED_FOREGROUND #dadada
#define SELECTED_BACKGROUND COLOR2
#define SCRATCHNORM COLOR3
#define SCRATCHSEL COLOR9
#define HID_NORM_FG_COLOR BASE_FOREGROUND
#define HID_NORM_BG_COLOR BASE_BACKGROUND
#define HID_SEL_FG_COLOR COLOR3
#define HID_SEL_BG_COLOR BASE_BACKGROUND
#define WS_NORM_FG_COLOR BASE_FOREGROUND
#define WS_NORM_BG_COLOR BASE_BACKGROUND
#define WS_SEL_FG_COLOR SELECTED_FOREGROUND
#define WS_SEL_BG_COLOR SELECTED_BACKGROUND
#define MARKED_FG_COLOR COLOR7
#define MARKED_BG_COLOR COLOR6
#define BORDER COLOR0
#define WARNING_FG_COLOR #dadada
#define WARNING_BG_COLOR COLOR5
#define URGENT_FG_COLOR COLOR0
#define URGENT_BG_COLOR COLOR5
Now we need to include the above in our ~/.Xresources file.
We do that by adding the following lines.
#include "/home/username/.cache/wal/dusk.res"
#include "/home/username/.config/dusk/themes/template.txt"
After that we need to reload resources with the following command:
$ xrdb ~/.Xresourcesand trigger dusk to to update the resouces:
$ duskc run_command xrdbDue to the nature of what pywal does (generating a palette based on the dominant colours of an image) there is no guarantee that the generated colours will complement each other or fit.
It should also be noted that the wal templates above are examples and may need tweaking to fit
your personal preferences. For example using color2 to decorate selected windows or workspaces
may not necessarily be the best option.
The wal output prints the palette that was generated.
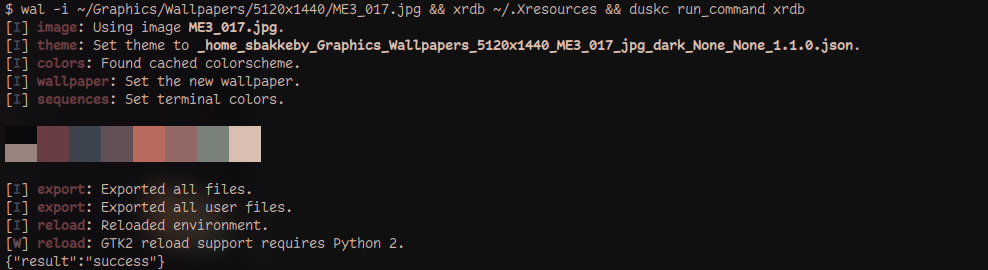
The top row has numbers 0 through 7 and the bottom row has numbers 8 through 15.
The general pattern to observe is that color0 is always black or dark, while color7 is always a light colour. Then color8 is a colour complementary to color0.
If the -l argument is passed to wal to generate a light theme then these colours will be
inverted, while the primary colours 1 through 6 remain the same.
It is also worth noting that colours 9 through 14 are typically the same as colours 1 through 6, so there are not that many colours to choose from.
Tip: Something that may be interesting to play around with is trying out different backends for
wal. This refers to the algorithm that generates the colour scheme.
There are a few to choose from, but note that these need to be installed separately.
$ wal --backend
Backends:
 - colorthief
 - colorz
 - haishoku
 - schemer2
 - wal
The same example as above but using the colorthief backend results in a darker pastel theme:

On Arch some of these are available in the AUR under the following package names:
- python-colorthief
- colorz
- python-haishoku
For schemer2 refer to the github page (depends on go to install):
As you may have noticed when running wal it will change the colours of running terminals.
You may also have noticed that the colours are not persisted when you open a new terminal.
How does pywal change the colours then?
In very simple terms pywal will generate shell escape codes that are sent to each running terminal.
These escape codes are also stored in ~/.cache/wal/sequences. In order to set that colour scheme
when opening a new terminal one can run that file through cat.
$ cat ~/.cache/wal/sequencesA quick fix would be to add the below command to your .bashrc or relevant file for your shell of choice.
(cat ~/.cache/wal/sequences &)That said you may not want to run this if you are in a non-interactive shell or if you are logging into the box via ssh.
In such case you can refer to this snippet that only restores colours for interactive non-login shells:
Alternatively, if you do not want to deal with escape code sequences when you launch a terminal, then note that you can also add a template that generates configuration for your terminal of choice.
For some terminals generating Xresources may be sufficient.
Having worked out how to apply pywal generated colour schemes to dusk you may want to make things simpler by putting this into a script.
There are many ways to go about doing this. In this example we are going to create a shell script that you can pass an image to which then will do everything necessary to make sure the new colour scheme is applied.
First create the file and make sure that it is executable.
$ touch ~/bin/generate_image_theme.sh
$ chmod +x ~/bin/generate_image_theme.sh
Let's imagine that this script is going to take a single image as a command line argument.
We'll want to:
- pass this to
walto generate the theme - make sure to reload
xrdband - make dusk reload Xresources
The script will look something like:
#!/bin/sh

FILE=$1
wal -i "$FILE"
xrdb ~/.Xresources
duskc run_command xrdb
Assuming that ~/bin is in your PATH we can test the script by executing:
$ generate_image_theme.sh ~/path/to/wallpaper.jpgYou can expand the script to include other tasks that need to be done. For example some programs may be configured to reload if they receive certain kill signals.
For example:
killall -q -USR1 polybar
killall -q -HUP dunst
Now let's say that you want to visually see the available wallpapers, select one and apply the theme for that image.
In the following example we are going to use nsxiv for this
purpose, but it will work for sxiv as well.
We are going to take advantage of the external key handler, which is a (shell) script that nsxiv
will execute when the keyboard shortcut of Ctrl+x (x for external) is used followed by
another key combination.
We need to create an executable file ~/.config/nsxiv/exec/key-handler and add the below code to it.
$ mkdir -p ~/.config/nsxiv/exec/
$ touch ~/.config/nsxiv/exec/key-handler
$ chmod +x ~/.config/nsxiv/exec/key-handler#!/bin/sh
case "$1" in
"C-t") while read file; do ~/bin/generate_image_theme.sh "$file"; done ;;
esacThe "C-t" above means that we have chosen Ctrl+t as the secondary key combination for the
external key handler. You can add other handlers as you wish.
Now you should be able to run the program to load all of the wallpapers in a given directory.
$ nsxiv -t ~/path/to/wallpapers/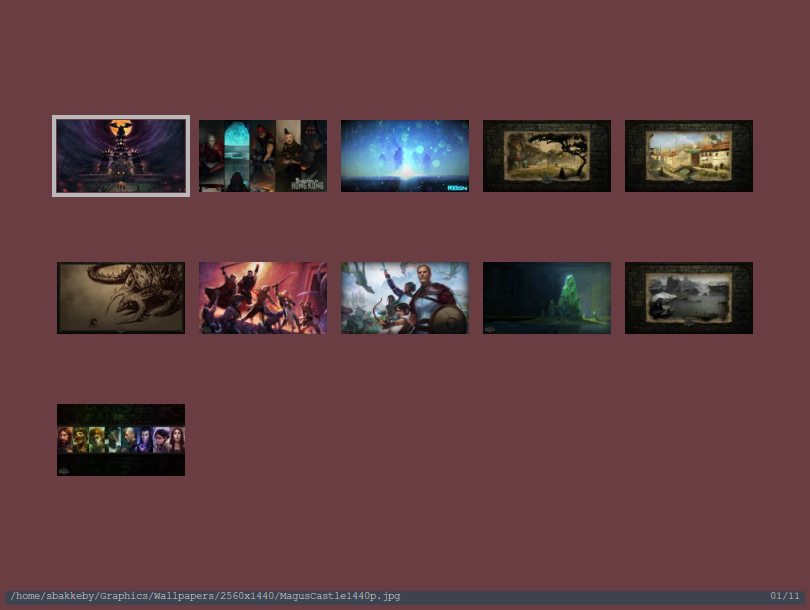
Then you should be able to select any of the wallpapers, hit the Ctrl+x keybinding followed by
Ctrl+t to set the theme based on the that picture.
Besides wal generating a colour scheme based on dominant colours of a picture it also comes with
a set of predefined themes.
These can be listed by passing the --theme argument on its own.
$ wal --theme
There is also theme.sh that has a rich library of (terminal) themes.
Tip: If you are running a multi-monitor setup and you want to use separate wallpapers per monitor
then you can pass the -n argument to wal to skip setting the wallpaper. You can then use other
programs such as feh to handle the setting of the background wallpaper while wal takes care of
the theme generation.
Tip: A hybrid theme approach may help if want a more consistent look and feel.
By hybrid I mean that you have consistent base colours for the bar, and the wal generated colour scheme is only used for highlights (for example what window or workspace is selected).
The approach is relatively simple; just hardcode fixed colour values in the template files.
For the Xresource template hardcode the following resources:
dusk.norm.bg.color: #26241d
dusk.norm.fg.color: #cbc3a9
dusk.titlenorm.bg.color: #26241d
dusk.titlenorm.fg.color: #cbc3a9
dmenu.norm.bg.color: #26241d
dmenu.norm.fg.color: #cbc3a9
and with the dusk resource template:
#define BASE_BACKGROUND #26241d
#define BASE_FOREGROUND #cbc3a9
Alternatively with the Xresource template approach if you do not specify a resource then it will fall back to whatever colour scheme is defined in the configuration file.
Tip: If you want to propagate escape codes to all running terminals manually without using wal
then you can use a shell script along these lines:
for PTS in /dev/pts/[0-9]*; do
	cat ~/.cache/wal/sequences > $PTS
done
(pts is short for pseudo-terminals in this context)
Tip: It is possible to generate the sequences / escape codes via other means. Here is an example that generates sequences based on the current Xresources.
#!/bin/sh

mkdir -p ~/.cache/wal

xrdb -query | awk '
	$1 ~ /^\*\.color([0-9]+):$/ {
		split($1,F,"r")
		printf "\033]4;%d;%s\033\\", F[2], $2
	}
	$1 ~ /^\*\.cursor:$/ {
		printf "\033]12;%s\033\\", $2
	}
	$1 ~ /^\*\.foreground:$/ {
		printf "\033]10;%s\033\\", $2
		printf "\033]13;%s\033\\", $2
		printf "\033]17;%s\033\\", $2
		printf "\033]4;256;%s\033\\", $2
	}
	$1 ~ /^\*\.background:$/ {
		printf "\033]11;%s\033\\", $2
		printf "\033]19;%s\033\\", $2
		printf "\033]4;232;%s\033\\", $2
		printf "\033]708;%s\033\\", $2
	}
' > ${XDG_CACHE_HOME:-~/.cache}/wal/sequences
Back to Guides.