2.3. Battery meter calibration - athertop/MavLink_FrSkySPort GitHub Wiki
The most successful means of establishing accurate LiPo consumption readings in Ardupilot telemetry is by making sure that the LiPo sensor(s) being used is accurately calibrated. In the case of the APM power brick (as used in most Pixhawk configurations) this means spending time and effort to get accurate calibrations for both Voltage (BATT_VOLT_MULT) and Current readings (BATT_AMP_PERVOLT). These sensors however are not 100% accurate, as they rely on measurement techniques based upon a volt drop across a low value resistor through which the current flows. The higher the current, the higher the heat produced and this has an effect on the resistance causing skewed results in current measurement - so it should be expected for a certain level of inaccuracy using these sensor types. We can improve the accuracy of readings using better quality sensors based on other underlying technologies, such as the Mauch line of 'Hall effect' sensors, which come pre calibrated (providing values to assign to BATT_VOLT_MULT and BATT_AMP_PERVOLT in ardupilot).
In an effort to have our telemetry screen display consumption values which are as accurate as possible, the Telemetry configuration page allows us to assign Wh% and mAh% offset values - which more finely tune these values displayed on the main Telemetry screen. This configuration can be seen in the screen shot shown below. The following paragraphs describe techniques for determining how to tune these values.
Telemetry screen battery calibration with the help of a lipo charger
If we fly our model, starting the flight with a freshly, fully-charged battery, and make sure our mAh% and Wh% offsets are both set to zero, then during the flight the numbers representing Wh and mAh on the telemetry screen will increase, indicating battery consumption. Lets say, for this first flight that we land our model when the cell voltage reading drops to about 3.7v (assuming a LiPo battery), and just before we unplug the power from the model we take a note of what the Wh and mAh values read from the Taranis display.
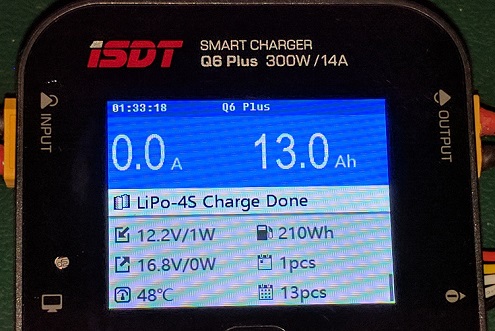
Next, we go home and put our battery on charge again. As most chargers inform us about the amount of energy in Wh and mAh which goes back into our battery during a charge, its then possible to note these values as the battery reaches full charge. Now we also know that the charging process is not 100% efficient - there are losses due to heat, and balancing of cells, so lets assume that the mAh and Wh values that our charger reports to charge the battery is 10% more than has actually gone into the battery itself in capacity - we now have all the figures we need to make a comparison and correctly scale the offset values, giving us a perfect readout on the telemetry screen for future flights:

Note - modern chargers do not always provide Wh values, so some estimation may be required to obtain a usable Wh value during charging - a good starting point is to take the mAh value * 1000 (to get Ah) and multiply this by the nominal voltage of the LiPo - so for a 3s this is 11.1v, for 4s this is 14.8 (3.7v per cell). This method is not perfectly accurate but as best we can manage in this situation.
So, to calculate our offset % values:
In our example our charger displayed a charge of 13.0Ah (or 13,000 mAh) and 210Wh. Lets assume these values are 110% of the actual capacity that our battery actually received, so these values divided by 1.1 would give us a measure of the actual values of the charge which are: 11,800mAh and 190.9Wh

Next, our Taranis display at the end of the flight provided values: 12,959mAh and 193Wh

So to get the offset percentage we calculate:
(1 - (Consumption value from Taranis ÷ Charge value)) x 100
-
First let's look at mAh% offset:
(1 - (12959mAh ÷ 11800mAh)) x 100
(1 - 1.09822) x 100
-0.09822 x 100 = -9.822% - I.e. the charger put in 9.822% less than what our taranis reads, so we should set our mAh% offset to a rounded value of -10%
-
Next let's look at the Wh% offset:
(1 - (193Wh ÷ 190.9Wh) x 100
(1 - 1.011) x 100
-0.011 x 100 = -1.1% - I.e. the charger put in 1.1% less than what our Taranis reads, so we should set our Wh% offset to a rounded value of -1%
After making these offset adjustments, we should test these by carrying out another test flight, and once again compare the subsequent charge values with those reported on the Taranis at the end of the flight. The charge values should hopefully read about 10% more than those of the flight, showing a perfectly calibrated telemetry display. We can then set the Wh capacity value as we see fit to represent the usable Wh value for our battery - this will allow the Battery meter to scale properly representing the usable 80% of the full battery capacity. Happy flying!