Tutorial 2: How to control LED with Pushbutton - ashima-24/interactive_systems GitHub Wiki
About Push button:
A push-button is a simple switch mechanism to control some aspect of a machine or a process. Buttons are typically made out of plastic. The surface is usually flat or shaped to accommodate the human finger or hand, so as to be easily depressed or pushed.
Push buttons or switches connect two points in a circuit when you press them. The example below turns on the built-in LED on pin 13 when you press the button. The "push-button" has been utilized in:
- Calculators
- Telephones
- Kitchen appliances
- Various other mechanical and electronic devices
Components Required:
- Arduino Board
- Momentary Push button
- 10K ohm resistor
- 220 ohm resistor
- Jumper wires
- breadboard
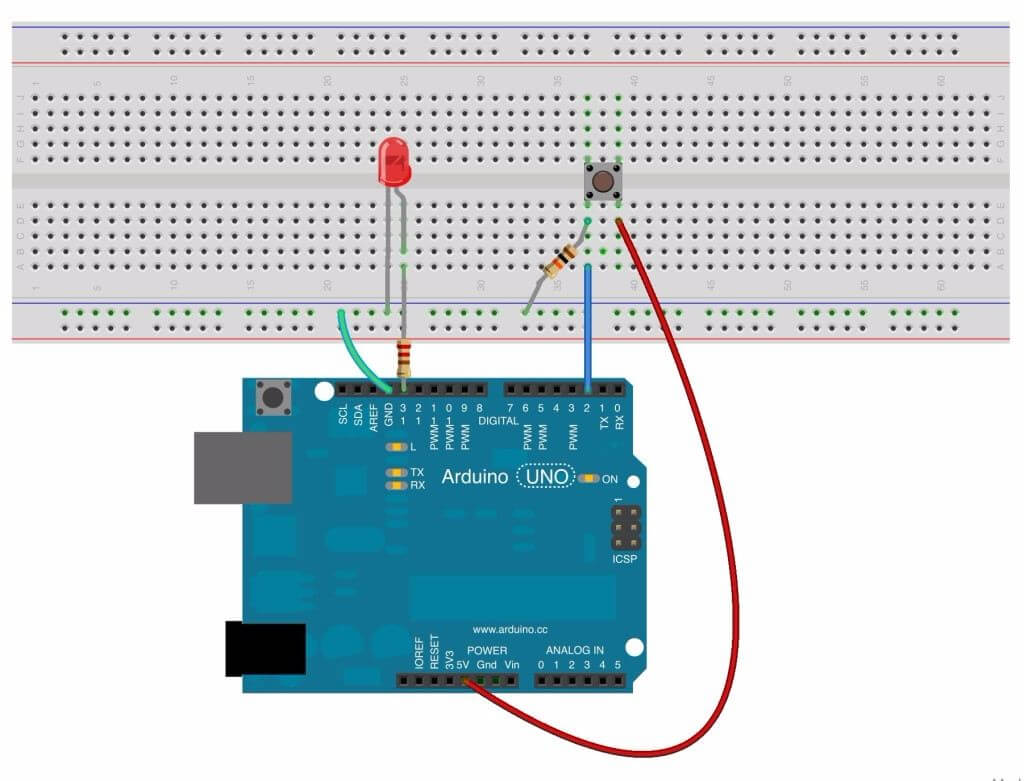
Circuit Diagram:
Youtube Link :
- You can also make circuit connection by taking help of this link.
Note: Here in this video the led pin is connected to digital pin 12 and Button is connected to pin 4. and circuit diagram & code is given Led at Digital pin 13 and momentary push button at pin 2.
Code
/*
  Button

 Turns on and off a light emitting diode(LED) connected to digital
 pin 13, when pressing a pushbutton attached to pin 2.


 The circuit:
 * LED attached from pin 13 to ground
 * pushbutton attached to pin 2 from +5V
 * 10K resistor attached to pin 2 from ground

 * Note: on most Arduinos there is already an LED on the board
 attached to pin 13.


 This example code is in the public domain.

 http://www.arduino.cc/en/Tutorial/Button
 */

// constants won't change. They're used here to
// set pin numbers:
const int buttonPin = 2;     // the number of the pushbutton pin
const int ledPin =  13;      // the number of the LED pin

// variables will change:
int buttonState = 0;         // variable for reading the pushbutton status

void setup() {
  // initialize the LED pin as an output:
  pinMode(ledPin, OUTPUT);
  // initialize the pushbutton pin as an input:
  pinMode(buttonPin, INPUT);
}

void loop() {
  // read the state of the pushbutton value:
  buttonState = digitalRead(buttonPin);

  // check if the pushbutton is pressed.
  // if it is, the buttonState is HIGH:
  if (buttonState == HIGH) {
    // turn LED on:
    digitalWrite(ledPin, HIGH);
  } else {
    // turn LED off:
    digitalWrite(ledPin, LOW);
  }
}
Fantastic! you have finished your second tutorial. Let's move on to next tutorial 3 about Potentiometer.