🧵 How to fit Fan Splines to your data - articulateinstruments/AAA-DeepLabCut-Resources GitHub Wiki
If you are unsure what type of Spline to use, we recommend 2D splines instead of Fan Splines.You can click here for a tutorial on 2D Splines.
If you are sure you want to use Fan Splines, please read the tutorial below.
Set up a Fan for your data
Fan grids have two main functions
- Defining the origin and angular extent of the polar grid
- Setting the scaling from pixels to real-world co-ordinates (mm)
If you have recorded your data with a Micro, EchoB or Art system then the fan grid and origin extent and scaling are automatically calculated. When you add a new set of fan splines to a recording simply select the fan setup with a tick next to it. IF YOUR TONGUE IS POINTING TO THE LEFT then you will need to "mirror" the fan so that the dental side of the fan grid is on the left. This will ensure that calculations that need to know the orientation of the tongue can determine this from the fan orientation. To mirror the fan grid see guide immediately following this decribing the fan setup dialog. You can skip to the next section of this tutorial here.
If you are using an ultrasound system which connects to AAA by video input (for example a Mindray 6600 ultrasound system) or you have imported *.avi files of ultrasound data then you will need to set up a Fan manually. This is how you inform AAA where the probe origin is relative to the image, and what the field of view of the recorded data is.
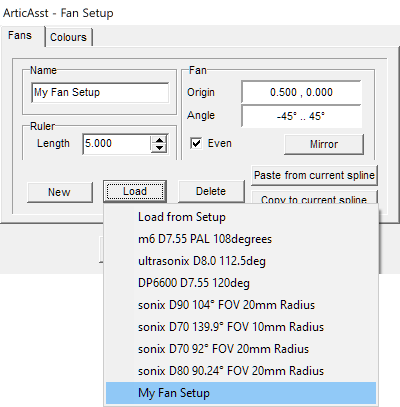
First, check if a fan already exists and is invisible: right-click on the video display and you will see an option called Show Fan. If that does not have a tick to the left of it, then click it to make any existing Fans visible. If there is no Fan present, you can proceed to set one up: right-click on the video display and select Fan Setups. Click on Load: many different ultrasound systems have presets present here, and you may find your ultrasound system already listed, which you can then click to set up the fan for it instantly.
- D = Depth (eg.
D90= 90mm depth). - FOV = Field of View (eg.
104° FOVor104deg= 104 degrees). - Radius = The distance from the probe origin (where the fan converges) to the surface of the probe.
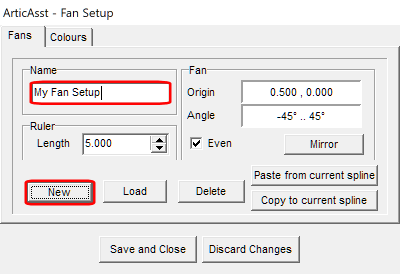
If you cannot find a preset that matches your equipment, please instead click on the New button to the left to create your own preset. Name your new preset with the Name field above.
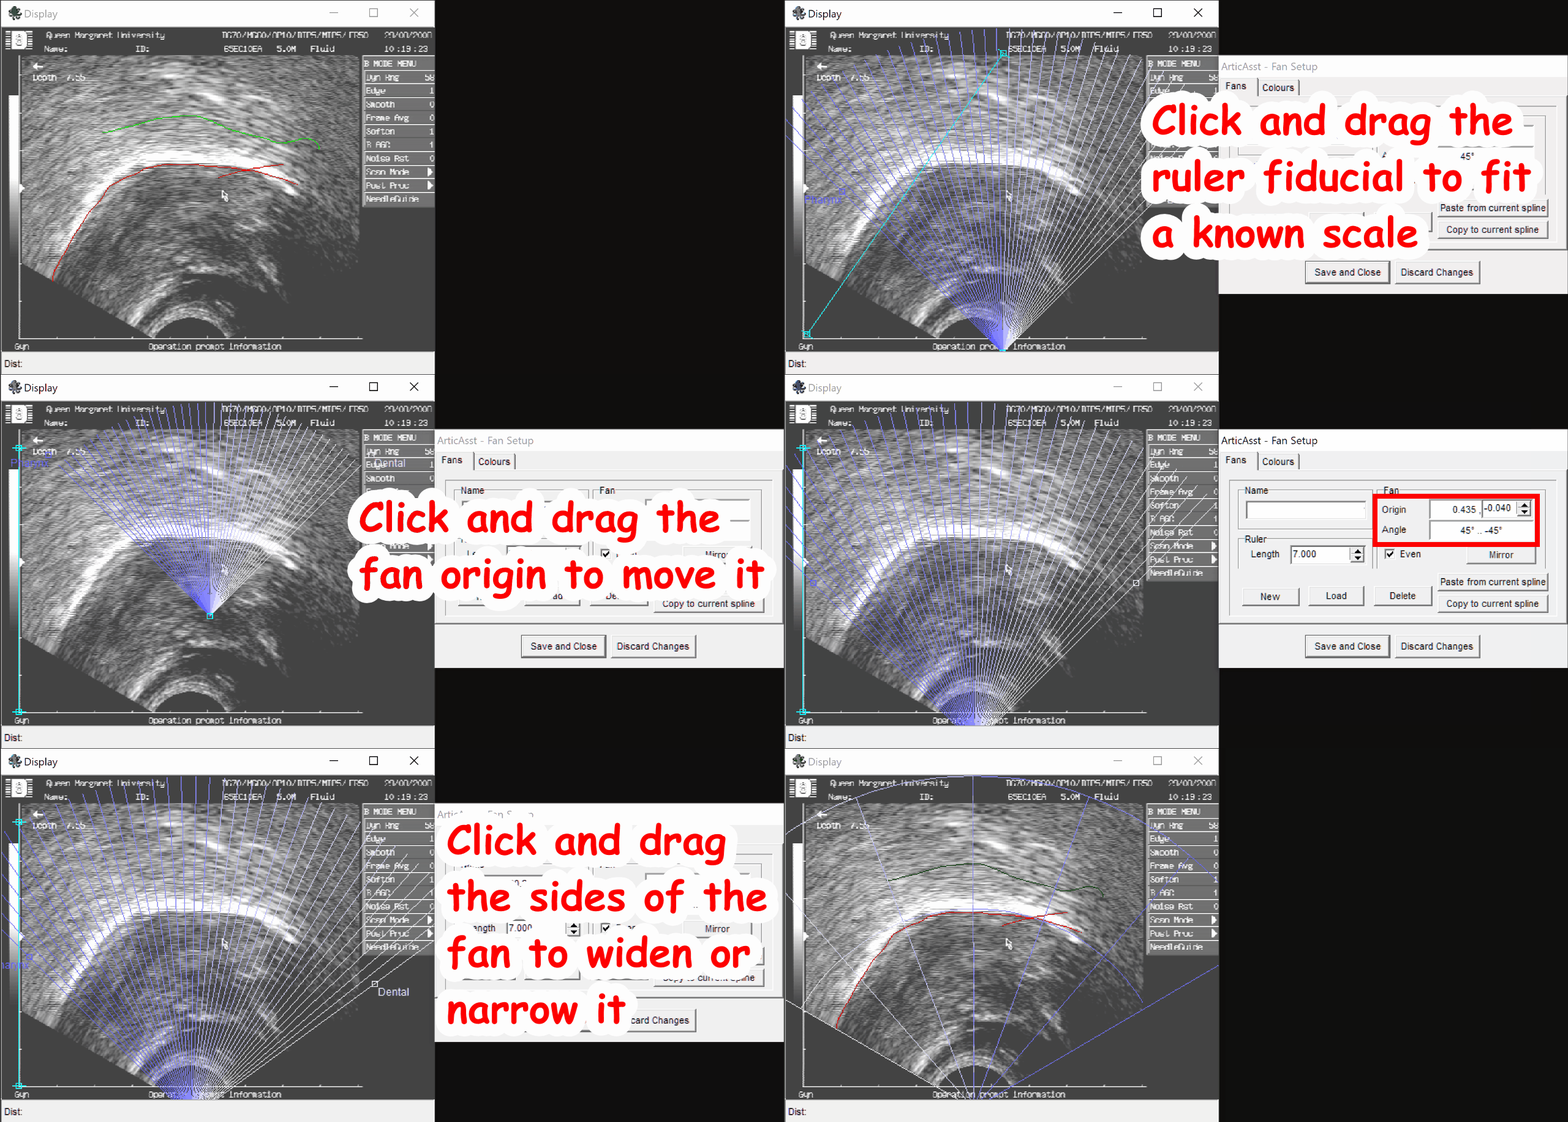
The Fan Setup display shows the ultrasound image with a fan overlaid on the image, and you can manipulate the fan by clicking and dragging the anchor points: one at the bottom controls the fan origin, and there is an additional anchor on each side of the fan half-way up which controls the angle on that side, and you can type in specific values on the right side of the dialog. You also need to tell AAA what the scale of the image is (eg. 5cm from top to bottom): the ruler is a straight line on the image with an anchor at each end which you can drag around, for example lining it up with a scale overlaid on the image by your ultrasound hardware. You can then type the distance it corresponds to on the right; the units of measurement are your responsibility to define, remember, and be consistent with in your project.
Automatically fit Fan splines to your data
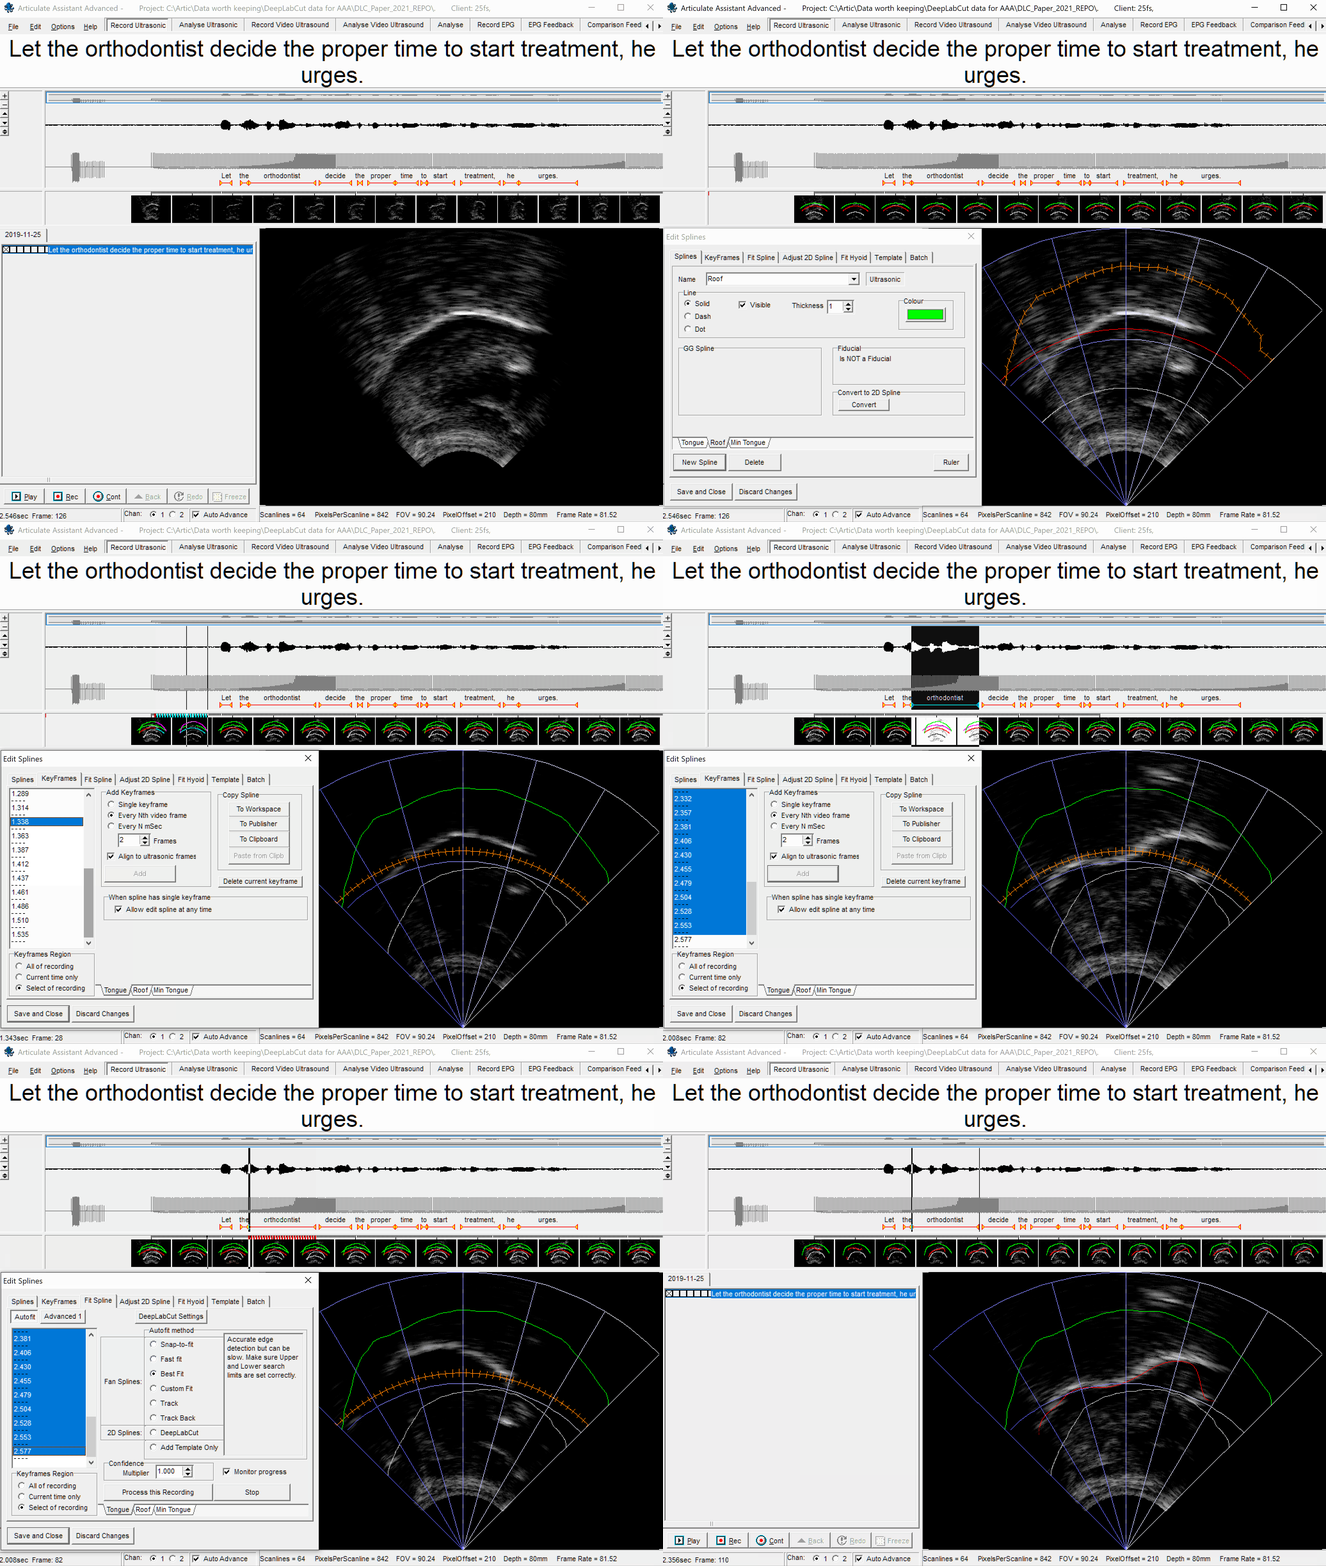
Splines are be created and edited using the Edit Splines dialog, which you can open by right-clicking anywhere on an ultrasound or video display and clicking Edit Splines.... Splines are always specific to each recording, so if you create a spline for one recording it will only be present on that recording, but there are tools to create, edit and fit splines to many recordings with a single key click, and those tools will be discussed later in this tutorial.
The Splines tab at the top left of the dialog shows the page where you can create new splines or change the appearance of existing splines.
If any splines exist for a recording they will always appear as tabs along the bottom of the dialog. Any tools and properties on each page that you can edit apply only to the spline currently selected unless otherwise specified.
As an example, let's follow Alice as she uses Fan splines.
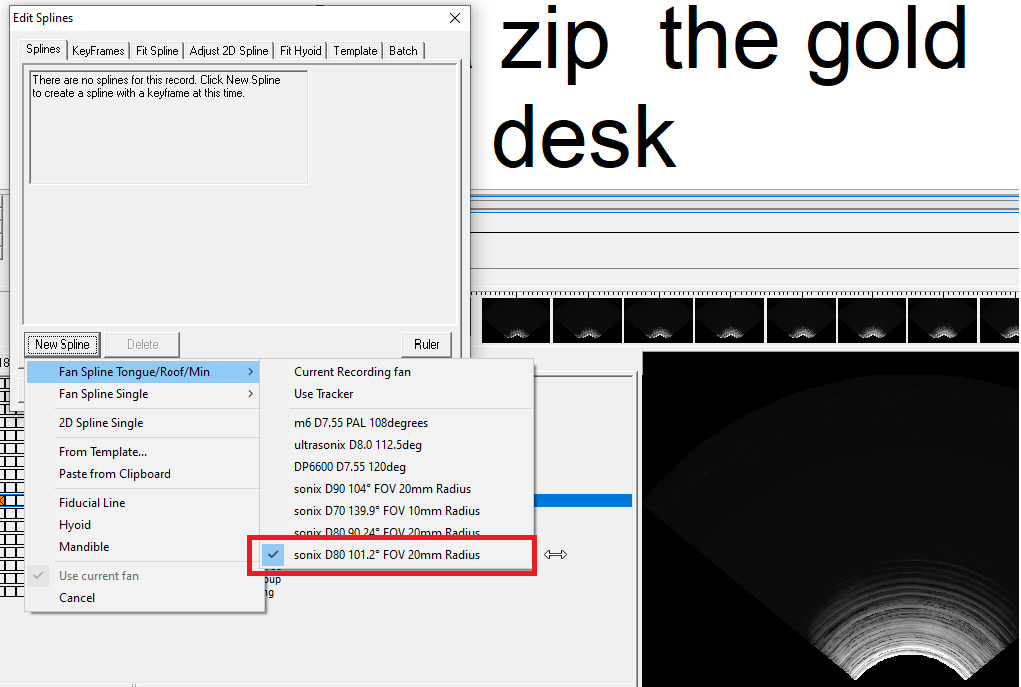
Alice wants to analyse the shape of her participant's tongue, but at the moment she's only interested in certain words in the recording. She decides to create a spline and fit it to the sub-region of her latest recording where the word of interest is spoken. To do this, she needs to first create splines for her ultrasound data so she begins by right-clicking the ultrasound display and selecting Edit Splines.... There are no splines currently in her recording, so she clicks New Spline. Here, there are many options. She can create either Fan splines, 2D splines or fiducials.
Alice wants to perform analyses in polar coordinates, so she decides to use Fan splines because they are defined in polar coordinates, unlike 2D splines which use euclidean coordinates. (She does not use a fiducial spline either because a fiducial is a single straight line between two points, used as a reference point for other analyses, and so is unsuited to contouring around a tongue surface.)
When creating a spline, one of the options is to create Tongue/Roof/Min Tongue: many fan-spline related features of AAA are designed to work especially quickly and easily with this special trio of splines. Roof and Min Tongue should define the upper and lower limits in the mid-sagittal plane within which the tongue will stay. If you want to use automatic tongue tracking, you should fit Roof and Min Tongue manually by selecting each of them in turn and clicking and dragging the mouse-cursor in the ultrasound display to draw their shape. You can still click and drag in the timeline to navigate through your recording, which may help you to see the limits of the tongue's movement over the recording (you can do this without needing to close the Edit Splines dialog).
You can create splines that stay constant throughout a recording and you can create splines that change over time. Every spline has Keyframes, which can be seen in the Keyframes tab at the top. A keyframe is a point in time where a spline has a particular shape. Keyframes are listed on the left as numbers, where each is the number of seconds since the start of the recording at which that keyframe exists. You can manually create keyframes at specific time points in the recording by clicking in the timeline for the recording and then choosing Single keyframe and clicking Add. You can also create many keyframes at once by click-drag selecting a region of the recording in the timeline, or double-clicking an annotation, and then choosing Every Nth video frame or Every N mSec and clicking Add. Any two spline keyframes with a gap of time between them will fill that gap by linearly interpolating between the shapes at each keyframe, eg: | → ( → C
A spline that you want to stay constant throughout a recording should have only one keyframe (which should be listed on the left as a single number). In the time before a spline's first keyframe, it will have the same shape as has in its first keyframe, and likewise in the time after a spline's last keyframe it will have the same shape as in its last keyframe.
Alice creates keyframes for the Tongue spline by selecting her region of interest in the timeline, then selecting Every Nth video frame and clicking Add. She leaves Roof and Min Tongue with only 1 keyframe each, as they were created, because she wants them to stay constant throughout the recording.
Next, Alice clicks on the Fit Spline tab to choose an automatic tracking method appropriate for fan splines. There are multiple options available:
- Best Fit: Searches along each fan line, from the probe origin out to the most distal points on the fan, and searches for the brightest edge. The parameters for how it determines the brightest edge can be selected in the
Advanced 1tab at the top, but it is advised to leave the settings at their defaults, as they have been carefully calibrated to give good results. - Fast Fit: This works exactly the same way as Best Fit but performs its calculations on a lower resolution of data, so processes significantly faster but gives slightly less accurate results.
- Snap-to-Fit: Searches for a bright edge in the same way as Best Fit, but only looks near the spline's current position/shape. This is particularly useful if you want to manually draw the spline shape, as you can then use Snap-to-Fit to contour it exactly along a nearby bright edge. In the
Advanced 1tab you can choose how far each knot should try to search from its current position. - Track: This only works when splining more than one keyframe at a time. It uses Snap-to-Fit, but instead of using the position/shape of the current spline keyframe, it uses the position/shape of the spline in the previous keyframe as the seed to calculate the new keyframe from. This can be useful to stop bright areas which briefly appear in the ultrasound image from attracting the spline. Track Back does the same, but progresses in the opposite direction, starting at the chronological end of the recording and working back towards the beginning.
Best Fit and Fast Fit make important use of the special
RoofandMin Tonguesplines because they define the limits within which the search for a bright edge will occur. This is important to help the algorithm find the tongue surface and prevent it from misinterpreting other bright areas of the ultrasound image as being part of the tongue surface.
Next, in Keyframes Region in the bottom-left Alice either chooses Select of recording which would cause tracking to be done on the selected keyframes (either as selected in the timeline or as selected in the list on the left), or she chooses All of recording which would cause tracking to be done on all currently existing keyframes. She then clicks Process this Recording.
When the tracking finishes, Alice selects the Tongue spline and selects individual keyframes in it and makes some manual adjustments where she thinks the automatic tracking has made mistakes.
Automatically track the Hyoid and Mandible
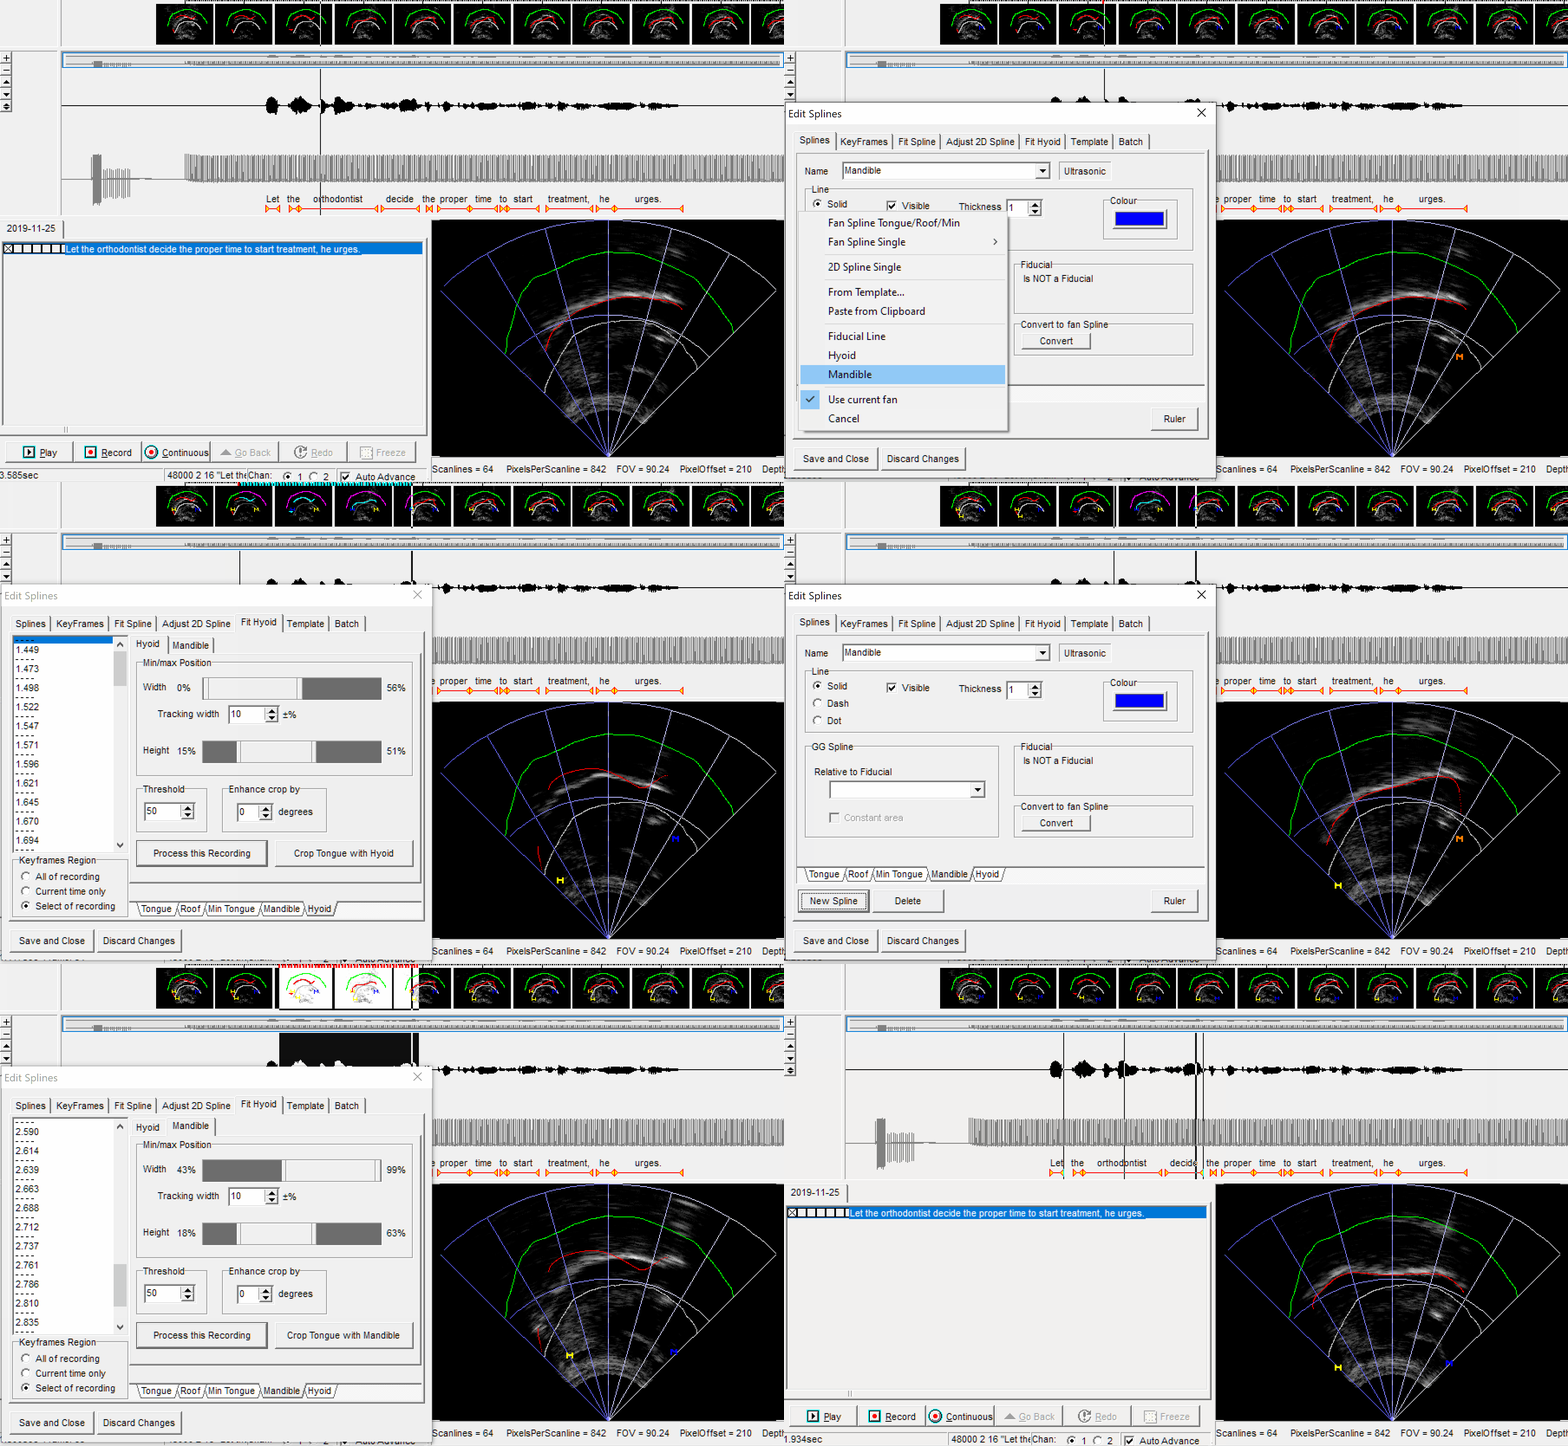
In addition to splines, you can also automatically track the hyoid and mandible:
You can create a Hyoid label and a Mandible label using the same button to create a new spline. Each of these labels marks a single spatial point, and you can automatically fit them to the data in a very similar way as you can fit splines, using the Fit Hyoid tab.
Alice reconsiders the analysis she wishes to perform on her data and decides to use 2D splines instead. She doesn't want to destroy the splines she's made so far. To tidy the image she temporarily hides the fan splines from view. On the Splines tab she selects each of her existing Splines one-at-a-time and unchecks the Visible box .
Batch fitting splines to many recordings at once
Batch Fan Splining works by first defining one or more splines to act as a template: you only do this once, and then when you run the batch process each of these template splines will be automatically duplicated once for every recording being processed. Each of these sets of duplicated splines will then be used as the starting point from which to run the chosen tracking algorithm within each recording. So each time the batch process loads a new recording, it will paste the copied splines once, and then use them as the initial state of the splines when it runs the tracking algorithm for the recording.
The special splines called Roof and Min Tongue, as explained earlier, define the upper and lower limits within which the algorithms will try to search for the tongue. This is especially important here because we want the spline to fit the tongue surface most correctly in each recording, and to do that those upper and lower limits need to include the full range of tongue movements but also exclude as many bright areas as possible which aren't part of the tongue surface. The challenge is that we need to create one position/shape of Roof and Min Tongue which will be used as the limits for every recording. (You can make exceptions where you use a different Roof and Min Tongue for individual recordings in your batch, and this will be explained next.)
The process may seem complicated, but it will become clearer as we walk through an example.
Alice plans to batch spline all the recordings she has made so far of her participant. She knows that she will need to define the Roof and Min Tongue as limits for tracking all her recordings, so she loads a few of her recordings and looks through them to familiarise herself with the limits of her participant's tongue movements. Alice chooses an arbitrary recording of her participant and opens the Edit Splines dialog by right-clicking on the ultrasound display. She clicks New Spline and selects Fan Spline Tongue/Roof/Min to create a Tongue, Roof and Min Tongue spline. Alice selects each of Tongue, Roof and Min Tongue in turn and clicks and drags her mouse cursor on the ultrasound display to draw the shape she wants for each, according to where she wants the upper and lower limits for all recordings. The 'Tongue' should be in a neutral position below the 'roof' and above the 'MinTongue' splines.
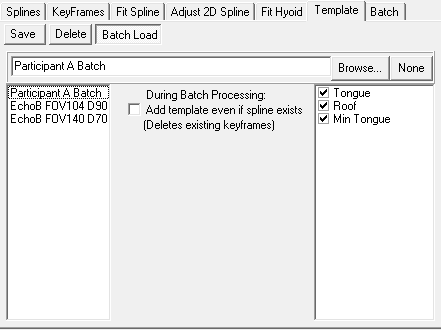
Alice now needs to save these Tongue, Roof and Min Tongue splines as a template to be used later in batch processing. Alice clicks on the Template tab at the top of the dialog. Here, she can see a list of all the splines currently in this recording. She clicks on the checkboxes to select Tongue, Roof and Min Tongue and she leaves all other splines unchecked, then she types in a name for her template into the field to the left: she chooses a name that will help her remember what this template is for. She then clicks Save. (You can also Save to File... and back up the saved template or move it to other computers, for example sending it by email).
Now that Alice has saved her Tongue, Roof and Min Tongue splines as a template, she no longer needs to keep them as splines in the recording she made them in, and she can safely delete them.
Alice is almost ready to start the automated batch splining process, but first she needs to choose which algorithm to use. She clicks on the tab Fit Spline at the top of the dialog, and chooses an algorithm in the same way as she did for splining a single recording. There is no need to select any keyframes at this stage, and any keyframe selections here will not be used. She does not click on the button to process the current recording.
Next Alice clicks on the 'Fit Spline' tab at the top o the dialog and selects the 'Track' option from the 'FanSplines' autofit methods.
Next, Alice clicks on the Template tab again at the top of the dialog. This time, she clicks on the Batch Load sub-tab near the top. Here, Alice can see on the left a list of all templates she has previously saved, including her template she has just recently saved from her Tongue, Roof and Min Tongue splines. She clicks on it in the list on the left, and on the right those Tongue, Roof and Min Tongue splines appear. Alice wants to provide the Tongue, Roof and Min Tongue splines to the batch process to define the tongue initial position and upper and lower tracking limits, so she ensures that the checkboxes for the three splines are ticked on the right by clicking on them. (If you want to load a template from a file instead, you can click on the Browse... button and select the appropriate file on your computer.)
Next, Alice clicks the Batch tab at the top of the dialog, and then the Choose Recordings sub-tab beneath it. This is where Alice needs to specify which recordings should be automatically processed.
First, Alice must choose whether the automatic batch splining should process each selected recording in its entirety, or only spline certain annotations (which could be all annotations if that is desired). She wants to process entire recordings, so she clicks on the Recordings button.
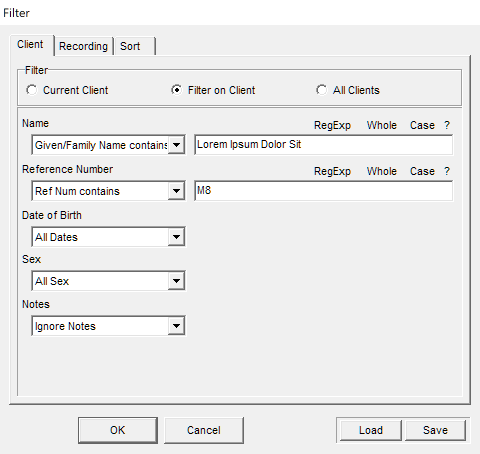
Next, she clicks on Change Filter. This shows a new dialog with 3 tabs: Client, Recording and Sort.
Alice clicks on each tab in turn and selects the options available to specify what data she wants the batch splining to operate on. She wants to batch spline all the recordings for her "Participant A": to do this she could either choose Current Client if she had a recording from "Participant A" currently loaded in AAA, or alternatively she could click Filter on Client and use the options to specify the client she wants. Furthermore, because Alice wants all the recordings for "Participant A" to be batch splined, she chooses All Recordings. The Sort tab defines the order in which the recordings or annotations will be processed, but does not affect which data gets processed. Alice clicks OK at the bottom of the dialog to close and save her choices.
The conditions that you can specify in the three tabs combine both within each tab and also across tabs with 'AND'. Regular Expressions are parsed by the TRegExpr library which supports most but not all modern regex functionality.
The large white box on this dialog page now shows a list of all the recordings that Alice has specified. She visually inspects the list to double-check that it looks correct.
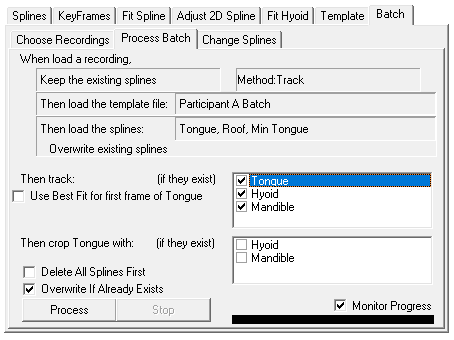
Next, Alice clicks on the Process Batch sub-tab at the top. This page shows a summary of all the choices she's made so far.
Alice wants to track the tongue. She's not interested in the Hyoid or Mandible at this time, but she checks the boxes to track them anyway, so she can make them invisible afterwards and they will be available if she changes her mind. The Crop tongue with selection allows you to make all spline knots to the left of the hyoid and to the right of the mandible (respective to the probe origin) automatically have confidence of zero (and thus be invisible), which may be useful in certain research projects. Alice leaves them unchecked.
It is now time for the automatic processing: Depending on the amount of data you have chosen to be automatically batch processed, and depending on the power of your computer's processor, this might take a long time. Tracking on video data (including ultrasound systems that provide video data to AAA) is significantly slower to process than raw ultrasound data. The first time you process, it is recommended to enable Monitor Progress in the bottom-right, which slows down processing but shows you a live visualisation of the automated spline fitting so you can verify it's doing what you want. If you have a very large amount of data to process you might then want to disable Monitor Progress if you are satisfied that it's doing what you expect.
There are many factors that affect processing time so it's very hard to estimate. One user of AAA might find that their batch processing is ten times faster than another user's because of differences in their computer, the nature of their data and the algorithm(s) they've chosen. The only thing you can do is try it for yourself and find out. Processing progress across all your selected data is displayed in the progress bar at the bottom of dialog, and depending on the algorithm you're using there might also be an additional progress bar showing progress through each individual recording too.
Be careful because you cannot undo any batch changes you make; it's always good practice to keep incremental backups of your work. When you are happy with all the options you have selected, click the Process button to begin.
