🧱 Window Designer - articulateinstruments/AAA-DeepLabCut-Resources GitHub Wiki
The Window Designer, also known as the "Designer" or "Task Window editor" is a tool that allows you to edit, create, duplicate, delete and rename task-windows.
When you open the designer AAA changes into design mode, in which you can manipulate the tools and displays that comprise a task window. Each element has a small square symbol in the top-left corner which you can click-and-drag to move it to a new position or pop it out from the window into its own sub-window. You can add new tools and displays from the designer drop-down menu. You can remove an element by double-clicking its top-left square or click-dragging it out into its own window, then closing the window.
Once you have made changes to a task-window, you can right-click it in the list of task-windows to save it or save your changes as a new task-window (which does not overwrite the old one), rename it or delete it. Some elements have additional properties you can edit by right-clicking on them, such as menu bars which can be customised to become play/record buttons if you wish.
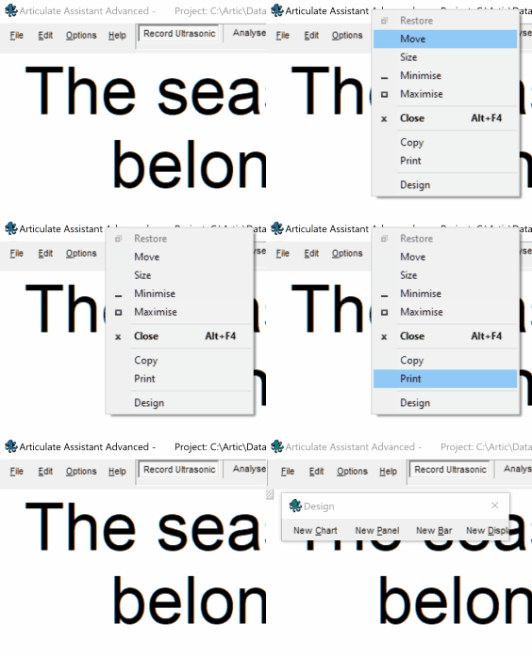
Designing a new task window or permanently adjusting subwindow sizes in an existing task window is done in design mode. Because this is an advanced function access to this function is concealed as a  right-click menu option in the application caption bar.
In order to enter design mode click on the caption bar at the top of the AAA application with the  right mouse button. Then select the ‘Design…’ option in the popup menu.

The ‘Design Dialogue’ list will then appear.

To exit design mode without saving any changes simply close the ‘Design Dialogue by clicking on the  .
.
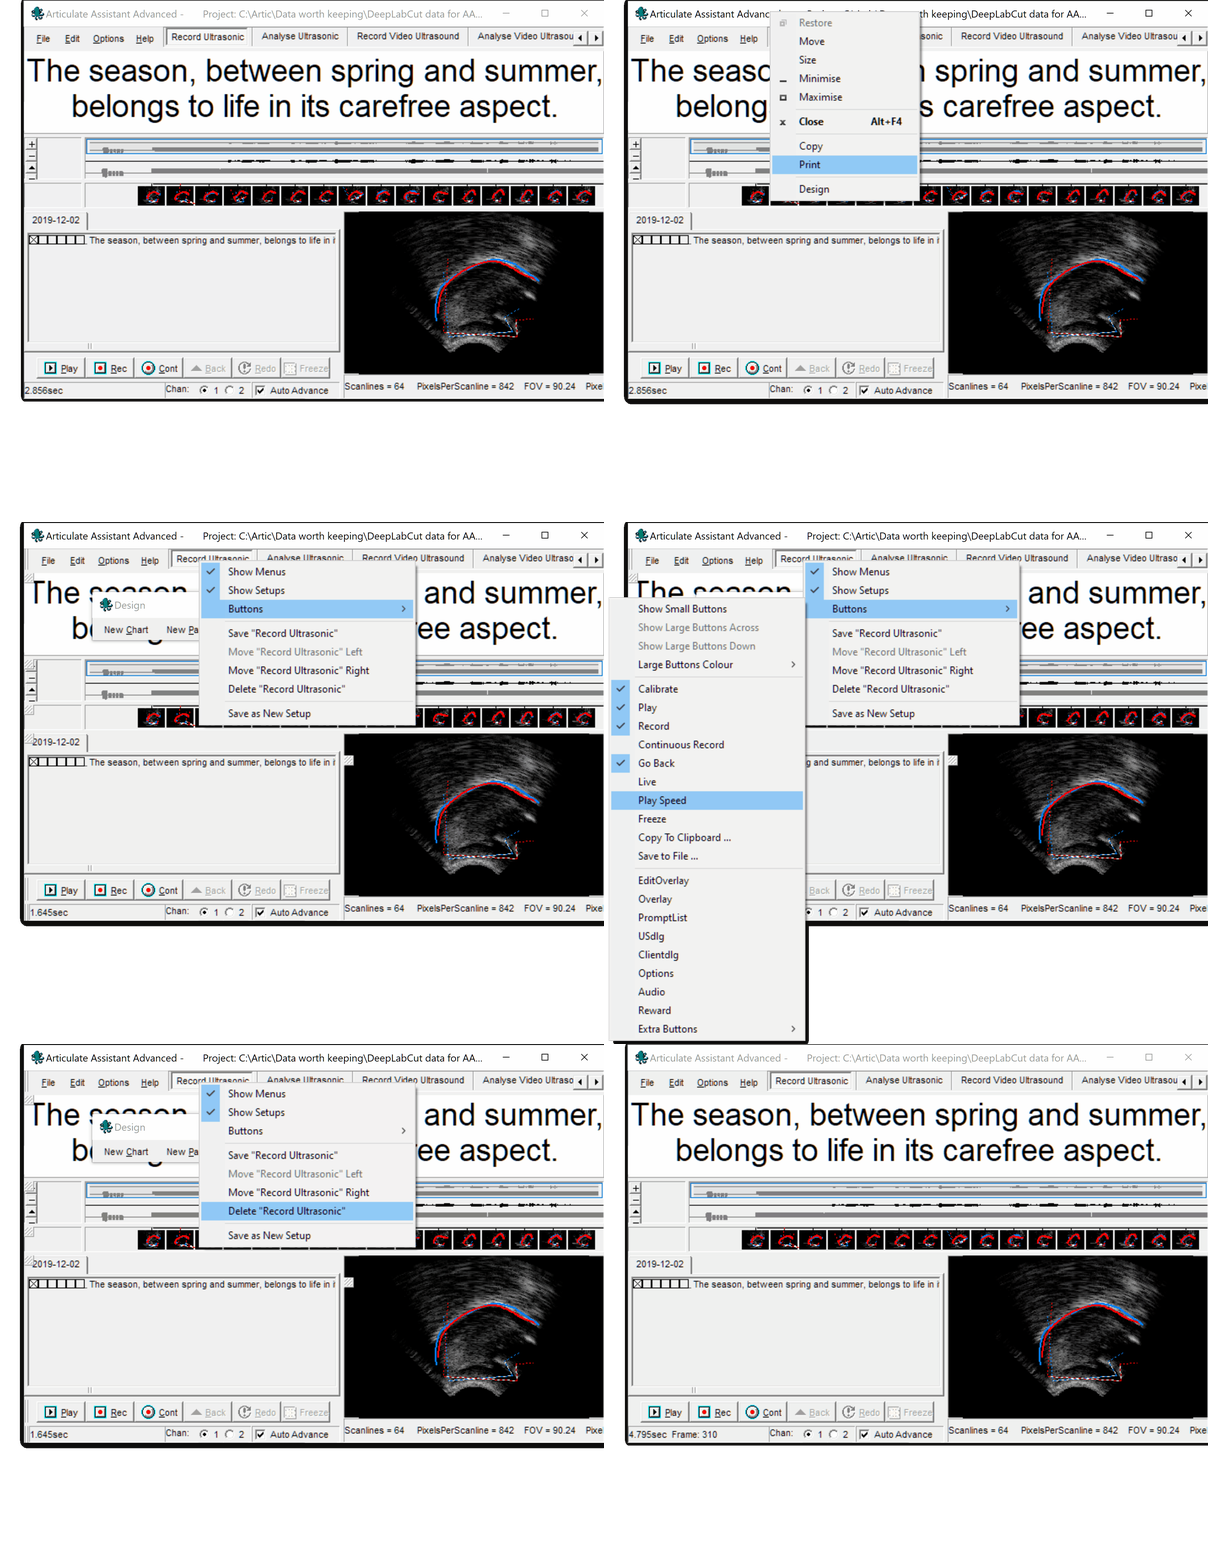
Saving changes must be done before exiting design mode. To save changes made in design mode, click the  right mouse button anywhere in the Task Bar to reveal the popup menu.

Click ‘Save “<Task name>”’ (‘Save “Record Ultrasonic”‘ in this example). Saving always applies to the currently selected task window regardless of where you  right-click.
Click ‘Save as New Setup’ to copy the current Task Window configuration to a new task window and leave the current task window unchanged. You will be prompted to give this new Task Window a name.

The new task window button will appear at the far right of the Task bar.
-
Click ‘Move “<Task name>” left’ to shift the button position left in the bar.
-
Click ‘Move “<Task name>” right’ to shift the button position right in the bar.
To delete a Task Window, first left-click to select the Task Window to be deleted. Then  right-click to bring up the menu.
Click ‘Delete “<task window>” ‘ (e.g. ‘Delete EPG “Feedback” ’).
Task windows are made up of subwindows that dock together and can be resized and positioned to create an ensemble suited to a particular task. Modules fall into 4 categories as follows:
Charts: Any subwindow which has a display with a time axis.

Panels: Subwindows that do not fall into the other 3 categories.

Bars: Subwindows that cannot be resized in normal operation.

Displays: Any module with a graphical display, which doesn’t have a time axis.

To create a new module, simply select it from the menu in the ‘Design Dialogue’.
The ‘Menu Bar’ can be configured further by right clicking in it to bring up the popup dialogue. The top three options in this popup menu control the visibility of ‘Menu’, Task ‘Setup Buttons’ and ‘Buttons’. There is a submenu allowing each of the buttons to be enabled or disabled.

The ‘Palate Display’ also has a popup dialogue to control the visibility of elements of the display . The elements consist of:
- Key. Colour scale
- Score. Variability Index
- Cumulative. Cumulative contact check box
- Comparison. Palate comparison gauge

It is also possible to specify whether the ‘Palate Display’ is a ‘Reference Palate Display’.
Note: Only one ‘Reference Palate Display’ permitted per ‘Task Window’.
To rearrange the modules in a Task Window, click and drag the  in the top left corner of the window (or the
  at the left edge in the case of ‘Bar’ type modules).

A grey outline that will move about the screen and ‘dock’ in positions relative to other modules. When you are happy with the position release the mouse button. The relative size of the module can be adjusted by moving your mouse over an edge/border of the module until the mouse cursor changes into a double-ended arrow similar to this ⤡, then click and drag the mouse to move that edge/border.

It is also possible to move a module so that it exists in a separate window on its own. In fact this is the state of a new module created by selecting a menu option from the ‘Design Dialogue’. To get a module to be separate from the main window, click and drag until the grey outline is not aligned with the other modules (as shown above) then release the mouse button.
Repositioning modules is an art that improves with practice.
To delete a module from a Task Window move the module so that it exists in a separate window on its own (as described in the previous section) then close that window by clicking on the  .
.
Right-click on the title bar next to the octopus logo, and select Design.


