Payments Overview and Workflow - alxspiker/Pi-Network-Developer-Docs GitHub Wiki
Complete guide to integrating Pi cryptocurrency payments in your application
Secure, blockchain-powered transactions with seamless user experience
Secure, blockchain-powered transactions with seamless user experience
🔐 Secure, synchronized Pi blockchain transactions for your application
Key Features:
- 💫 Simplified Blockchain Integration - Easy-to-use APIs for Pi transactions
- 🔄 Multi-Party Synchronization - Coordination between app, Pi blockchain, and Pi servers
- 🛡️ Security Framework - Cryptographic confirmation of completed transactions
- ✅ Developer-Friendly - Handle complex blockchain operations with simple SDK calls
| 🎯 Feature | 📝 Description |
|---|---|
| Easy Integration | Simple SDK methods for payment creation and handling |
| Automatic Verification | Pi Network handles blockchain transaction verification |
| Fraud Protection | Server-side approval and completion workflow |
| User Experience | Seamless payment flow within Pi Browser |
⚠️ Critical: Pi Payments only work within Pi Browser - proper detection is essential
Hybrid App Requirements:
- ✅ Detect Pi Browser first using Pi Browser Detection guide
- ✅ Show payment options only in Pi Browser
- ✅ Provide graceful fallbacks for regular browser users
- ❌ Never call payment methods in regular browsers (causes errors)
Complete Hybrid Payment Example
// ✅ Modern hybrid payment approach
async function initializePayments() {
  // 1. Initialize Pi SDK
  Pi.init({ version: "2.0", sandbox: false });

  // 2. Detect environment
  const isPiBrowser = await detectPiBrowser();

  if (!isPiBrowser) {
    // 3a. Show fallback UI for regular browsers
    showPaymentFallback();
    return;
  }

  // 3b. Enable payment features for Pi Browser
  enablePaymentFeatures();
}

function showPaymentFallback() {
  document.getElementById('payment-section').innerHTML = `
    <div class="payment-fallback">
      <h3>💰 Pi Payments Available in Pi Browser</h3>

      <div class="fallback-content">
        <div class="qr-section">
          <img src="/qr-code.png" alt="Scan with Pi Browser" />
          <p>Scan this QR code with Pi Browser to make payments</p>
        </div>

        <div class="cta-section">
          <a href="https://pinet.com/YOUR_APP" class="pi-button">
            Open in Pi Browser for Payments
          </a>
        </div>

        <div class="info-section">
          <h4>What you'll get in Pi Browser:</h4>
          <ul>
            <li>✅ Secure Pi cryptocurrency payments</li>
            <li>✅ Instant transaction processing</li>
            <li>✅ Built-in fraud protection</li>
          </ul>
        </div>
      </div>
    </div>
  `;
}

function enablePaymentFeatures() {
  // Show payment UI elements
  document.getElementById('payment-buttons').style.display = 'block';

  // Set up payment handlers
  document.getElementById('pay-button').onclick = handlePayment;
}

async function handlePayment() {
  try {
    // This function only gets called in Pi Browser
    const payment = await Pi.createPayment({
      amount: 1.0,
      memo: "Premium features upgrade",
      metadata: {
        itemId: "premium_upgrade",
        userId: "user123",
        timestamp: Date.now()
      },
    }, {
      onReadyForServerApproval: function(paymentId) {
        console.log('Payment created, sending for approval:', paymentId);
        // Send to your server for approval
        approvePaymentOnServer(paymentId);
      },
      onReadyForServerCompletion: function(paymentId, txid) {
        console.log('Payment ready for completion:', paymentId, txid);
        // Send to your server for completion
        completePaymentOnServer(paymentId, txid);
      },
      onCancel: function(paymentId) {
        console.log('Payment cancelled by user:', paymentId);
        // Handle cancellation in your UI
        handlePaymentCancellation(paymentId);
      },
      onError: function(error, payment) {
        console.error('Payment error:', error);
        // Handle payment errors gracefully
        handlePaymentError(error, payment);
      }
    });
  } catch (error) {
    console.error('❌ Payment creation failed:', error);
  }
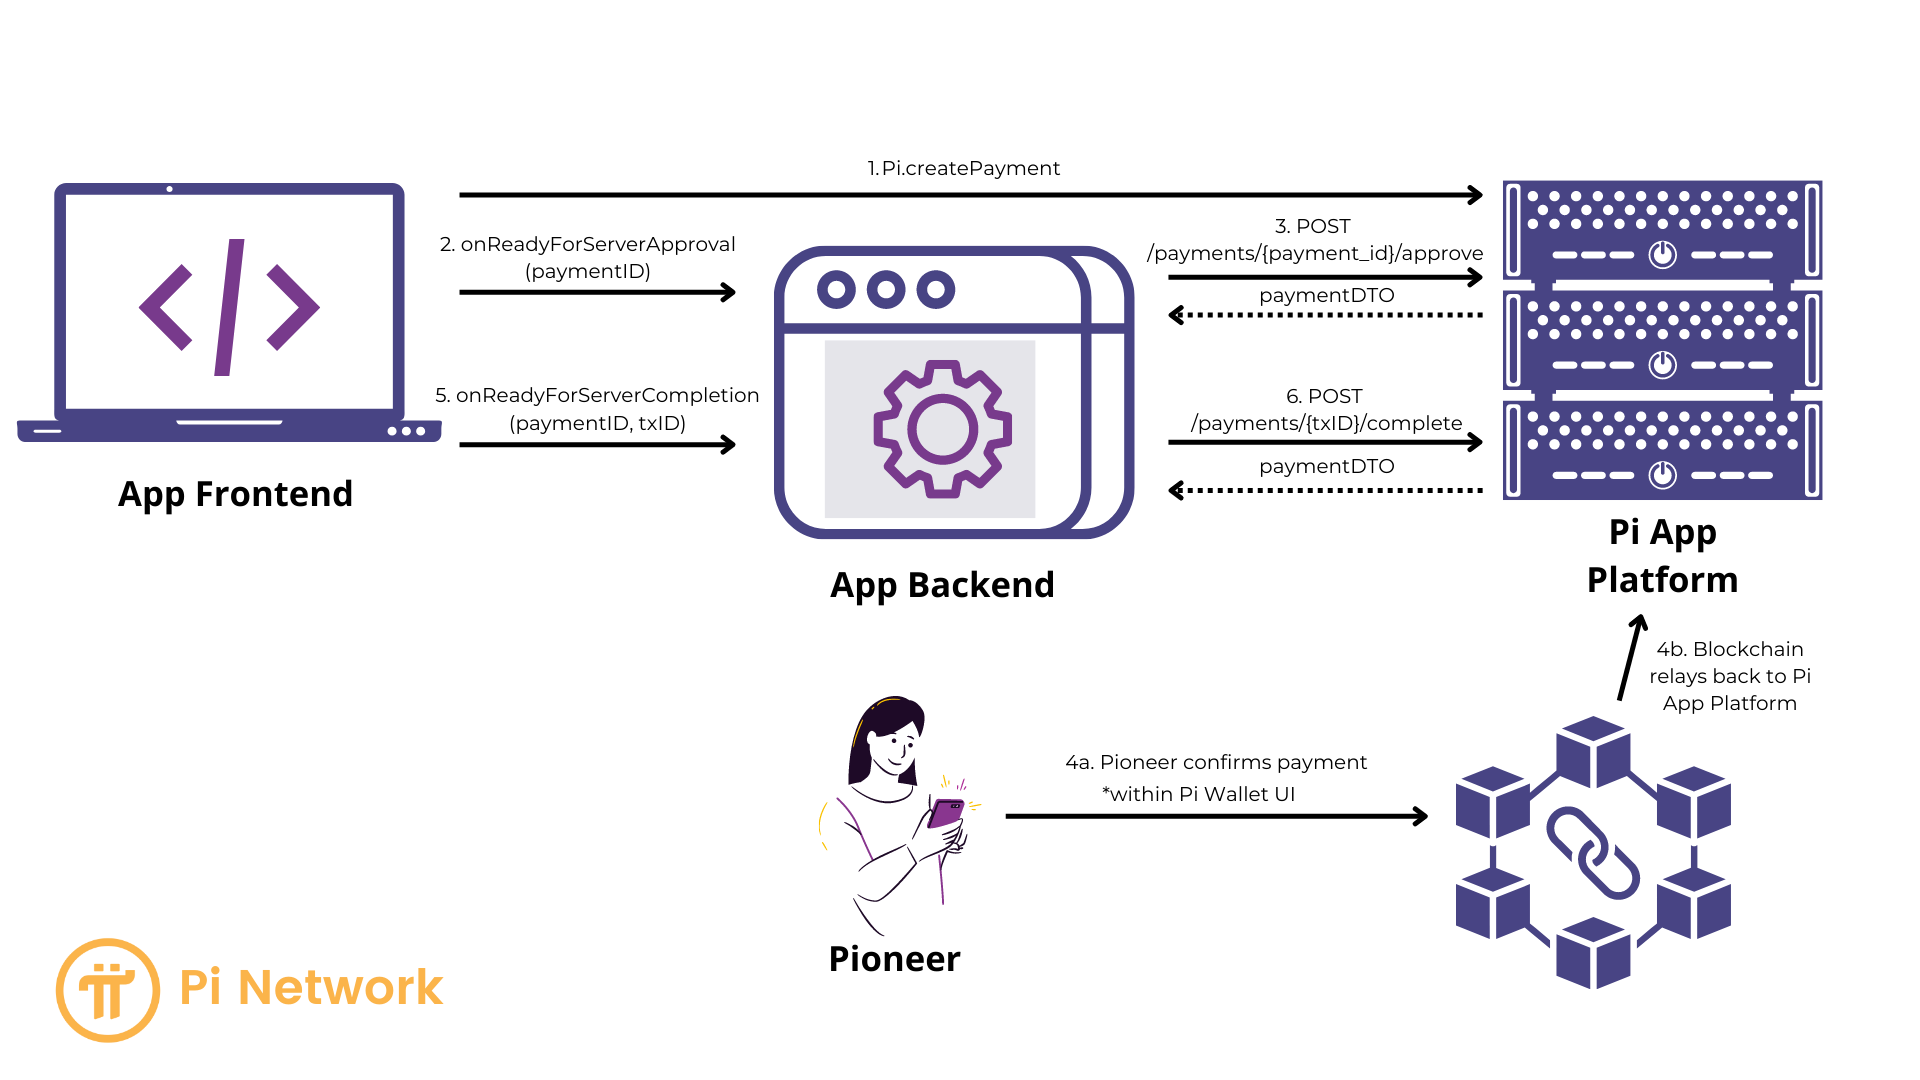
}Payment Flow: Key Phases
-
Creation and Server-Side Approval
- Your app frontend creates the payment.
- The JavaScript SDK obtains a PaymentID.
- Your server approves the payment via the
/approveAPI call, enabling the Pioneer to proceed.
-
Pioneer Interaction and Blockchain Transaction
- Pioneer confirms, signs, and submits the transaction.
- The blockchain processes the transaction.
- Pi Apps Platform and Pi Wallet handle this phase.
-
Server-Side Completion
- Pi Servers submit the transaction to the blockchain.
- The SDK provides your app with a TxID (transaction ID).
- Your server completes the payment via the
/completeAPI endpoint, verifying the transaction's success. - The payment flow closes.
Payment Flow Diagram
Security
-
Crucial: Complete payments within your app only after successful Server-Side Completion, indicated by a 200 response code from the
/completeAPI call. - Failure to do so opens your app to potential fraud by malicious users.
Developer Responsibilities
- Implementing the frontend to server communication for PaymentID and TxID.
- Using the Pi SDK's
createPayment,onReadyForServerApproval, andonReadyForServerCompletionfunctions. - Making the necessary
/approveand/completeAPI calls from your server. - Updating your app interface to reflect payment status for the Pioneer.
