V2 Ground Station - alanbjohnston/CubeSatSim GitHub Wiki
Step 3: Ground Station Setup
The CubeSatSim transmits telemetry in five different modes. Windows software will allow you to decode all the modes.
These instructions are for configuring a Windows Ground Station.
Video
Here is a video of this step
Windows Ground Station
Several software packages are needed for a complete Ground Station.
FoxTelem
For the FSK and BPSK telemetry modes, the Ground Station for the CubeSatSim utilizes FoxTelem, the open source AMSAT telemetry decoding software by Chris Thompson, G0KLA/AC2CZ which you can download here https://www.amsat.org/foxtelem-software-for-windows-mac-linux/

You will need an SDR such as the RTL-SDR. I recommend this one https://www.amazon.com/gp/product/B0129EBDS2. You will need a telescopic dipole or vertical antenna.
Here are the steps to get it running on your computer:
-
Download the ZIP file from https://www.amsat.org/foxtelem-software-for-windows-mac-linux/ Unzip all the files.
-
Plug your RTL-SDR into your computer. Make sure no other SDR software is running such as sdrpp or SDR#. If you haven't used the RTL-SDR on your computer, you will need to follow the first three steps here: https://github.com/alanbjohnston/CubeSatSim/wiki/sdrpp-setup-for-windows involving Zadig.
-
Run FoxTelem.exe and follow the directions here https://www.amsat.org/foxtelem-software-for-windows-mac-linux/
-
The first time you run it, you will get this prompt - you can just click Continue.
- When FoxTelem opens, go under the Spacecraft menu then select Add then select CubeSatSim-FSK. Do the same for CubeSatSim-BPSK. You should see both of those Spacecraft in FoxTelem like this:
- At the
Select audio source here then press startdrop down menu, selectRTL SDR. In theCenter Frequencybox, type434840.

Click Start and you should see this:

Drag the horizontal bar towards the bottom of the screen just above the red line upwards until you see the red spectrum line like this:

- Run the CubeSatSim in FSK mode (the default for a new installation) and you should see this:

You will probably have to click on the signal peak on the red line to tune the signal. The frames count on the bottom right should increase every four seconds or so. When you see this, click the CubeSatSim-FSK tab.

If you have received telemetry, you should see non-zero values in the boxes.
- Now switch the CubeSatSim to BPSK (mode 3). You will press and hold the pushbutton on the CubeSatSim and release it when the green LED blinks 3 times. Click on the
Inputtab then clickStop. Open theFilemenu thenSettings.

Check the boxes for Find Signal, PSK: Use Costas, and also lookup your latitude and longitude and enter it in the Lat and Long boxes, then click OK. Now, BPSK should tune and the frames count should increase:

Click on the CubeSatSim-BPSK tab and see the telemetry data.
- There are additional directions in this video: https://youtu.be/l1o9LD_2hlU?t=242
You are now ready to install software to decode the other modes.
SDR for Windows
The remaining modes require a Software Defined Radio (SDR).
I recommend downloading and installing SDR++ (sdrpp) for Windows instead of SDR#. Since only one application at a time can use the RTL-SDR dongle, you will need to quit FoxTelem before running sdrpp. Here are the steps to get SDR++ running with the RTL-SDR dongle:
https://github.com/alanbjohnston/CubeSatSim/wiki/sdrpp-setup-for-windows
With this installed and an antenna plugged in, if you tune to 434.9 MHz, you should be able to hear and see the CubeSatSim signal. The remaining modes use Narrowband FM (NFM) modulation. For example, if the CubeSatSim is still in the BPSK mode 3, the signal will look something like this:

You should use the Zoom slider in the top right side of sdrpp so that you can see the whole signal but it doesn't take up the entire width like this.
Watch this video on how to change the mode for the CubeSatSim to APRS mode 1: https://youtu.be/_K9sLvUW9Mo?t=373 You will press and hold the pushbutton on the CubeSatSim and release it when the green LED blinks 1 time.
Once you see and hear the APRS packets on sdrpp you are ready for the next step.

You will need APRS decoder software and also either audio loopback software or a loopback plug. An audio loopback plug is easier - you just plug it into the headphone jack of your computer and it connects the output of the speaker to the input of the microphone:

If you don't have an audio feedback plug or a headphone jack on your computer, then install VBCable by following these instructions: https://github.com/alanbjohnston/CubeSatSim/wiki/VBCable-Audio-Piping
If you can hear the sound of the APRS packets coming out your computer speakers, plug in the loopback plug. You will no longer hear it as the audio is being directly fed back to the microphone input on your computer. In some cases, you will continue to hear the audio even after the plug is inserted. In this case, you will need to disable the speaker device and enable the headphone speaker device, and disable the built-in microphone and enable the headphone microphone.
In sdrpp and your computer, turn the volume up to full volume. Open the Windows Control Panel for Sound.

If your volume is up high and not muted, you will see the green level bar in the Playback tab.

With the audio loopback plugged in, you won't hear it on your computer anymore. However, you should see the green bar in the Recording tab under a Microphone device. If you don't see a microphone device, you might need to enable it.

If you see the green bar in the speaker device in Playback but not in the microphone in Recording, you might have your microphone muted. To fix this, double click on the microphone device in Recording, then click on the Levels tab. If you see a red circle with a slash on the speaker icon like this:

then your microphone is muted. Click on the icon with the speaker with the red line through it to Unmute it.
If you can see the green bar in your microphone device, then you are ready to install and configure the APRS decoding software. Note the order of the enabled microphone devices. The first one is device 0, then second 1, etc. Don't count disabled devices. Note the device number of the microphone that has the green bar. In my example, the device number is 1 since the audio jack is the second microphone device, but on your computer, it might be the first one, so device number 0.

Direwolf for Windows
Download the Direwolf APRS decoding software for windows by downloading the zip file from here: https://github.com/wb2osz/direwolf/releases/tag/1.6 This Windows 64 bit binary should work for most Windows computers: https://github.com/wb2osz/direwolf/releases/download/1.6/direwolf-1.6.0-413855e_x86_64.zip
Unzip the folder and note the location. I recommend changing the name of the folders to just direwolf from, for example, direwolf-1.6-2.0-413855e_x86_64
Open a Windows Command Prompt by typing cmd in the Windows search box.

You will need to change directories (cd) to your downloaded location. For example, you might need to type:
cd Downloads/direwolf/direwolf
Now, you need to create a configuration file called direwolf.conf with the device number of your microphone that you noted earlier. For example, if you microphone is the first device, device 0, then type this command:
echo ADEVICE 0 0 > direwolf.conf
If your microphone is the second device (such as it is on my computer), device 1, then type this command instead:
echo ADEVICE 1 0 > direwolf.conf
If it is the third device, then replace the 1 with a 2, etc.
Now you can run Direwolf by typing:
direwolf.exe

And you should get a message such as this:

If your CubeSatSim is transmitting APRS packets, you should see them decoded like this:

If you didn't create the config file correctly, you will see something like this:

To exit Direwolf, type Control-C or just close the Command Prompt window.

MMSSTV for SSTV
Switch the CubeSatSim into SSTV (Slow Scan TeleVision) mode 4: https://youtu.be/_K9sLvUW9Mo?t=839 You will press and hold the pushbutton on the CubeSatSim and release it when the green LED blinks 4 times.
Tune SDR++ to 434.9 Narrowband FM (NFM) and you should see a long continuous signal of many tones.

Once you see the SSTV images in sdrpp, you are ready to install and run MMSSTV on Windows to decode the images. Note that due to the VBCable or audio feedback plug, you won't hear it, but you can see it on the sdrpp waterfall.
Here's how to download MMSSTV: https://hamsoft.ca/pages/mmsstv.php
Download and run the installer. When you run it the first time, it will ask you for your callsign. This is only needed for SSTV transmission, so you can just click Cancel, but it will ask you again next time you run it. If you type something then OK it won't prompt you again.

Select Option then Setup MMSSTV to open the configuration menu.

Then click the check box next to Auto slant then click OK.

You might not need to configure the microphone for MMSTV if you see this when you run it:

Note the green vertical bar indicating the software is locked onto the SSTV signal, and also the box Scottie 2 will be selected, which is the SSTV mode that the CubeSatSim transmits in.
But if you see this, with a black or grey vertical bar, and only Auto selected, it means you need to configure it, or your loopback plug is not inserted, or your audio is muted:

To change your input device, select the Option menu then Setup MMSSTV then select the Misc tab. Next to Sound Card In, there is a dropdown where you can select your microphone device (in my case, Sterwo Mix), then click OK.

You now should see the green vertical bar and Scottie 2 selected and the image should fill in over time.
If you are using VBCable instead of a loopback plug, you will need to configure the input audio device in MMSSTV. Under the Option menu go to Setup MMSSTV then under Sound Card In select Cable Out.
You should see the signal in the MMSSTV window and also the images decoding. If your CubeSatSim doesn't have a camera, you will see stored images transmitted. If it has a working camera, you will first see a stored image, then it will send camera images after that.


Morse Code (CW)
Next, you will setup a Morse Code decoder called Fldigi for Windows using sdrpp.
Download Go to https://sourceforge.net/projects/fldigi/files/
Click on fldigi folder. Click on fldigi-4.1.26_setup.exe file and download.
Run fldigi-4.1.26_setup.exe and go through installer steps.
Run the Fldigi application.
The first time, you can skip entering the callsign. On the Soundcard/Devices menu, click checkbox next to PortAudio and select your default speaker soundcard. Click Next until you can click Finish. Then the application will start:

Run sdrpp.exe with RTL-SDR dongle plugged in. Tune to 434.9 MHz NFM. Put the CubeSatSim into mode 5 for Morse Code (5 blinks of the green LED). Tune sdrpp until you hear the Morse code clearly.
In Fldigi, look in the waterfall for the Morse code signal. If you don’t see it, you may need to change your soundcard. Go under the Configure menu then Config Dialog then select Soundcard then Devices. PortAudio should be checked. Try changing the Capture soundcard then Save then Close. Now look for the signal in the Waterfall. Try turning up volume in sdrpp.exe

Once you click on the signal, the red box will move there and you should start seeing numbers decoded in the yellow box in Fldigi. These should look like the numbers you received in APRS packets.

Decoding APRS and CW Telemetry
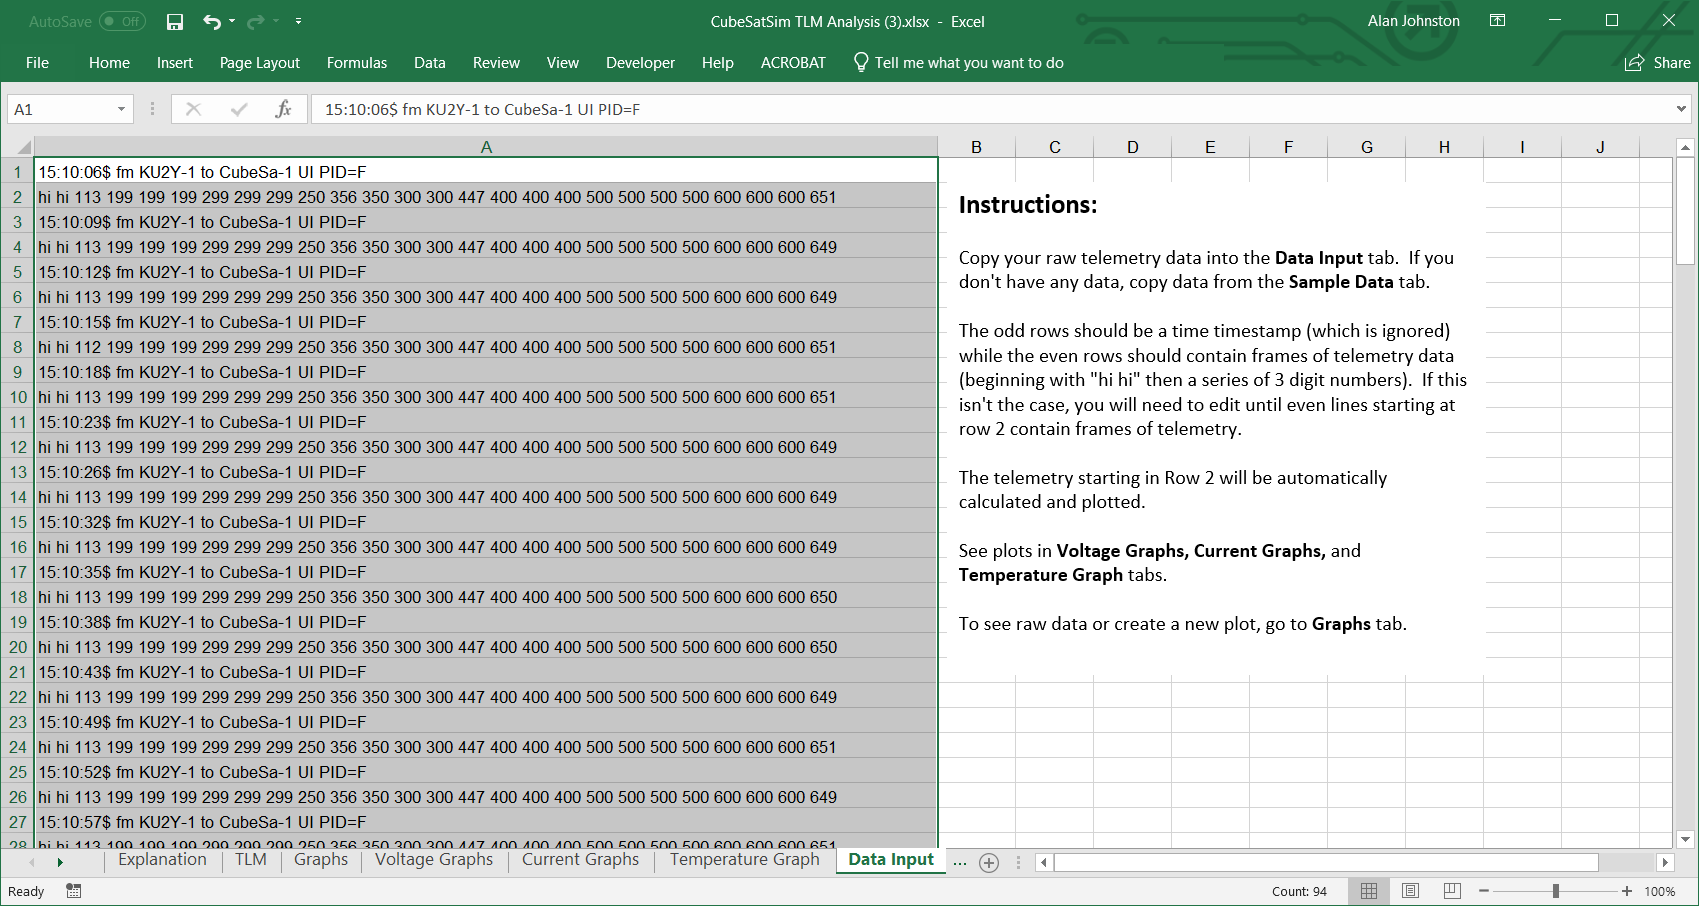
Once you have telemetry data from APRS or CW you can decode them in a spreadsheet. The telemetry is a whole series of numbers beginning with hi hi such as:
AMSAT HI HI 100 VA99 199 199 299 299 299 270 386 342 301 300 446 400 400 400 500 500 500 500 600 600 600 651
Download the telemetry analysis spreadsheet at https://github.com/alanbjohnston/CubeSatSim/tree/master/spreadsheet Note that there is an online spreadsheet if you have a Google account but don't have a spreadsheet application. https://cubesatsim.org/telem On the online spreadsheet, you will need to make a copy so you can edit it. On the downloaded spreadsheet, you will need to open the spreadsheet and Enable Editing by clicking the button:

In the Data Input tab, position the cursor at the top (A1) and paste the data.
Now look at the Current Graphs tab and you should see updated graphs.
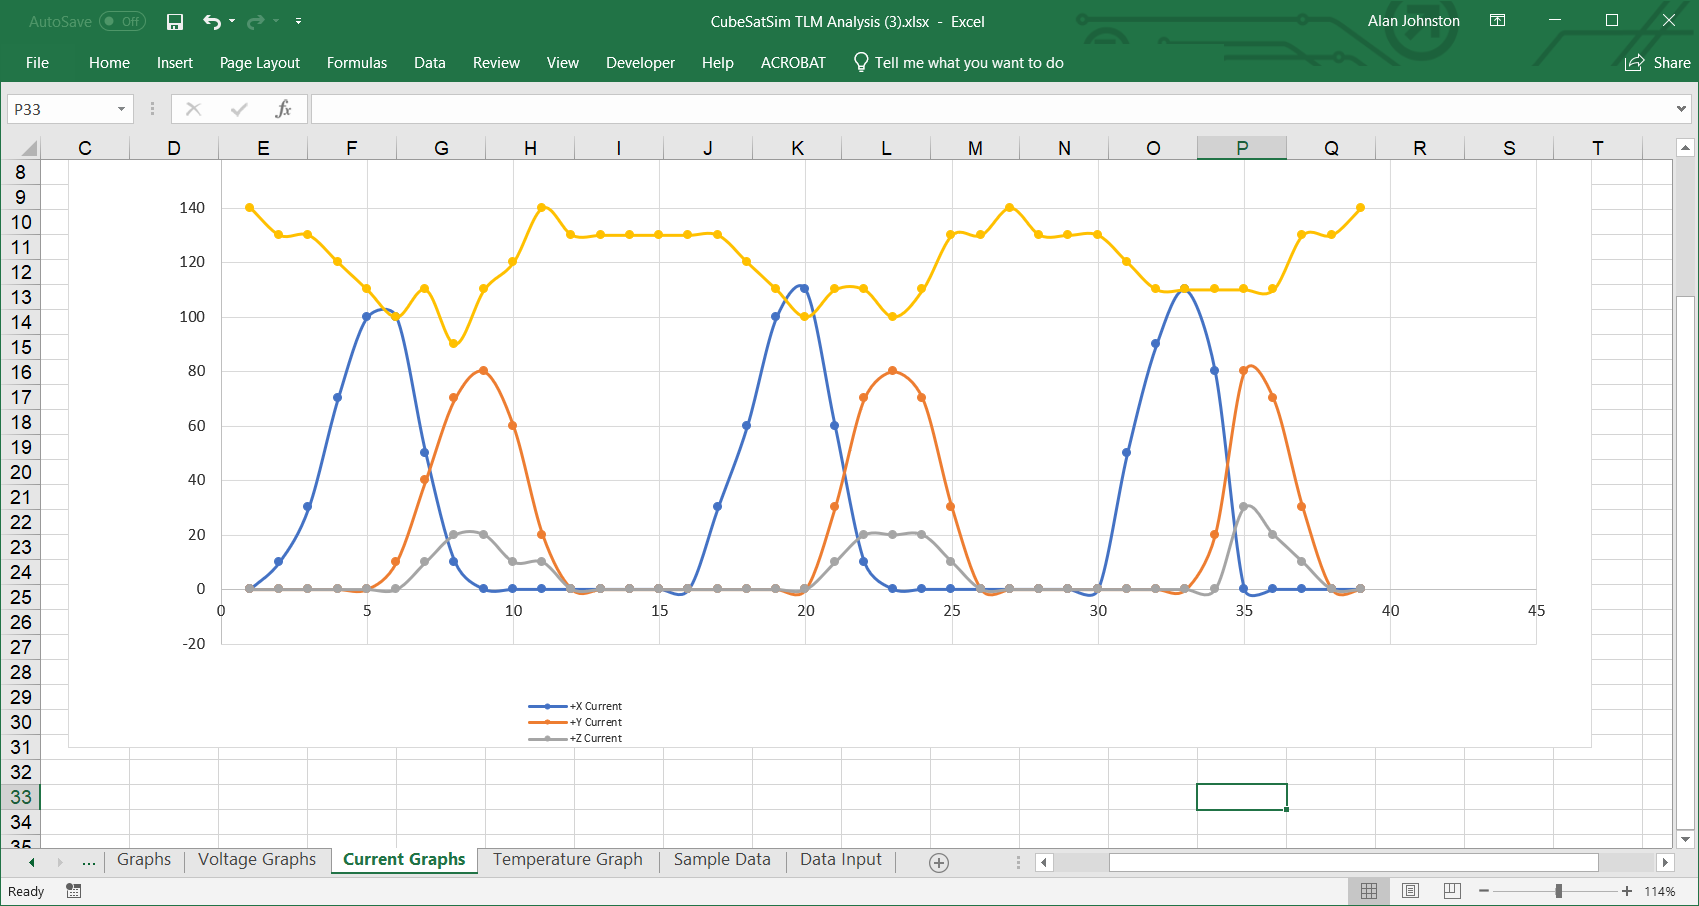
You can also look at the Voltage and Temperature Graphs.
In order to update the graphs, you will need to clear the existing data then copy and paste new data from the AFSK 1200 Window. Note that only 80 data points are graphed (data in A1 - A161). To clear the existing data, go to the Data Input tab in the spreadsheet, then highlight the cells with the data (e.g. A1 through whatever row has data in it). If you are using Excel, right click then choose Clear Contents. If you are using the Google Docs online spreadsheet or Libra Office, hit Backspace. Don't delete the cells or the formulas may become broken. If this happens, even with valid data, the graphs will be blank. If this happens, you will need to download the spreadsheet again from Github and then paste in the data again.
Your Windows Ground Station is complete!