Widget Manager: Creating a Custom View for an Existing Widget - akumina/AkuminaTraining GitHub Wiki
Sometimes Existing Widgets are close to, but do not completely meet requirements. In the case that the Widget’s output doesn’t quite match up with requirements we can create a custom template for the widget. Custom template can change the style of the output or hide elements of the OOB data model that we do not want to display. In the following example we will create a custom template for the Important Dates widget on the Digital Workplace homepage that will display the Events in columns and hide the event description.

- Retrieve the View Icons from the Important Dates widget on the Home Page. You can find out how to do so here. Use these icons when developing your custom template
- In the Management Apps tab of Interchange, click on the View Manager. Click “Add New”. In the left pane navigate to “/DigitalWorkplace/Content/Templates/ImportantDates” for the folder path. Click “Choose File”, navigate to your custom template (DigitalWorkspaceCustom.html). Click “Save & Exit”.
- In the Management Apps tab of Interchange, click on the Widget Manager app. Then find the ImportantDates widget. Click the ‘Edit’ button next to it. Add a view with the values in the Widget Manager – Widget Definition section. Click Save & Exit.
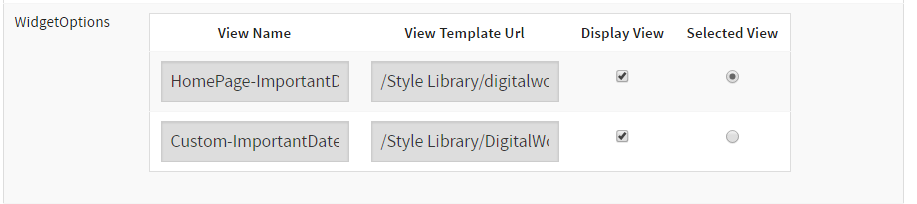
- In the Manage Widgets window find ImportantDates and click its ‘View Widget Definitions’ button. Then find ‘HomePage-ImportantDates’ and click its ‘Edit’ button. In the Widget Options section select your new view as shown in the Widget Manager – Widget Instance section. Click Save & Exit.
- Return to your site’s home page.
- Flush your cache by clicking on the Akumina icon in the left rail, clicking the refresh icon, then clicking “Refresh All Cache”. Refresh the page.
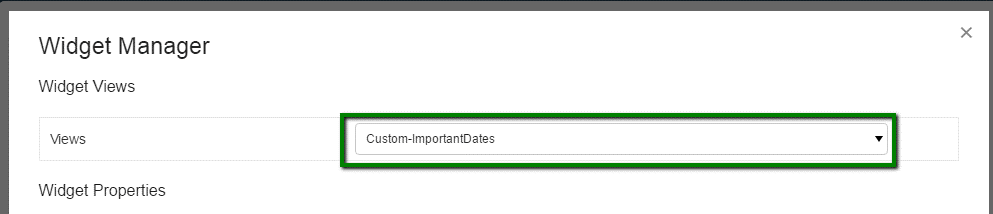
- Edit your widget by clicking on the Akumina icon in the left rail, clicking the pencil icon, then clicking your app. Change the view to Custom-Important dates. Click ‘Update’ your custom view will appear.
Create an html file called DigitalWorkspaceCustom.html and paste the following within.
<div class="interAction">
<div class="ak-event-list ak-module">
<h4 class="ak-module-header">{{WebPartTitle}}</h4>
<div class="row">
{{#HasItems}}
{{#Items}}
<div class="small-12 medium-12 large-4 columns">
<span class="ak-events-date">
<span class="ak-events-month">{{DateMonth}}</span>
<span class="ak-events-day">{{DateDay}}</span>
</span>
{{#HasLink}}
<h5 class="ak-events-title"><a href="{{LinkSrc}}" target="{{Target}}" target="{{Target}}">{{LinkText}}</a></h5>
{{/HasLink}}
{{^HasLink}}
<h5 class="ak-events-title">{{LinkText}}</h5>
{{/HasLink}}
<p class="ak-events-description">{{SubText}}</p>
</div>
{{/Items}}
{{/HasItems}}
{{^HasItems}}
<h5 class="ak-events-title">No Events to Display</h5>
{{/HasItems}}
</div>
{{#if showAllLink}}
<a class="ak-events-more ak-module-more-link" href="{{ViewAllLink}}">All Events ›</a>
{{/if}}
</div>
</div>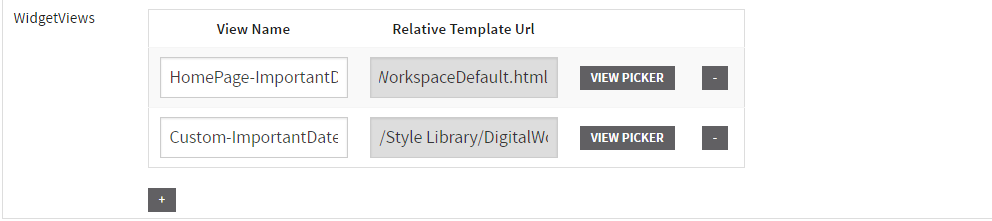
Custom-ImportantDates
/Style Library/DigitalWorkplace/Content/Templates/ImportantDates/DigitalWorkspaceCustom.html

For more info on the Widget Manager see the articles below: