People Sync: Add Org Chart to the directory control - akumina/AkuminaTraining GitHub Wiki
Version: Akumina Foundation 3.3.0.0+
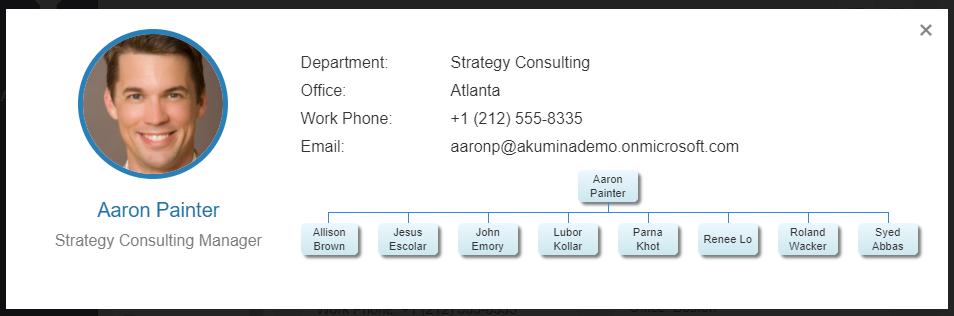
The Akumina People Directory widget is very flexible and can be extended in a number of ways. In our example we would like to add in an organization chart based on the user's direct reports.
We must first validate that the data exists that we will use.
In order for the solution to display properly, there must be data in the "directreports" property of the user being viewed. You can verify this by looking in the aadusers.xml file for a given record. Below is an example of the attribute:

See also
It is necessary to edit the people directory display. As a best practice, we will create a new view that is based on the existing view instead of editing the default view (see deploying section for details).
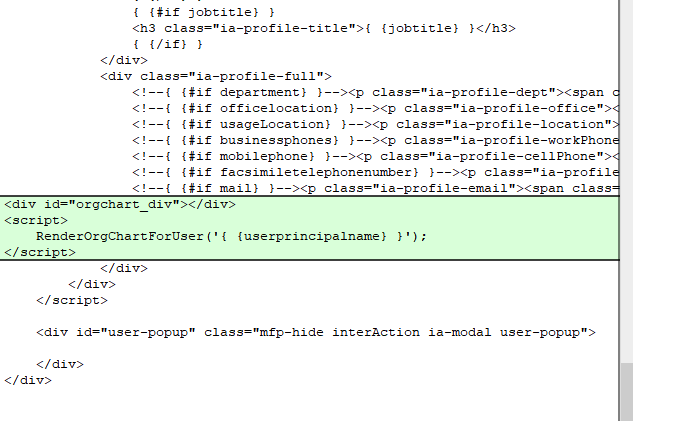
The following must be added to the end of the element div class="ia-profile-full", as shown below.
<div id="orgchart_div"></div>
<script>
  RenderOrgChartForUser('{ {userprincipalname} }');
</script>
When added to the view:
The following JavaScript must be added to the digitalworkplace.custom.js file.
function RenderOrgChartForUser(uniqueId){
	if (uniqueId =='{{userprincipalname}}')
		return;

	// check for google charts
	if (google != null && google.charts != null){
		GetUserData(uniqueId, GetOrgChartForUser);
	} else {
		// load google charts file
		$.getScript( "https://www.gstatic.com/charts/loader.js", function( data, textStatus, jqxhr ) {
			GetUserData(uniqueId, GetOrgChartForUser);
		});
	}
}

function GetUserData(uniqueId, callback){
	var apiUrl = Akumina.Digispace.ConfigurationContext.InterchangeURL + '/api/connector/users?pageSize=1&pageNumber=1&orderBy=givenName&interchangeQueryKey=' + Akumina.Digispace.ConfigurationContext.InterchangeQueryKey;
	var queryData = { "filters":[]};
	var filter = {
		"property": "userprincipalname", "values": [uniqueId], "operator": "starts-with"
	};

	queryData.filters.push(filter);

	$.ajax({
		type: "POST",
		url: apiUrl,
		data: queryData,
		dataType: "json",
		xhrFields: {
			withCredentials: true
		}
	}).done(function (response) {
		if (response.Users.length > 0){
			var userInfo = response.Users[0];
			if (callback != null){
				callback(userInfo);
			}
		} else {
			alert( ' No users!' );
		}
	}).fail(function () {
		alert( ' Error!' );
	});
}

function GetOrgChartForUser(userInfo){
	// google API
	google.charts.load('current', {packages:["orgchart"]});

	var data = GetOrgChartDataForUser(userInfo);

	var chart = new google.visualization.OrgChart(document.getElementById('orgchart_div'));
	chart.draw(data, {allowHtml:true});
}

function GetOrgChartDataForUser(userInfo){
	var data = new google.visualization.DataTable();
	data.addColumn('string', 'Name');
	data.addColumn('string', 'Manager');
	data.addColumn('string', 'ToolTip');

	var uniqueId = userInfo.Properties.userprincipalname;
	var displayName = userInfo.Properties.displayname;
	var jobTitle = userInfo.Properties.jobtitle;

	var directReportsData = userInfo.Properties.directreports;
	if (directReportsData != null && directReportsData != ''){
		// add current user
		data.addRows([
		  [{v:uniqueId, f:displayName},
		   '', jobTitle]
		]);

		var directReports = jQuery.parseJSON(directReportsData);
		for (var i = 0; i < directReports.length; i++) {
			var directReport = directReports[i];

			var directReportDisplayName = directReport.a;
			var directReportJobTitle = directReport.i;

			// add reports
			data.addRows([
			  [{v:directReportDisplayName,
			    f:directReportDisplayName},
			   uniqueId, directReportJobTitle]
			]);
		}
	}

	return data;
}Follow the steps below to Deploy the solution
- Download digitalworkplace.custom.js from the “/Style Library/DigitalWorkplace/JS” folder within SharePoint
- Paste the javascript code above within digitalworkplace.custom.js
- Upload the updated digitalworkplace.custom.js to the “/Style Library/DigitalWorkplace/JS” folder within SharePoint
- Download the /Style Library/DigitalWorkPlace/Content/Templates/PeopleDirectory/Default.html file.
- Copy the file as custom-default.html.
- In the Management Apps tab of Interchange, click on the View Manager. Click “Add New”. In the left pane navigate to “/DigitalWorkplace/Content/Templates/PeopleDirectory” for the folder path. Click “Choose File”, navigate to your custom template (custom-default.html). Click “Save”.
- In the Management Apps tab of Interchange, click on the Widget Manager app. In the Manage Widgets window, find PeopleDirectory and click its ‘Edit’ button. Add the view created in the previous section to the widget's views. Click Save & Exit button.
- In the Manage Widgets window, find PeopleDirectory and click its ‘View Instances’ button. Then click on ‘Edit’ for the only item there, which should be the default. In the "WidgetOptions" section, select the new view as the display and the selected view. Click Save & Exit