Page Life Cycle: Appending Additional Markup - akumina/AkuminaTraining GitHub Wiki
Akumina Foundation 3.4.0.0
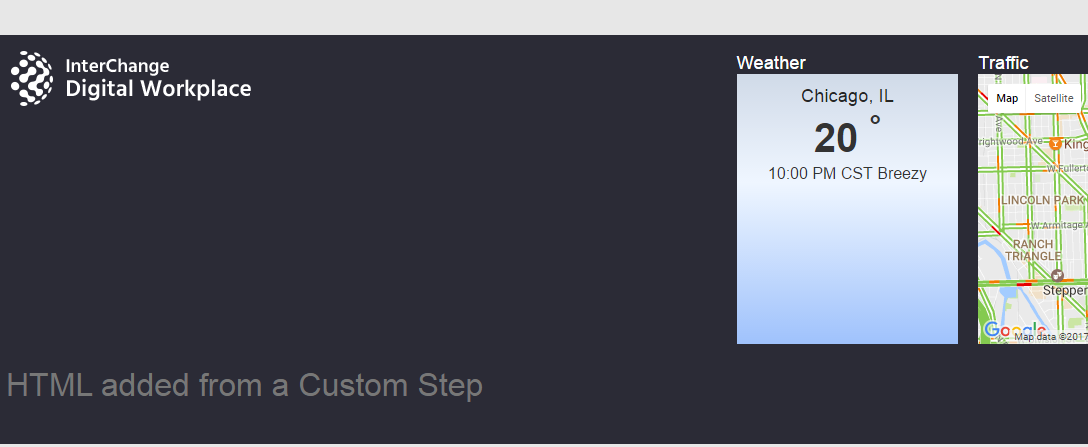
We will create a custom step that adds markup to the footer of a Digital Workplace Page.
- In the Management Apps tab of Interchange, click on the View Manager. Click “Add New”. In the left pane navigate to “/DigitalWorkplace/Content/Templates/” for the folder path. Click “Choose File”, navigate to your custom template (CustomTemplate.html). Click “Save”.
- Download digitalworkplace.custom.js from the “/Style Library/DigitalWorkplace/JS” folder within SharePoint
- Paste the Code within digitalworkplace.custom.js
- Upload the updated digitalworkplace.custom.js to the “/Style Library/DigitalWorkplace/JS” folder within SharePoint
- Navigate to a page on your Digital Workplace site
- Flush your cache by clicking on the Akumina icon in the left rail, clicking the refresh icon, then clicking “Refresh All Cache”
- Refresh the page. The custom markup will be added to the footer.
Create a file called CustomTemplate.html and paste the following code within
<div>
   <h1>HTML added from a Custom Step</h1>
</div>var AdditionalSteps = AdditionalSteps || {
}
if ((typeof AdditionalSteps.MoreSteps) === 'undefined') {
AdditionalSteps.MoreSteps = {
Init: function () {
console.log('AdditionalSteps.MoreSteps.Init');
var steps = [];
steps.push({ stepName: "Getting Additional Markup template", additionalSteps: [{ name: "Add Custom Template", callback: AddCustomTemplate}] });
return steps;
}
}
}
function AddCustomTemplate() {
var popupTemplateUrl = __getTemplatePrefix() + "/Style%20Library/" + Akumina.Digispace.ConfigurationContext.TemplateCoreFolderName + "/Content/Templates/CustomTemplate.html";
new Akumina.Digispace.AppPart.Data().Templates.ParseTemplate(popupTemplateUrl, {}).done(function (html) {
$("#digiFooter").append(html);
Akumina.Digispace.AppPart.Eventing.Publish('/loader/onexecuted/');
});
}
To learn how to customize the Page Life Cycle using the Akumina Framework see the following articles: