WireGuard Setup Guide - ajgillis04/GillisDockerDepot GitHub Wiki
WireGuard is a fast, modern, and secure VPN tunnel that provides ease of use and high performance. It is available for various platforms including Windows, Linux, macOS, iOS, and Android.
- Docker installed (optional, for containerized setup)
-
Docker: My preferred use case continue to
Step 2 - Windows: Download the installer from the official WireGuard website and follow the installation instructions.
-
Linux: Use your package manager to install WireGuard. For example, on Ubuntu:
sudo apt install wireguard
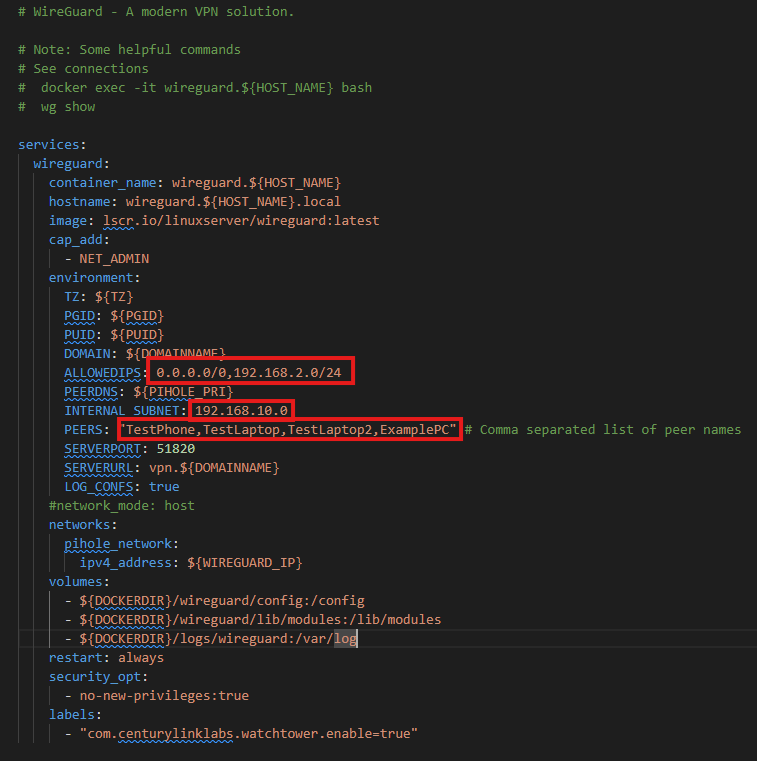
- Open
wireguard.yamland update the unique to you settings - ALLOWEDIPS: 0.0.0.0/0,<your networks IP range
- PEERDNS: ${PIHOLE_PRI} - This is optional, this will make sure everyone who connects to the VPN will use PIHole
- INTERNAL_SUBNET: <Choose an IP range for your VPN clients ie) 192.168.10.0
- PEERS: <Give each peer you intend to connect with a name here. You can add more later)
- Save
wireguard.yaml - Re-create the container
docker compose -p mediaserver -f docker-compose-server<num>.yaml up --detach
Follow these steps to reset the private and public keys for a WireGuard peer:
-
Generate New Private Key:
wg genkey | tee /path/to/new_private_key -
Generate New Public Key from Private Key:
- Note, if you get Permission denied set the permissions to write for the file.
wg pubkey < /path/to/new_private_key > /path/to/new_public_key
-
Update WireGuard Configuration File:
- Update your WireGuard configuration file (wg0.conf or similar) with the new keys.
-
Restart WireGuard Interface:
- Restart the WireGuard interface to apply the changes.
sudo wg-quick down wg0
sudo wg-quick up wg0
-
Update Peers:
- Inform the affected peer(s) to update their configuration with the new public key.
This guide describes how to run a reliable WireGuard VPN server on Windows that:
- Provides full internet access to VPN clients
- Allows VPN clients to reach all LAN devices
- Survives reboots
- Avoids ICS, IPv6 hacks, and brittle PostUp scripts
- Uses Windows’ built‑in NAT for clean routing
- Keeps the Windows host’s internet stable
- Windows 10 or 11
- Administrator access
- WireGuard installed: https://www.wireguard.com/install
- Router port‑forwarding for UDP 51820
- Static IP or Dynamic DNS (DuckDNS, No‑IP, Cloudflare, etc.)
Forward UDP 51820 to your Windows host:
Protocol: UDP
External Port: 51820
Internal IP: Your Windows server (e.g., 192.168.x.x)
Internal Port: 51820
If your WAN IP changes, use a dynamic DNS hostname in your client config.
- Install WireGuard for Windows
- Open the GUI
- Add → “Add empty tunnel”
- Save as wg-server.conf
[Interface]
PrivateKey = <server private key>
Address = 10.9.0.1/24
ListenPort = 51820
DNS = 192.168.x.x

# Add one [Peer] per client
[Peer]
PublicKey = <client public key>
AllowedIPs = 10.9.0.2/32
Notes:
- Server does NOT need AllowedIPs = 0.0.0.0/0
- Server does NOT need PostUp/PostDown rules
- Server does NOT need IPv6 disabled
============================================================ Step 3 — Register the Tunnel as a Service
"C:\Program Files\WireGuard\wireguard.exe" /installtunnelservice "C:\Program Files\WireGuard\Data\Configurations\wg-server.conf.dpapi"
Verify in services.msc:
- WireGuard Tunnel: wg-server
- Startup type: Automatic
Set-ItemProperty -Path "HKLM:\SYSTEM\CurrentControlSet\Services\Tcpip\Parameters" -Name IPEnableRouter -Value 1
Reboot required.
============================================================ Step 5 — Create NAT for VPN Subnet (Full Tunnel Required)
This NAT rule allows VPN clients to use your Windows PC’s internet connection.
New-NetNat -Name "WG-NAT" -InternalIPInterfaceAddressPrefix 10.9.0.0/24
Notes:
- NAT applies ONLY to 10.9.0.x
- Does NOT affect the Windows host’s own internet
- Safe to leave active even when WireGuard is stopped
============================================================ Step 6 — Enable Forwarding on Interfaces
Replace "ethernet name" with the exact name shown in Get-NetAdapter.
Set-NetIPInterface -InterfaceAlias "wg-server" -Forwarding Enabled
Set-NetIPInterface -InterfaceAlias "ethernet name" -Forwarding Enabled
Allow inbound WireGuard:
New-NetFirewallRule -DisplayName "WireGuard UDP 51820" -Direction Inbound -Protocol UDP -LocalPort 51820 -Action Allow
Allow VPN → LAN:
New-NetFirewallRule -DisplayName "WG LAN Access" -Direction Inbound -Action Allow -InterfaceAlias "wg-server"
Allow LAN → VPN replies (optional):
New-NetFirewallRule -DisplayName "LAN to WG" -Direction Outbound -Action Allow -InterfaceAlias "ethernet name"
Example (Android/iPhone):
[Interface]
PrivateKey = <client private key>
Address = 10.9.0.2/32
DNS = 192.168.x.x
MTU = 1280

[Peer]
PublicKey = <server public key>
Endpoint = vpn.example.com:51820
AllowedIPs = 0.0.0.0/0
PersistentKeepalive = 25
Notes:
- 0.0.0.0/0 gives full internet + LAN access
- Adding 192.168.x.0/24 is optional and redundant
From the client:
ping 192.168.2.1
ping 192.168.2.12
nslookup google.com 192.168.2.12
curl https://icanhazip.com
Expected results:
- LAN devices respond
- DNS resolves via Pi‑hole
- Public IP matches your home WAN
- Internet works normally
This updated guide:
- Removes ICS (unreliable, breaks after reboots)
- Removes IPv6 disabling (unnecessary, harmful)
- Removes PostUp/PostDown hacks
- Uses Windows NAT (stable, supported, clean)
- Ensures full LAN access for VPN clients
- Keeps the Windows host’s internet stable
- Matches your actual working setup exactly
.\wg.exe show
or
"C:\Program Files\WireGuard\wg.exe" show
Shows:
- Latest handshake
- RX/TX stats
- Peer endpoint and status
### Troubleshooting
**Common Issues**:⚠️ July 2025, Note for Docker/Alpine Users
If you're using the linuxserver/wireguard container image and encountered issues around July 2025 (like WireGuard tunnels not passing traffic), it may be due to changes in Alpine base image or iptables configuration.
The image tagged 1.0.20250521-r0-ls81 introduced breaking changes — rolling back to 1.0.20210914-r4-ls80 resolved it for many.
To avoid future breakage, consider pinning your WireGuard image tag explicitly in docker-compose.yaml, and monitor the [GitHub repo](https://github.com/linuxserver/docker-wireguard) for updates or changelogs.

**Logs**: Check container logs (docker logs <container_name>) for error messages related to iptables, interfaces, or peer connections.
✘ Wireguard Error manifest unknown Error response from daemon: manifest unknown
**Support**: Monitor the [GitHub repo](https://github.com/linuxserver/docker-wireguard) for updates or changelogs.