Pi‐hole Setup Guide - ajgillis04/GillisDockerDepot GitHub Wiki
Pi-hole is a network-wide ad blocker that acts as a DNS sinkhole, blocking ads and tracking domains for all devices connected to your network.
- Docker installed
- Pi-hole container running in your Docker stack
- Open your browser and navigate to
http://<your-piholeip-address/admin/login>. This was set in .env. - Log in with your Pi-hole credentials.
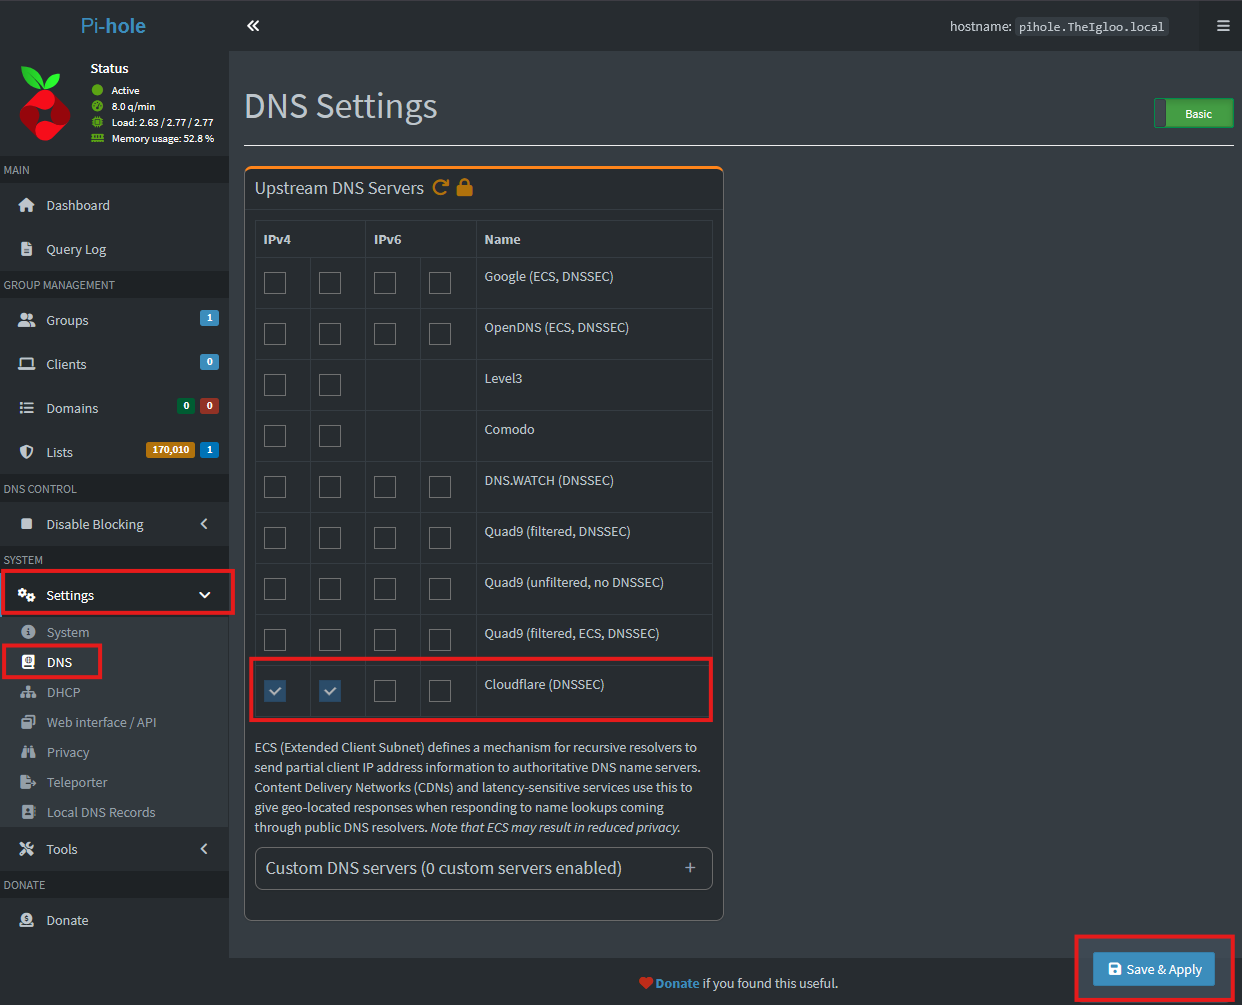
- Navigate to the
Settingstab. - Go to the
DNSsection. - Configure the DNS settings, including upstream DNS servers and custom DNS entries. Note: These Should all be pre-configured.
- Click
Save.
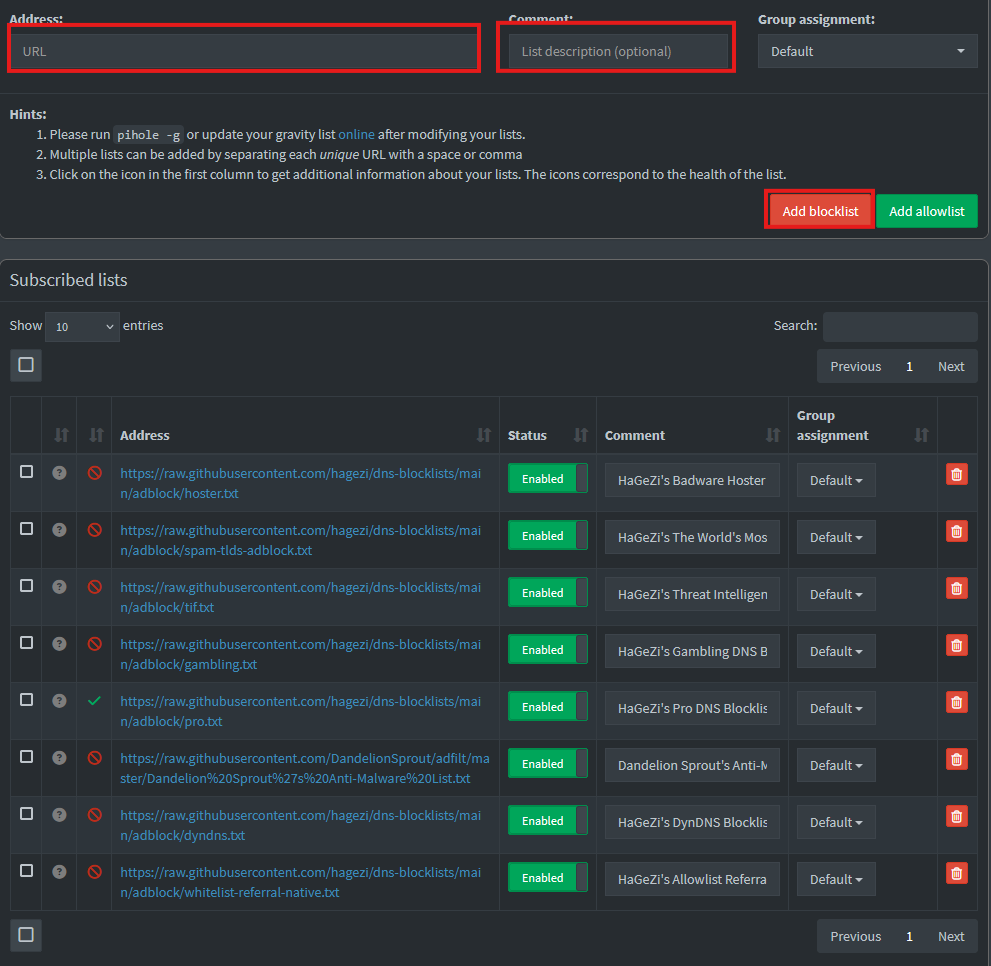
-
Navigate to the
Liststab. -
Go to the
Adlistssection. -
Click
Add BlockListto add new block lists.HaGeZi's Badware Hoster DNS Blocklist:
https://raw.githubusercontent.com/hagezi/dns-blocklists/main/adblock/hoster.txtHaGeZi's The World's Most Abused TLDs:
https://raw.githubusercontent.com/hagezi/dns-blocklists/main/adblock/spam-tlds-adblock.txtHaGeZi's Threat Intelligence Feeds DNS Blocklist Malware:
https://raw.githubusercontent.com/hagezi/dns-blocklists/main/adblock/tif.txtHaGeZi's Gambling DNS Blocklis:
https://raw.githubusercontent.com/hagezi/dns-blocklists/main/adblock/gambling.txtHaGeZi's Pro DNS Blocklist:
https://raw.githubusercontent.com/hagezi/dns-blocklists/main/adblock/pro.txtDandelion Sprout's Anti-Malware List:
https://raw.githubusercontent.com/DandelionSprout/adfilt/master/Dandelion%20Sprout%27s%20Anti-Malware%20List.txtHaGeZi's DynDNS Blocklist:
https://raw.githubusercontent.com/hagezi/dns-blocklists/main/adblock/dyndns.txtHaGeZi's Allowlist Referral:
https://raw.githubusercontent.com/hagezi/dns-blocklists/main/adblock/whitelist-referral-native.txt -
Enter the URL & Description of the block list you want to
Add Blocklist.
- Go to the
Clientstab. - Click
Add Client. - Enter the IP address or hostname of the client device.
- Configure client-specific settings, such as group assignment and DNS rules.
- Click
Save.
- Navigate to the
Dashboardtab. - Monitor blocked queries, total queries, and top domains.
- Use the various tabs to view query logs, client activity, and block lists.
⚠️ Hint: Redundancy is good practice. If your main Pi-hole goes offline, it will impact your network.
- Raspberry Pi with Raspberry Pi OS
- Docker installed
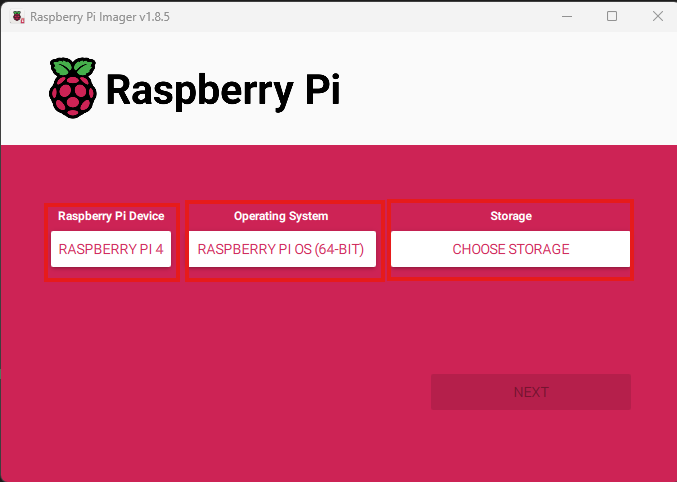
-
Download and Install Raspberry Pi OS:
-
Download and install the Raspberry Pi Imager from Raspberry Pi Imager to install Raspberry Pi OS on a microSD card.
-
Launch Raspberry Pi Imager from your start menu and select the device, operating system, and storage, then click Next. Note: Your selections may be different than mine depending on hardware
-
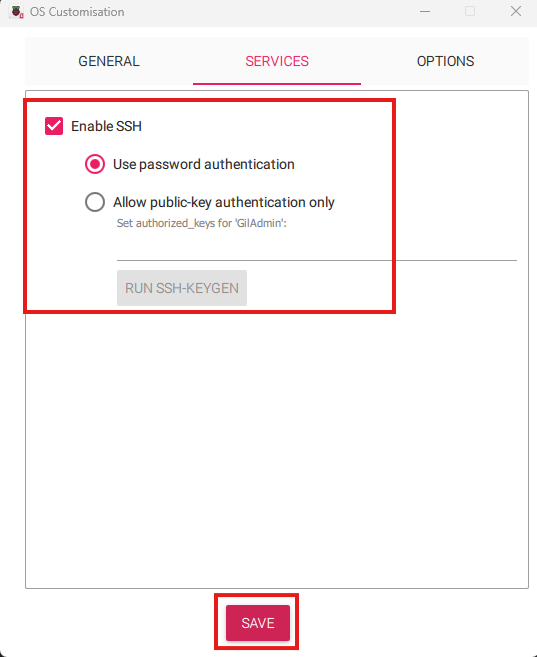
Choose Edit Settings.
-
In the General blade, select Enable SSH.
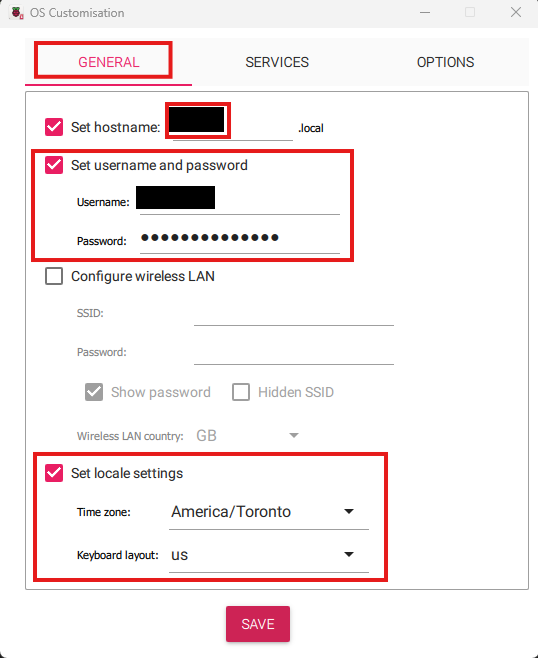
-
In the Services blade, select the hostname, and set the username and password.
-
Insert the microSD card into your Raspberry Pi and boot it up.
-
-
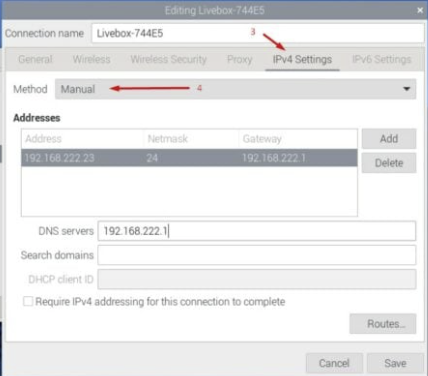
Set Static IP for the Raspberry Host machine: I set a static address so i can always reach the the Raspberry host even if dhcp is down. Raspberry actually recommends setting a DCHP reservation on you router
-
On the host desktop go to the top right and *right click icon that looks like blue up and down arrows
-
Choose Network Manager Settings, and set static ip, subnet, and dns servers. I use my pihole servers as the DNS
-
-
Update Your Raspberry Pi:
- Putty into the Raspberry Pi and run these commands:
sudo apt update
sudo apt upgrade -y
-
Install Docker:
- Install Docker:
curl -sSL https://get.docker.com | sh
sudo usermod -aG docker $USER
sudo reboot
-
Install Git on Your Raspberry Pi:
sudo apt install git -y
-
Clone Your Repository:
- Clone:
cd /usr/local
sudo git clone https://<your-token>@github.com/yourusername/GillisDockerDepot.git
cd GillisDockerDepot
sudo chown -R {yourusername}:{yourusername} /usr/local/GillisDockerDepot
sudo chmod -R 775 /usr/local/GillisDockerDepot
-
(Optional) Install & Update the Samba Configuration:
- Run the following commands:
sudo apt install samba -y
sudo nano /etc/samba/smb.conf
- Add the Share Configuration: Add the following lines at the end of the file to define your share:
[GillisDockerDepot] path = /usr/local/GillisDockerDepot browseable = yes read only = no valid users = <your-username>- Create a Samba Password for : Add the user to Samba and set a password:
sudo smbpasswd -a <your-username>
- Restart Samba Services: After saving your changes to the configuration file, restart the Samba services:
sudo systemctl restart smbd
sudo systemctl restart nmbd
-
Access the Shared Directory:
- Access the shared directory from your Windows machine by typing
\\<RaspberryIP>\GillisDockerDepotin the File Explorer address bar. - I copy over any files that are not part of the git repository like .env, traefik yamls, and shared folder.
- Access the shared directory from your Windows machine by typing
-
Update .env
- Either create or modify the .env file to update paths and environment variables for this server.
**
⚠️ Hint: to get the PUID and PGID run these and copy into your .env
id <username>
- Update docker-compose-server{num}.yaml
-
Start Containers
docker compose -p mediaserver -f docker-compose-server{num}.yaml up --detach
**
⚠️ Hint: Ensure you have `Expert' turned on
-
Go to Settings, All settings, Miscellaneous
-
Find the
misc.dnsmasq_linessection and adddhcp-option=6,<DNS_Server1_IP>,<DNS_Server2_IP> -
Select Save & Apply
-
Repeat on Pihole 2 if you do not have a sync between the systems in place
- Open Command Prompt:
Press
Win + R, typecmd, and pressEnter. - Check IP configuration:
ipconfig /all - Look for DNS Servers (Example below):
- Verify that
<primary Pi-hole IP>and<secondary Pi-hole IP>are listed.
Default Gateway . . . . . . . . . : 192.168.1.1 DHCP Server . . . . . . . . . . . : 192.168.1.5 DNS Servers . . . . . . . . . . . : 192.168.1.5 192.168.1.6 - Verify that
- Open Terminal:
Press
Cmd + Space, typeTerminal, and pressEnter. - Check IP configuration:
networksetup -getdnsservers <network_interface>
- Look for DNS Servers:
Verify that
<primary Pi-hole IP>and<secondary Pi-hole IP>are listed.
- Open Terminal: Open a terminal application.
- Check resolved configuration:
nmcli device show <network_interface> | grep IP4.DNS
- Look for DNS Servers:
Verify that
<primary Pi-hole IP>and<secondary Pi-hole IP>are listed.
- Open the Pi-hole admin interface for the primary Pi-hole (
<primary Pi-hole IP>). - Navigate to Settings > Teleporter.
- Click Backup to export the settings.
- Download the backup file to your local machine.
- Open the Pi-hole admin interface for the secondary Pi-hole (
<secondary Pi-hole IP>). - Navigate to Settings > Teleporter.
- Click Restore and choose the backup file you exported.
- Click Restore to import the settings.
By following these steps, you can set up multiple Pi-hole instances with redundancy, synchronize configuration, and ensure that DHCP clients receive both DNS servers. Additionally, you can use the Teleporter feature to export and import settings between Pi-hole instances.