Nextcloud Setup Guide - ajgillis04/GillisDockerDepot GitHub Wiki
Note for QNAP: Do not host Nextcloud user data inside their NAS home folders. Permissions will conflict with containerized Nextcloud. Instead, move user data to a dedicated folder (e.g.,
/share/CACHEDEV2_DATA/nextcloud/$user) and symlink if needed.
This guide provides steps to set up a Nextcloud instance using a regular containerized setup. It is ideal if you require full control over the deployment or if you’ve migrated from Nextcloud AIO.
- Docker and docker-compose installed
- NAS storage or a local directory for external storage
- Environment variables for modular configuration
- MariaDB (for self-hosting databases)
- Create or update the
.envfile to manage configurations:
NEXTCLOUD_HOMES=/path/to/homes  # Avoid using symlinks; Nextcloud does not handle them well
NEXTCLOUD_EXSTORAGE=/share
- Create a blank database in MariaDB for Nextcloud to use:
docker exec -it mariadb.${HOST_NAME} /usr/bin/mariadb -u root -p
CREATE DATABASE nextcloud CHARACTER SET utf8mb4 COLLATE utf8mb4_general_ci;
CREATE USER 'nextclouduser'@'%' IDENTIFIED BY 'yourpassword';
GRANT ALL PRIVILEGES ON nextcloud.* TO 'nextclouduser'@'%';
FLUSH PRIVILEGES;
EXIT;
- Test if the database is set up correctly:
docker exec -it mariadb.${HOST_NAME} mysql -u nextclouduser -p --password={your password} -e "SHOW DATABASES;"
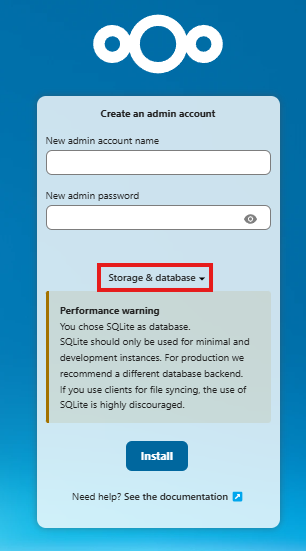
- Open your browser and navigate to
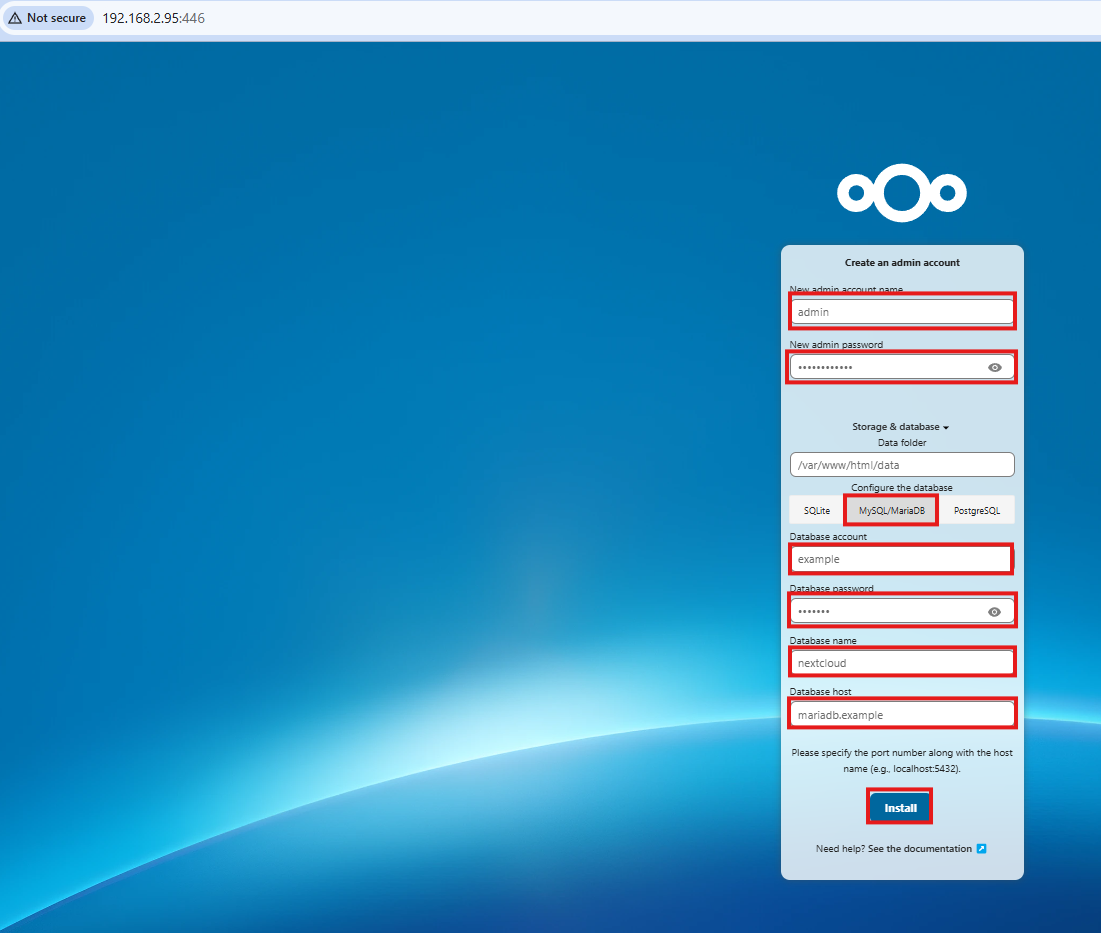
http://<your-server-ip>:8080. - Select Storage & Database.
- Enter a new admin account name and specify the database connection:
- Database account: contents of
secrets/nextcloud_mysql_user - Database password: contents of
secrets/nextcloud_mysql_password - Database name:
nextcloud - Database host:
mariadb.${HOST_NAME}
- Database account: contents of
-
Brute-force settings
Helps protect your Nextcloud instance by limiting repeated failed login attempts. This reduces the risk of brute-force attacks and keeps accounts secure. -
Calendar
Provides a shared calendar system directly inside Nextcloud. Great for personal scheduling, team coordination, and syncing with other calendar clients. -
Configurable Share Links
Lets you customize how file and folder share links behave (expiry dates, permissions, etc.). This gives you more control over how data is shared externally. -
Contacts
Centralizes contact management. You can sync contacts across devices and integrate them with other apps like Mail or Calendar. -
External storage support
Enables mounting external storage sources (NAS shares, S3, SMB, etc.) into Nextcloud. This is essential for integrating your NAS directories with Nextcloud. -
Mail
A built-in email client that connects to your existing mail accounts. Useful for consolidating communication within Nextcloud. -
Nextcloud Office
Provides collaborative document editing (based on Collabora or OnlyOffice). Allows multiple users to work on text documents, spreadsheets, and presentations in real time. -
Notes
A simple note-taking app that syncs across devices. Handy for jotting down ideas, tasks, or documentation directly in Nextcloud. -
Two-Factor Email
Adds email-based two-factor authentication. This strengthens account security by requiring a one-time code sent via email in addition to the password.
- Set up external storage:
- Enable the External Storage Support app under Settings → Apps.
- Go to Settings → Administration → External storages and add your storage volumes (e.g.,
/homes).

- Modify
config.php
sudo nano /path/to/files/GillisDockerDepot/appdata/nextcloud/var/www/html/config/config.php
Add or adjust the following entries:
'trusted_domains' => [
  'localhost',
  'nextcloud.gillisonline.com',  // your public-facing domain
  '192.168.1.100',
  '127.0.0.1',
  '::1',
],

'default_phone_region' => 'CA',

'trusted_proxies' => [
  '172.30.0.0/24',   // container subnet
  '192.168.2.0/24',  // LAN subnet
  '127.0.0.1',
  '::1',
],

'memcache.local'    => '\\OC\\Memcache\\APCu',
'memcache.locking'  => '\\OC\\Memcache\\APCu',

'overwrite.cli.url' => 'https://nextcloud.example.com',
'overwritehost'     => 'nextcloud.example.com',
'overwriteprotocol' => 'https',
'overwritewebroot'  => '/',

'maintenance_window_start' => '03:00',-
Match your Cloudflare application URL:
Setoverwritehostandoverwriteprotocolto the public Cloudflare domain (e.g.,nextcloud.example.comwithhttps). -
Split applications if needed:
If you use separate subdomains for browser SSO and sync clients, include both intrusted_domainsand document which endpoint each client should use. -
Validate from outside your LAN:
Run:curl -I https://nextcloud.example.comto confirm headers are passed correctly through Cloudflare.
Why add your domains?
- Prevents Nextcloud from rejecting proxied requests.
- Ensures both browser logins (
nextcloud.example.com) and sync clients (sync.example.com) are trusted. - Keeps your setup consistent when splitting apps (browser SSO vs sync endpoints).
- Combined with Cloudflare ranges, ensures Nextcloud logs the real client IP and avoids session issues.
Restart the container:
docker restart nextcloud.$<HOST_NAME>
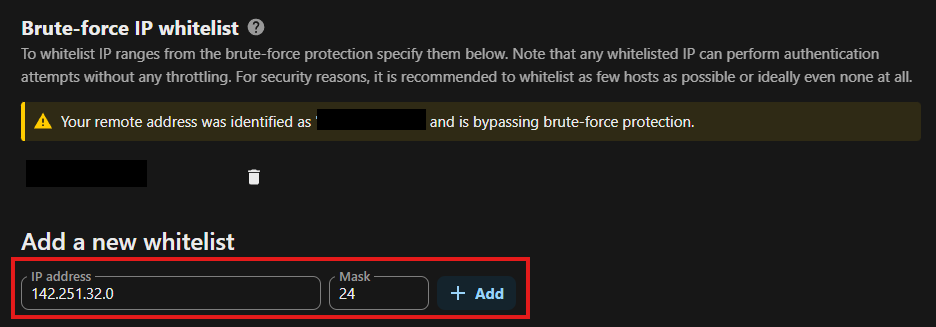
- Whitelist your IP under Security → Brute-force IP whitelist. Add your ISP IP with a
/24mask.
-
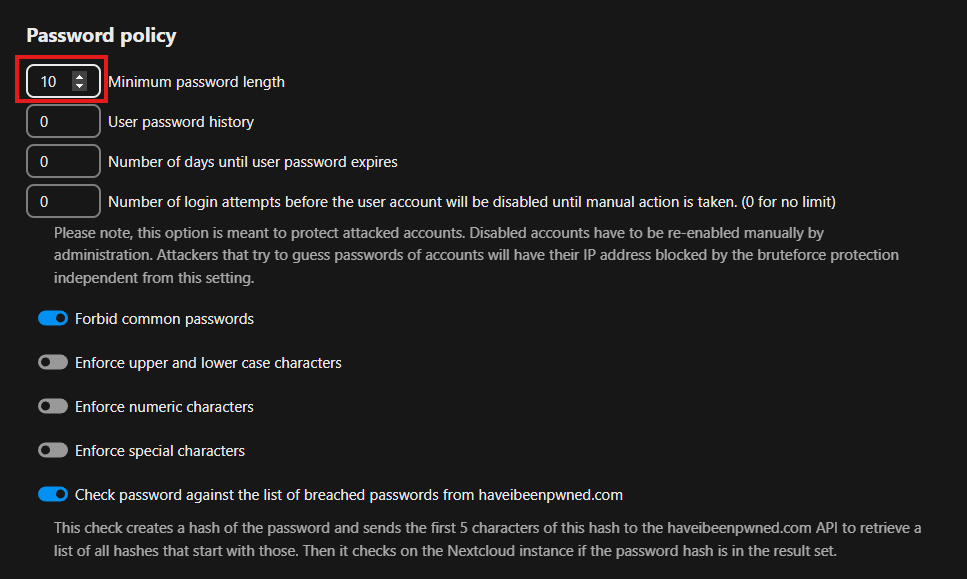
Set password policy as required.
-
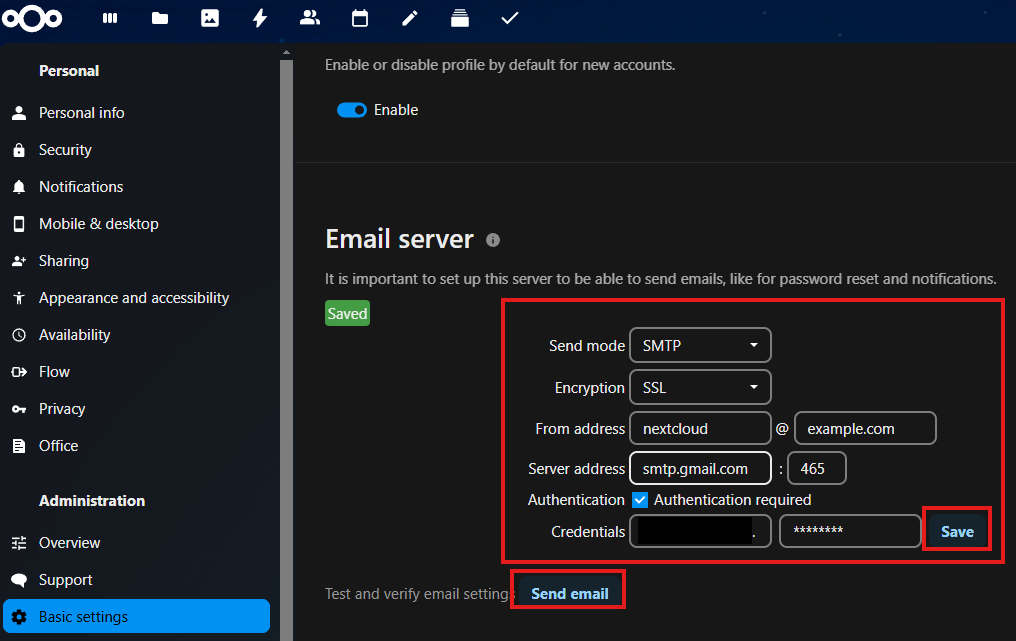
Configure email server under Basic settings → Email server.
-
Set up users and groups.
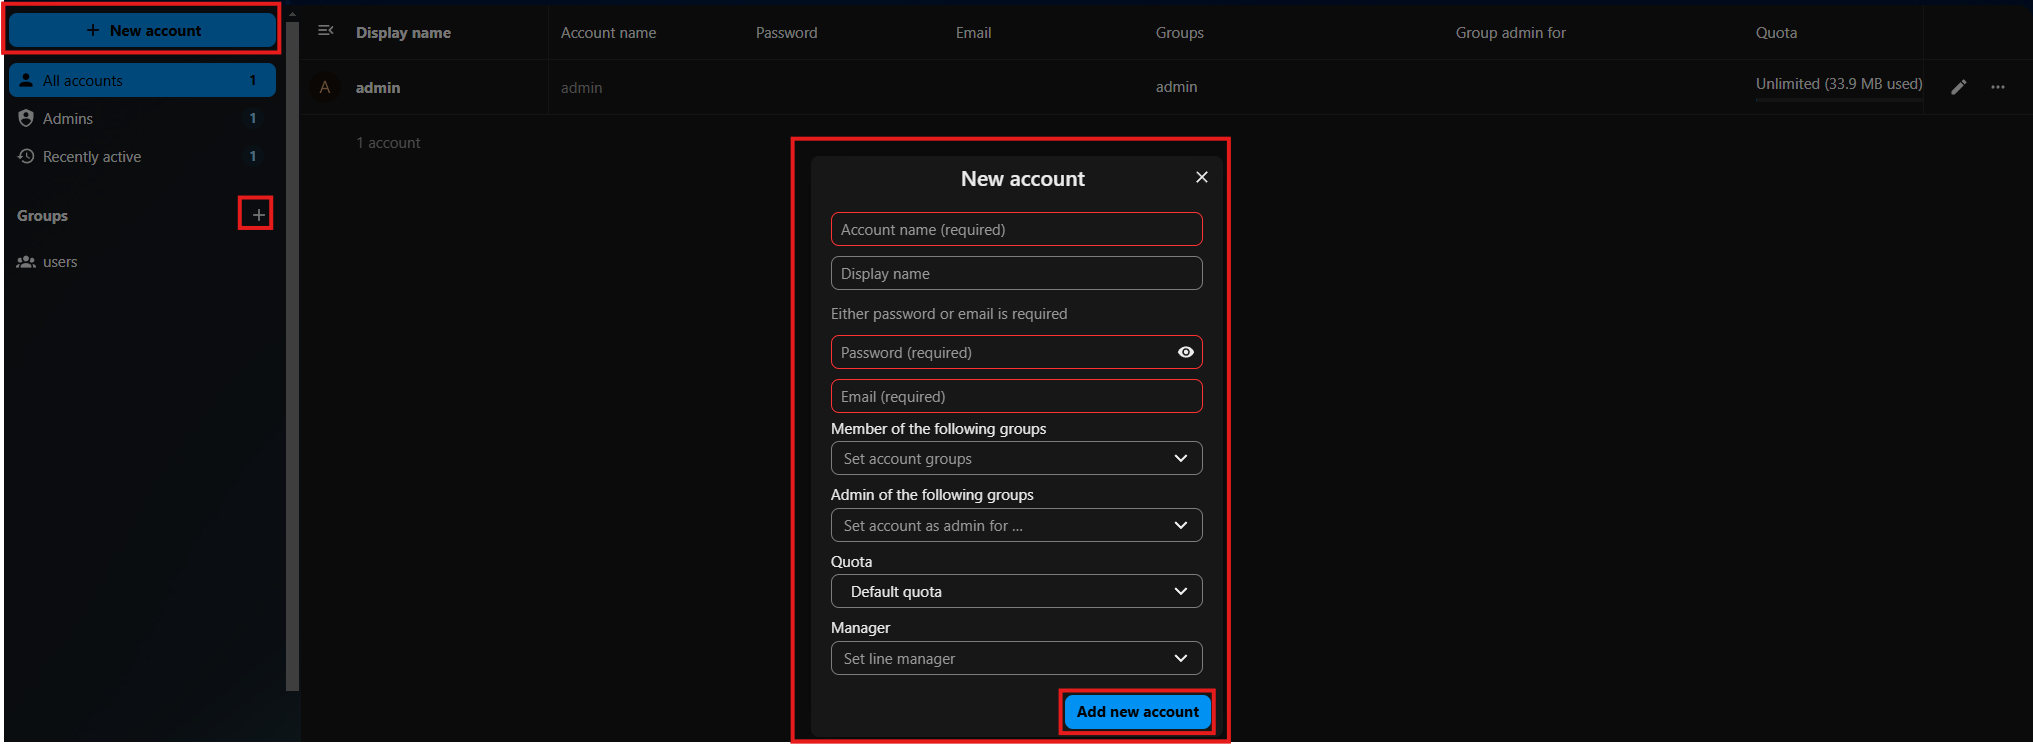
Example script:
export OC_PASS=whateverpassword
/var/www/html/occ user:add --password-from-env --display-name="Test User" --group="users" [email protected]
- Configure external storage under Administration → External storages.
- In Cloudflare Zero Trust, go to Access → Applications → Add an Application.
- Choose Self‑hosted and enter your Nextcloud domain (e.g.,
nextcloud.example.com). - Under Access → Policies, create a Bypass policy for your sync client endpoint:
- Action: Bypass
- Include:
sync.example.com(or whichever subdomain you use for the desktop/mobile sync client) - Exclude: none (unless you want to block specific ranges)
- This ensures browser logins go through Cloudflare Access, but sync clients can connect directly.
- Save the application and policy.
- In Cloudflare DNS, create CNAME records for:
-
sync.example.com→<TUNNEL_ID>.cfargotunnel.com
-
- Ensure Proxy status is enabled (orange cloud).
Open your Nextcloud config file:
sudo nano /path/to/files/GillisDockerDepot/appdata/nextcloud/var/www/html/config/config.phpAdd or adjust:
'trusted_domains' => [
  'localhost',
  'nextcloud.example.com',
  'sync.example.com',
  '127.0.0.1',
  '::1',
],

'default_phone_region' => 'CA',

'trusted_proxies' => [
  // Internal ranges
  '172.30.0.0/24',   // container subnet
  '192.168.2.0/24',  // LAN subnet
  '127.0.0.1',
  '::1',

  // Cloudflare IPv4 ranges
  '173.245.48.0/20',
  '103.21.244.0/22',
  '103.22.200.0/22',
  '103.31.4.0/22',
  '141.101.64.0/18',
  '108.162.192.0/18',
  '190.93.240.0/20',
  '188.114.96.0/20',
  '197.234.240.0/22',
  '198.41.128.0/17',
  '162.158.0.0/15',
  '104.16.0.0/13',
  '104.24.0.0/14',
  '172.64.0.0/13',
  '131.0.72.0/22',

  // Cloudflare IPv6 ranges
  '2400:cb00::/32',
  '2606:4700::/32',
  '2803:f800::/32',
  '2405:b500::/32',
  '2405:8100::/32',
  '2a06:98c0::/29',
  '2c0f:f248::/32',
],

'memcache.local'    => '\\OC\\Memcache\\APCu',
'memcache.locking'  => '\\OC\\Memcache\\APCu',

'overwrite.cli.url' => 'https://nextcloud.example.com',
'overwritehost'     => 'nextcloud.example.com',
'overwriteprotocol' => 'https',
'overwritewebroot'  => '/',

'maintenance_window_start' => '03:00',- Access
https://nextcloud.example.comexternally — you should reach the Nextcloud UI. - Test sync client with
https://sync.example.com. - Run:
curl -I https://nextcloud.example.comto confirm headers are passed correctly through Cloudflare.
- Check Nextcloud logs to confirm real client IPs are logged (thanks to
trusted_proxies).
- Open the Nextcloud app and enter the server address (
https://sync.gillisonline.com). - Connect and grant access.
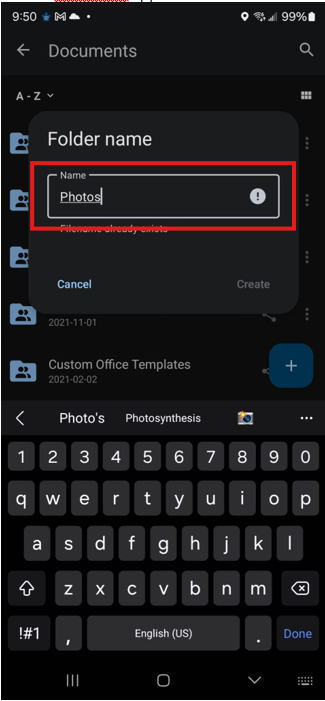
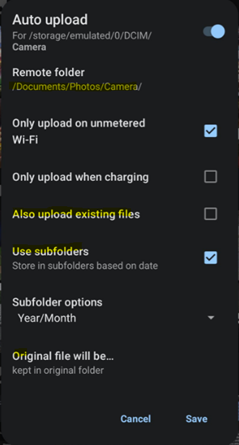
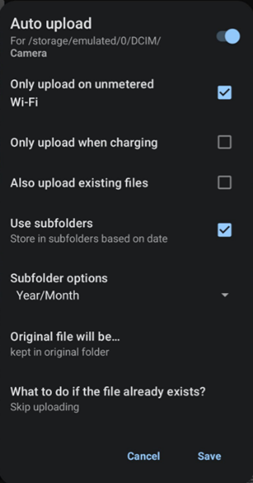
- Create a Photos folder under Documents.
- Configure Auto upload in app settings to point to this folder.
- Clear logs:
docker exec -it nextcloud.GillisNAS bash -c "echo '' > /var/www/html/data/nextcloud.log"
- Monitor resource usage:
docker stats
- Disable file versioning (recommended if syncing large files like Outlook PSTs). Nextcloud’s versioning feature automatically keeps historical copies of files in file_versions/.
docker exec -it nextcloud.GillisNAS bash -c "su -s /bin/bash www-data -c 'php occ app:disable files_versions'"
-
Create per-user directories on NAS (outside home folders):
/share/CACHEDEV2_DATA/nextcloud/$user
-
Set ownership to NAS user UID and Nextcloud group (GID 33 = www-data), with perms 770:
# Examples
sudo chown -R 1001:33 /share/CACHEDEV2_DATA/nextcloud/user1 && sudo chmod -R 770 /share/CACHEDEV2_DATA/nextcloud/user1
sudo chown -R 1002:33 /share/CACHEDEV2_DATA/nextcloud/user2 && sudo chmod -R 770 /share/CACHEDEV2_DATA/nextcloud/user2
sudo chown -R 1003:33 /share/CACHEDEV2_DATA/nextcloud/user3 && sudo chmod -R 770 /share/CACHEDEV2_DATA/nextcloud/user3
- Validate:
ls -ld /share/CACHEDEV2_DATA/nextcloud/*
Each Nextcloud user has a personal directory under:
/share/CACHEDEV2_DATA/nextcloud/$user
- Owner: the NAS user account (UID).
-
Group:
www-data(GID 33). -
Permissions:
770→ owner +www-datafull access, others none.
Example setup:
sudo chown -R <UID>:33 /share/CACHEDEV2_DATA/nextcloud/<user>
sudo chmod -R 770 /share/CACHEDEV2_DATA/nextcloud/<user>
Validate with:
ls -ld /share/CACHEDEV2_DATA/nextcloud/*
- In Control Panel → Privilege Settings → Shared Folders → nextcloud, grant each user Read/Write access to the
nextcloudshare. - Combined with POSIX
770, this ensures:- ✅ Users can fully manage their own files.
- ✅ Nextcloud services (
www-data) can sync and maintain data. - ❌ Users cannot read or write in other users’ directories.