Calibrating the Printer - aegean-odyssey/mpmd_marlin_1.1.x GitHub Wiki
The Initial Calibration
IMPORTANT. Some early models of the MP Mini Delta printer require a different set of "steps-per-unit" (
M92) and "delta configuration" (M665) values from the firmware's factory default values. The difference seems that these machines use 1/8 microstepping instead of 1/16 microstepping to control its stepper motors. The mpmd_marlin_1.1.x firmware uses factory default values suitable for the 1/16 microstepping models of the MP Mini Delta printer. If your machine uses 1/8 microstepping, please note the necessary extra step in the procedures below to correct the factory default values. (There some discussion at the "MP Mini Delta / Malyan M300 3D Printer (unofficial) Wiki" on the pages motion_controller and extruder_calibration.)
Once installed, the mpmd_marlin_1.1x firmware requires an initial calibration. This calibration process can be executed in two ways, with a serial terminal program via the USB port or directly on the printer via a micro SD card:
via the USB port
- calibrate the machine parameters
NOTE:The calibrate command,G33 T, can take several minutes to execute, repeatedly performing calibration cycles to improve its calibration results (minimize calibration error). The process usually completes in fewer than 10 iterations.
M502        ; OPTIONAL - load factory defaults
;
;; corrections for 1/8 microstepping (older machines)
M92 X57.14 Y57.14 Z57.14 E48.50
M665 L123.0 H134.0 R63.35
;
G33 T       ; automatically calibrate
M500        ; save
- produce a bed level (bi-linear) mesh
M851 Z0     ; reset the probe offset
G28         ; home (w/ new probe offset)
G29         ; compute a bed level mesh
M851 Z0.6   ; set a nominal probe offset
M500        ; save
- adjust the z offset (machine specific)
M851 Z0.450 ; machine specific offset
M500        ; save
via the SD card
The /setup_gcode folder contains a set of "command" (gcode) files that
extend the capabilities of the printer. Place these files on the micro
SD card and use the printer's "print" function to access them.
Select print on the Mini Delta and choose the file, AUTO_CALIBRATE.gcode,
(in the folder, setup_gcode) to perform the initial calibration for the
printer. Note: users with the stock build surface may wish to use
CALIBRATE_25MM.gcode, instead (see Issue #11).
This command will calibrate the printer geometry, create a bed
leveling grid, and save the settings to flash memory. The output that is
normally sent to the serial port during this process is captured and
saved to a file, /CALIBRAT.TXT, on the micro sd card.
The initial calibration sets the "Z-height" to 0.6mm, which by design
places the nozzle above the build plate when the nozzle is moved to the
origin (X0 Y0 Z0). This offset can be adjusted with the M851 Zn.nnn
M-code command and stored to the flash memory with the M500 M-code
command. "Print" the files, M851_Znnn.gcode and M500_SAVE.gcode,
respectively, to perform these functions.
RECAP:
- calibrate the machine and bed level parameters
NOTE:The file,AUTO_CALIBRATE.gcode, can take several minutes to execute, repeatedly performing calibration cycles to improve its calibration results (minimize calibration error). This part of the process usually completes in fewer than 10 iterations, and is followed by one final pass to generate a bed level mesh.
M502_FACTORY.gcode      ; OPTIONAL - load factory defaults
M92_XYZ57_E48.gcode     ; ONLY IF NECESSARY! - (see docs)
AUTO_CALIBRATE.gcode
- adjust the z offset (machine specific) and save
M851_Zxxx.gcode         ; where "xxx" is the offset (e.g. 450 is 0.450mm)
M500_SAVE.gcode
Other command files
/FCUPDATE.FLG                      ; file to signal the bootloader to update
/firmware.bin                      ; mpmd_marlin_1.1.x firmware update
/setup_gcode/
	AUTO_CALIBRATE.gcode       ; initial calibration (creates CALIBRAT.TXT)
	CREATE_FCUPDATE.gcode      ; create the fcupdate.flg file
	DELETE_FCUPDATE.gcode      ; delete the fcupdate.flg file
	FILAMENT_LOAD.gcode        ; (currently unimplemented)
	FILAMENT_UNLOAD.gcode      ; (currently unimplemented)
	G0_X0_Y0_Z0.gcode          ; move the nozzle to X0 Y0 Z0
	G28_HOME.gcode             ; move to the home position (home)
	G29_BED_LEVEL.gcode        ; calculate a bed level grid (creates BEDLEVEL.TXT)
	M111_S128.gcode            ; DEBUG - disable probe compensation
	M302_P1_COLD_E.gcode       ; allow cold extrusion (careful!)
	M500_SAVE.gcode            ; save the current settings to flash
	M501_RESTORE.gcode         ; load the saved settings from flash
	M502_FACTORY.gcode         ; load the factory default settings
	M503_REPORT.gcode          ; configuration info (creates SETTINGS.TXT)
	M851_Z000.gcode            ; set the "probe" Z offset to 0.000mm
	M851_Z200.gcode            ; set the "probe" Z offset to 0.200mm
	M851_Z250.gcode            ; set the "probe" Z offset to 0.250mm
	M851_Z300.gcode            ; set the "probe" Z offset to 0.300mm
	M851_Z350.gcode            ; set the "probe" Z offset to 0.350mm
	M851_Z400.gcode            ; set the "probe" Z offset to 0.400mm
	M851_Z450.gcode            ; set the "probe" Z offset to 0.450mm
	M851_Z500.gcode            ; set the "probe" Z offset to 0.500mm
	M851_Z550.gcode            ; set the "probe" Z offset to 0.550mm
	M851_Z600.gcode            ; set the "probe" Z offset to 0.600mm
	M851_Z650.gcode            ; set the "probe" Z offset to 0.650mm
	M851_Z700.gcode            ; set the "probe" Z offset to 0.700mm
	M851_Z750.gcode            ; set the "probe" Z offset to 0.750mm
	M851_Z800.gcode            ; set the "probe" Z offset to 0.800mm
	M92_XYZ57_E48.gcode        ; corrections for 1/8 microstepping (older machines)
Dimensional Accuracy Calibration (Optional)
Some people care more about dimensional accuracy than others. You could just scale your parts in your slicer, but this section provides methods for truly calibrating dimensional accuracy. The vertical (height) dimensional accuracy should already be correct in MPMD Marlin 1.1.X firmware (correct M92 XYZ values). Efforts on improving the calibration process for horizontal dimensional accuracy (via M665 adjustments) are ongoing, but current calibration methods are outlined here, by @PurpleHullPeas.
Because delta kinematics are highly coupled, bed leveling and dimensional accuracy must be calibrated simultaneously/iteratively (M665+M666 together). Completely calibrating dimensional accuracy requires the user to measure a test print or carbon paper test (see notes for option 2) in order to properly adjust M665. Calibration cubes are not used because the advanced M665 ABCDEF parameters are adjusted according to the three delta towers, not the Cartesian XYZ coordinates.
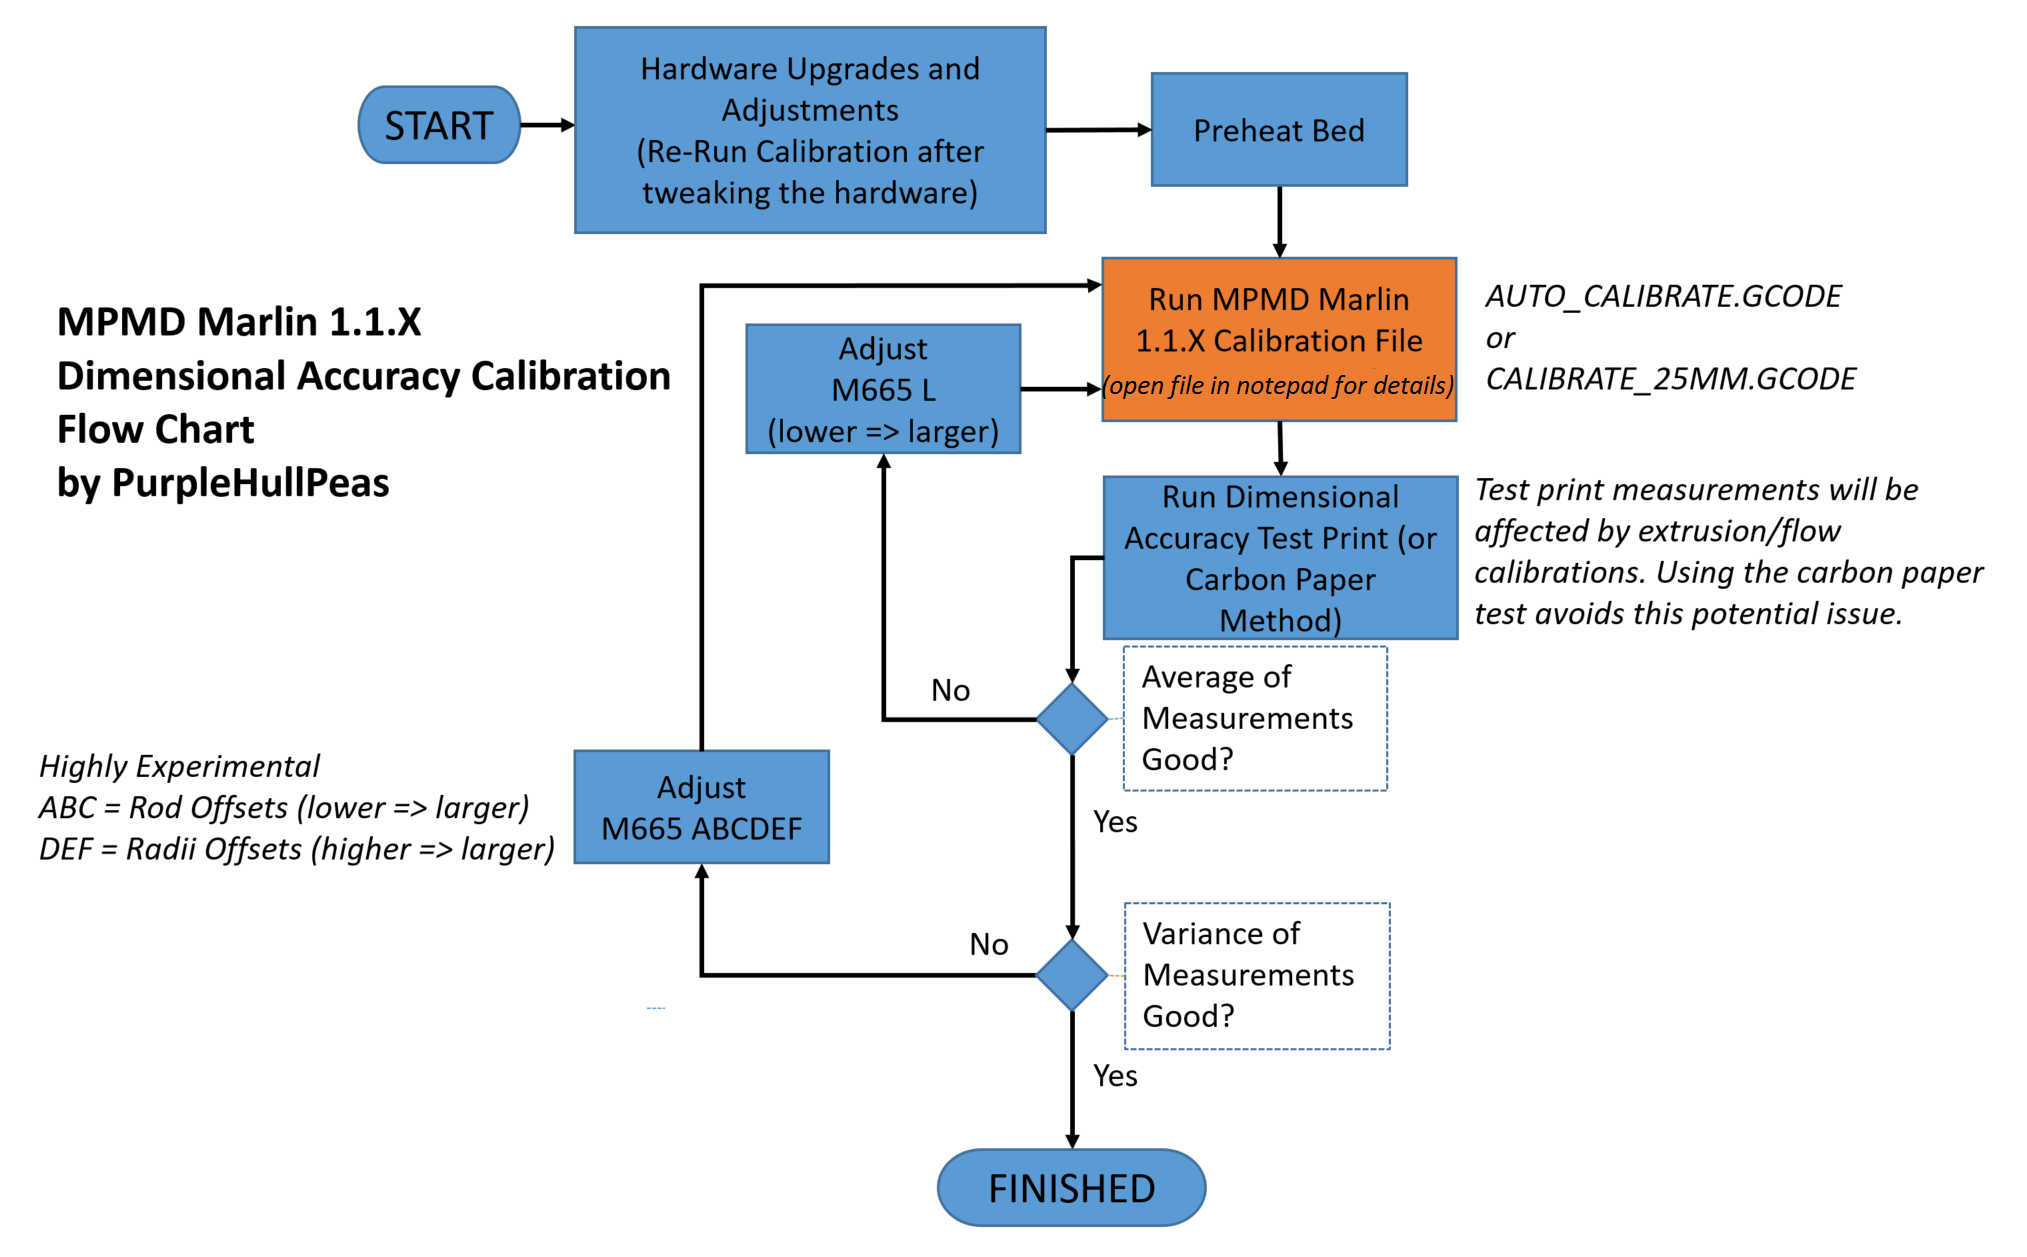
Dimensional Accuracy Calibration Option 1:
One method for calibrating dimensional accuracy in MPMD Marlin 1.1.X is summarized in this flow chart. The basic procedure is to adjust M665, run AUTO_CALIBRATE.gcode, test dimensional accuracy, and then repeat until you are happy with the results. You can modify M665 by either sending commands over USB or editing the AUTO_CALIBRATE.gcode file by putting the new M665 value at the top. More details on the meanings behind the M665 values can be found in the script link for Option 2. If you only care about getting the average close, then you can ignore the advanced M665 ABCDEF parameters.
Dimensional Accuracy Calibration Option 2:
@PurpleHullPeas wrote an advanced Python script to aid in simultaneously calibrating dimensional accuracy and bed leveling. The main advantages of using it, instead of the Option 1 flow chart, are that it includes @see3d's ratio equation for automatically adjusting M665 L and that it includes a user prompt for automatically running the carbon paper test.
In older tutorials, the carbon paper test was included as part of a method for adjusting M665 R (currently only works for the Python script method); however, in its simplest form, running the carbon paper test by itself is just a much quicker alternative printing test hexagons. Therefore, it can be used in place of a test print for any horizontal dimensional accuracy calibration method. The carbon paper test also has the advantage of being measured independently of extrusion/flow calibration. If you are hesitant to buy carbon paper, see the notes in the previously-linked video description about using Taco Bell receipts, instead.