A4. Personalize Single Page Applications using Target - adobe-target/clientside GitHub Wiki
Experience Targeting (XT) delivers content to a specific audience based on a set of marketer-defined rules and criteria.
Experience Targeting, including geotargeting, is valuable for defining rules that target a specific experience or content to a particular audience. Several rules can be defined in an activity to deliver different content variations to different audiences.
When visitors view your site, Experience Targeting (XT) evaluates them to determine whether they meet the criteria you set. If they meet the criteria, they enter the activity and the experience designed for qualifying audiences is displayed. You can create experiences for multiple audiences within a single activity.
In this exercise we will setup an Experience Targeting (XT) Activity for a React Application using Target's Marketer-friendly Visual Experience Composer.
- Click on the
Create Activitybutton on the top right of the page and select Experience Targeting

- Select Visual under
Choose Experience Composerand enter http://localhost:3000/#/home as theActivity URL

- You will notice a Mixed Content warning. This is because your localhost site is not secured using HTTPS. Follow the steps shown below and reload the page or speak to a TA:

- The
Visual Experience Composer (VEC)will launch in the browser and you will be able to see the React app loaded. - Rename your XT Activity as
L747-XT-XX, where XX is your participant ID :
The Visual Experience Composer (VEC) is an editor that enables marketers and designers to create and change content using a visual interface. Many design choices can be made without requiring direct editing of the code. Editing HTML and JavaScript is also possible using the editing options available in the composer.
- The React application is currently open in the VEC with a default experience (Experience A) set as the current experience. Notice on the left side that
Experience Ais currently set forAll Visitors. - Let us first add some actions using the VEC. Actions are the page modifications that you want to perform for this experience. An experience can have multiple actions.
- Add a Text Action
- Click on the header text
Bumblebee is an autobot.... You will notice theAction Menuas shown below. Click onEdit Text/HTML.

- An
Edit Text/HTMLpop-up will appear within VEC. Make any change to the text, such as changing the color. Save the changes you have made.
- Click on the header text
- Add a Rearrange Action
- Click on the left-side image. You will notice a
Expand Selectionoption at the end of the menu.
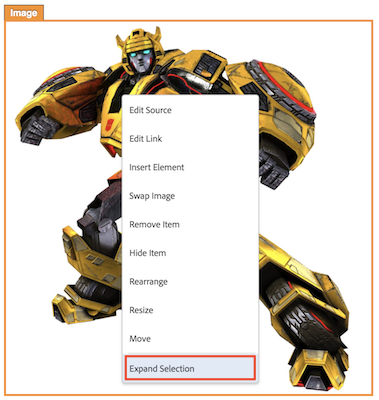
- Notice that on expanding the selection, the focus is moved to a Container and the menu options are changed.

- Select the
Rearrangeoption from the menu. The container will be highlighted and the page will be grayed out. Click the image and drag it to the right.
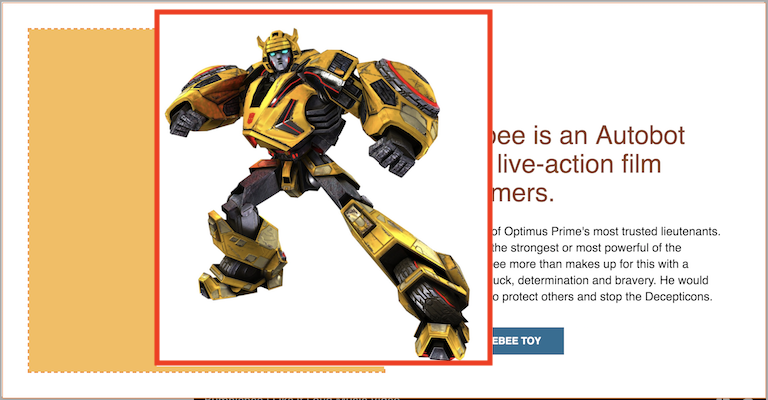
- Confirm the new position by clicking on the accept button.

-
Expand Selectionis a useful helper action that allows you to easily reach the right HTML element in the page DOM.
- Click on the left-side image. You will notice a
- We have added two actions to this experience. Take a moment to review the actions on the Target Help Page: https://marketing.adobe.com/resources/help/en_US/target/target/r_viztarget_options.html (open in new tab)
- Feel free to add more actions to this experience. Feel free to reach out to a Lab TA.
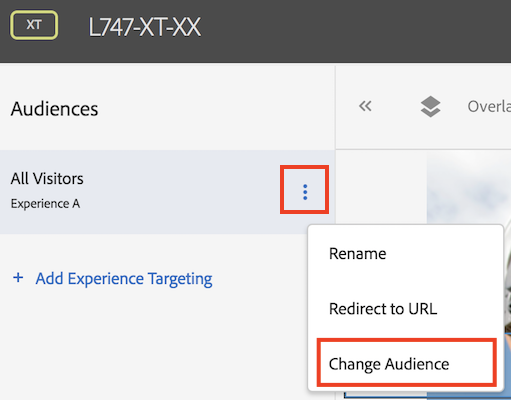
- Add an Audience to this Experience
- Click on the
vertical ellipses⋮ menu option to the right of Experience A and selectChange Audience.
- The
Audience Librarywill open up. Click on theCreate Audienceon the right corner:
- We will create an Audience using the Global Mbox Parameter that we used during the Launch Setup:
- In the
Create Audiencewindow enter an Audience NameL747-XT-XX, where XX is your Participant ID, and select theCustom Audience

- When adding the Custom Audience rule, enter
target-global-mboxas the MBox name andaccountIdas the Parameter. Choose evaluator as equals and set the value as XX, where XX is your participant ID.

- Save the audience. You will go back to the audience library.
- In the
- Associate the audience you just created to this experience
- Search for
L747-XT-XX(replace XX with your participant ID). - Include this library and click on
Done.

- The audience is now associated with Experience A.
- Search for
- Notice that
L747-XT-XXis displayed instead ofAll Visitorsabove Experience A. Only visitors that qualify the audience criteria will see this experience.
- Click on the
We will add another experience to demonstrate how Combined Audiences can be used to personalize.
- Click on the link
 below Experience A on the left side of the page.
 - In the Audience Library search for L747 to see a Audience titled
L747 - Safari Browser. This is an audience segment that qualifies visitors if they visit from a Safari Browser. Select this audience. Notice that the count onChoose Audiencesshould become 2. - Search for
L747-XT-XX, the audience you created in the previous step. Also select this audience. Your selection should look like:

- Click on
Combine Multiple Audiences - Give the combined audience a name, say
L747 and Safari Browser - XX, where XX is your participant ID. Save the combined audience.

- Notice that you will go back to the
Choose Audiencewindow. This time, you will be under theActivity Only Audiencesection. Select the combined audience you just saved and click onDone.

- Notice that a new experience (Experience B) is now visible on the left panel. The audience associated with Experience B should be
L747 and Safari Browser - XX, the name of the combined audience you just created. - Create some actions for this experience. Try changing the header text background this time.
- Click on the
Nextbutton in the top-right corner of the page.
Talk to a lab TA if you need any assistance in creating experiences.
This is the second step of VEC-based activity creation. Notice that there are two audiences, mapped to an experience each.
 The experiences we created have an interesting characteristic:
- Audience criteria (
accountId=1) for Experience A will always include the visitors that meet the audience criteria (accountId=1 AND browser=Safari) for Experience B. Since Experience A is first in the list of experiences, it will be preferred as the first match and will always be delivered for both audiences. This is not a desirable situation. - To address these kind of audience scenarios, where one audience may be a subset of another, reorder the experiences so that the smallest audience is first. In this case, we will reorder the experiences so that Experience B is first. You can do that by clicking on Experience A and dragging it below Experience B.

- Click on the
Nextbutton in the top-right corner of the page.
You can set several goals and metrics for a Target Activity. In this lab, we will set the Primary Success Metric as Conversion, Action as Viewed an Mbox and Mbox as **any mbox**.

Save this activity by clicking on the Save button on the top-right corner of the page.
A Target Activity to personalize content has been created using the VEC. Notice that you were able do this without making changes to the code of your website. Make this XT activity live by selecting the Activate option as shown below.

You have now successfully created a Target XT Activity that uses custom audiences using a Global Mbox Parameter
Let us pause for a few minutes and review the personalization that we created on our React App.
- In Google Chrome, open (or reload) the React app: http://localhost:3000/#/home
- Notice that the homepage now has the personalized content and is displaying the actions performed in Experience A:

- Open the React app in Safari Browser. Notice that the homepage in Safari reflects the actions performed in Experience B.

If you cannot verify the above, confirm the following:
- Is the React app running?
- Did you include the Launch Tag in the React App as explained in Step 3?
- Did you use replace
XXwith your Participant ID? - You should be using the same value for
actionIdin both Launch and Target. Can you confirm this? - Did you use the correct Audience in the steps above? Notice that there are multiple lab members working in the same Target organization. It is possible that you may have selected an audience created by another lab member.
If you are not able to proceed further, please reach out to a Lab TA for assistance.
