SCexport - acnicholas/scaddins GitHub Wiki
- SCexport
SCexport is a revit add-in I created to speed up and standardize file exports from whithin a Revit model.
Select which sheets you want to print/export and grab a beer while you wait.
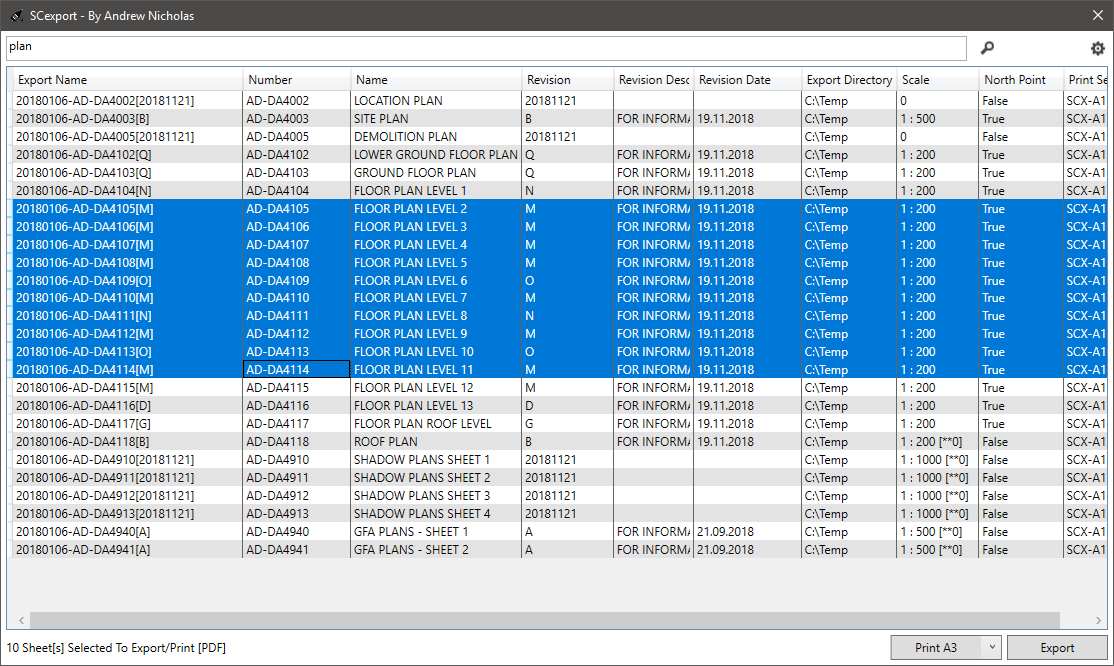
SCexport can export the following files
- PDF (using Adobe Acrobat,PDF24 or Revit native PDF export)
- DWG
- DGN (currently disabled)
- DWF
Other useful functions are:
- Assign revisions to multiple sheets.
- Quickly open and move back/forward through sheets.
- Print.
- Adobe Acrobat (optional for pdf export) Revit versions less than 2022 only
- PDF24 (optional for pdf export). See PDF24 Setup Revit versions less than 2022 only
-
Ghostscript (optional for alternate pdf export)This is removed in version 2024+ -
Postscript printer driver. I recommend this (optional for alternate pdf export)This is removed in version 2024+
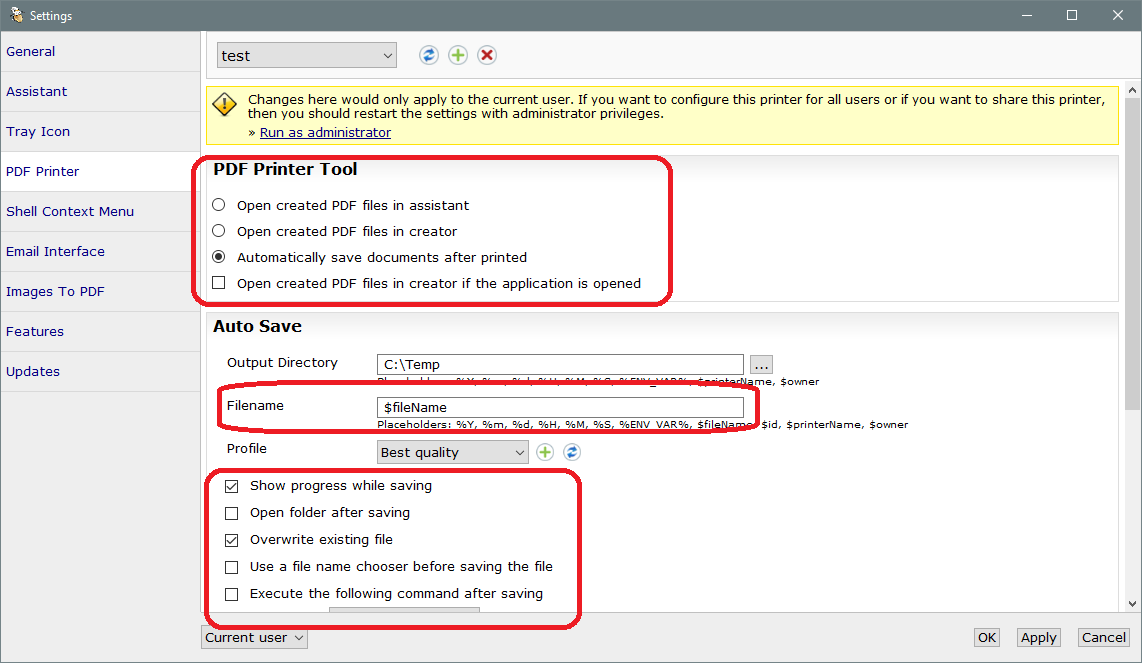
PDF24 can be used for revit versions 2018-2021. If you would like to use PDF24 for pdf creation, there's a lttle bit of setup required:
- Download and install PDF24 from here
- Adjust the settings as per the image below:
Options that can be accessed via right clicking the main window.
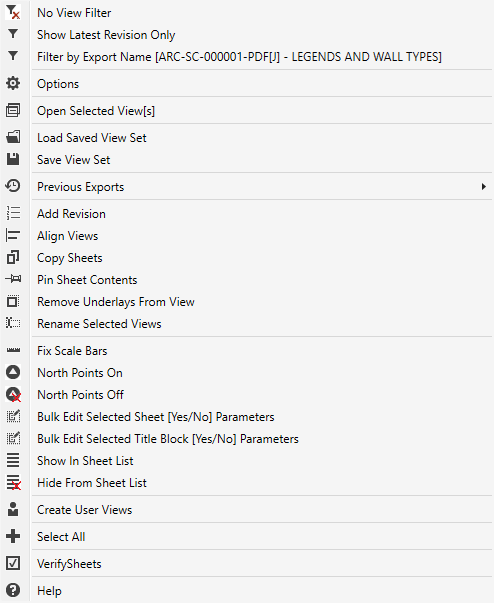
- No View Filter. Rmove any existing filters from this view.
- Show Latest Revisions Only. Filter the sheet list to show only the latest revision.
- Filter by... Smart-ish filter to try and filter by the current item.
- Options. Open the options dialog.
- Open Selected View. Open all selected views (don't select too many unless - you're getting a coffee)
- Load Saved View Set. Filter the sheet list by saved view sets.
- Save View Set. Save the current selection to a new set.
- Add Revision. Add a selected revision to all selected views.
- Copy Sheets. Send all the selcted sheets to Copy Sheets.
- Remove Underlays from Views. remove underlays from all views on all - selected sheets. be careful!
- Rename Selected Sheets. Renames sheet numbers and/or names using Rename.
- Fix Scale Bars. If your project has any kind of scalebar parameter, SCexport can attempt to assign the correct scale to it by matching it with each sheets viewports. You will need to define the scalebar parameter(s) in the options dialog.
- North Points On/Off If you have a Yes/NO[boolean] parameter in your title block whih is used for north point visibility, use these to toggle it. This parameter can be difined in the options dialog.
- Create User Views. Copy all the viewports on the selected sheets, remove their viewports and assign them to a defined view category.
- Verifiy Sheets. Check all sheets to make sure that the page size can be determined.
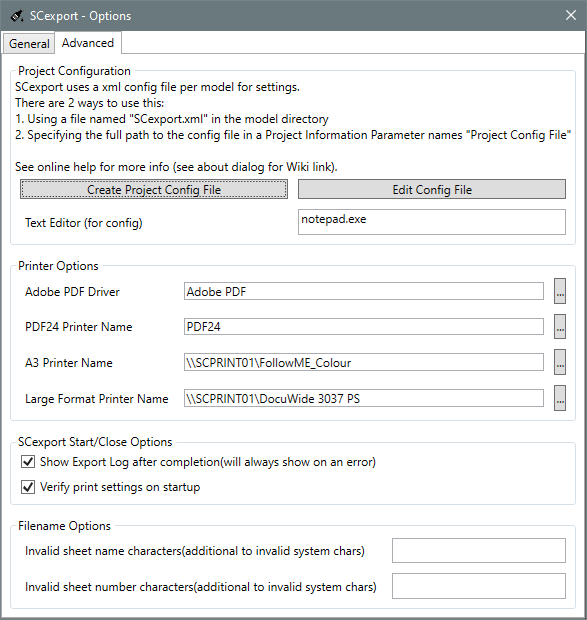
Create Project Config File. This will create a generic project config file for the currently open file. See XML Project Configuration File.
Text editor. Notepad is boring for editing xml files, change that here.
Postscript Printer Name. This is the printer driver used by Ghostscript to create pdf's, make sure this printer is set up to print to file.
Configuration for SCexport can be done via a XML config file (see below), or via setting up some Project Information parameters within Revit. Below is a table of Parameters that can be used:
| Revit Parameter Name | Description | Revit Version |
|---|---|---|
Primary SCexport Settings Name(1) |
Name of setting 1 | 2018+ |
Primary SCexport Settings Format |
Export format for setting 1. See XML Replacement Strings |
2018+ |
Secondary SCexport Settings Name(2) |
Name of setting 2 | 2018+ |
Secondary SCexport Settings Format |
Export format for setting 2. See XML Replacement Strings |
2018+ |
Primary SCexport PDF Settings Name(1) |
PDF setting 1 (Revit native) Will attempt to load a Revit PDF Export Setup of the same name |
2022+ |
Secondary SCexport PDF Settings Name(2) |
PDF setting 2 (Revit native) Will attempt to load a Revit PDF Export Setup of the same name |
2022+ |
Primary Post Export Script |
Script to run on completion(1).. See PostExportHook |
2018+ |
Primary Post Export Script Args |
Script args (1) | 2018+ |
Primary Post Export Extensions |
List of extensions to run hook on(1) This is a list of extensions (including the '.'). Each item should be separated by a semicolon |
2018+ |
Secondary Post Export Script |
Script to run on completion(2). See PostExportHook |
2018+ |
Secondary Post Export Script Args |
Script args (2). | 2018+ |
Secondary Post Export Extensions |
List of extensions to run hook on(2) This is a list of extensions (including the '.'). Each item should be separated by a semicolon |
2018+ |
Below are examples is setting a filename scheme via project parameters. NOTE: It is advisable to use this method for projects hosted on BIM360 as using a project config file may not be available for cloud models.
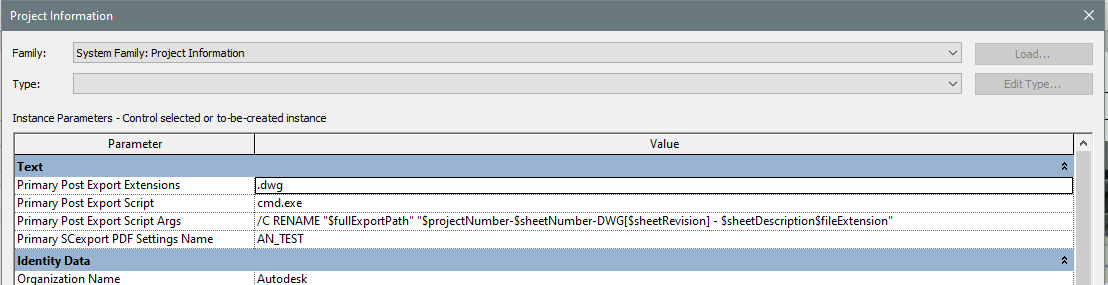
The example image below shows a filename scheme with the following properties
- It will create a SCexport setting called "AN_TEST", which will use a Revit pdf export setting of the same name.
- See (Exporting to PDF) for information on setting up pdf exports in Revit.
- See (Setup PDF Naming Rules) for information on setting up export names in Revit.
- There's a hook that will run on *.dwg files only.
- This hook will start the windows program "cmd.exe" after each dwg export.
- cmd.exe will run with the parameters "/C RENAME "$fullExportPath" "$projectNumber-$sheetNumber-DWG[$sheetRevision] - $sheetDescription$fileExtension". see (XML Replacement Strings)
Custom file name schemes can be created per Revit file, using the options menu or manually.
This is a XML file, and it needs to be placed in the same folder as your Revit central file.
Name the file:
SCexport.xml
  <SCexport>
    <FilenameScheme>
    <PostExportHook>
</SCexport> <FilenameScheme name="name">
<Format>"export name format string, see replacement string below"</Format> <!-- For Revit versions < 2022 -->
<PDFNamingRule>SC-PDF</PDFNamingRule> <!-- For Revit versions >= 2022 -->
<Hook>"hook name"</Hook>
<Hook>"another hook"</Hook>
</FilenameScheme>FilenameScheme describes the format of exported files.
name Label to display in GUI.
Format Is the file name format if you are not using PDFNamingRule (adobe or pdf24). Note that Format will still work of you are using the Revit internal PDF creator, but only the export name will be set-up. Use PDFNamingRule to enable more customiztion.
PDFNamingRule is the name if the Revit PDF export setup to use (including the filename scheme)
Hook Name of hook to run after an export.--
    <PostExportHook name="convertToPng">
        <Command>C:\Temp\createPNG.bat</Command>
        <Args>$exportDir\$fullExportName$fileExtension</Args>
        <SupportedFileExtensions>pdf</SupportedFileExtensions>
    </PostExportHook>
name The name of the hook, this is the name to use in the Hook node of FilenameScheme
Command Command to run.
Args Arguments to pass to the above command - see replacement string below
SupportedFileExtensions Extension to enable this hook on (include the ".", i.e. ".pdf").
The following replacement strings can be used in the "Args" node of PostExportHook and the "Format" node of FilenameScheme:
| Replacement String | Description | Example |
|---|---|---|
| $height | ||
| $width | ||
| $fileExtension | file extension including the "." | |
| $fullExportName | export name without extension ) | |
| $fullExportPath | ( full export name, including path and extension) | C:\Temp\20230123-A001-DWG[A] - Level 1 Floor Plan.dwg |
| $exportDir | C:\Temp | |
| $pageSize | A0 | |
| $projectNumber | 20230123 | |
| $sheetDescription | ( this is the sheet name ) | Level 1 Floor Plan |
| $sheetNumber | A001 | |
| $sheetRevision | A | |
| $sheetRevisionDate | 30.06.2023 | |
| $sheetRevisionDescription | For Construction | |
| __Custom__ | (place the parameter name between double underscores) |
    <!--
        Tag pdf's after export
        requirements:
        ExifTool http://owl.phy.queensu.ca/~phil/exiftool/
    -->
    <PostExportHook name="tagPdf">
        <Command>C:\exiftool\exiftool.exe</Command>
        <Args>-Title="$fullExportName - $sheetDescription" -Author="Scott Carver Pty Ltd" -Subject="$projectNumber" $exportDir\$fullExportName$fileExtension</Args>
        <SupportedFileExtensions>.pdf</SupportedFileExtensions>
</PostExportHook> <!--simple hook to rename dwg files with a _DWG suffix-->
<PostExportHook name="aconexDWGSuffix">
<Command>cmd.exe</Command>
<Args> /C RENAME "$exportDir\$fullExportName$fileExtension" "$fullExportName_DWG$fileExtension"</Args>
<SupportedFileExtensions>.dwg</SupportedFileExtensions>
</PostExportHook>
    <!--
        add a watermark to pdf's
        requires: https://www.pdflabs.com/tools/pdftk-server/
    -->
    <PostExportHook name="watermark">
        <Command>"C:\Program Files (x86)\PDFtk Server\bin\pdftk.exe"</Command>
        <Args> "$exportDir\$fullExportName$fileExtension" background "$exportDir\watermark.pdf" output "$exportDir\$fullExportName-WM$fileExtension"</Args>
        <SupportedFileExtensions>.pdf</SupportedFileExtensions>
</PostExportHook> <!--
convert each exported pdf to a transparent png
requirements:
imagemagick http://imagemagick.sourceforge.net/http/www/archives.html
ghostscript http://www.ghostscript.com/download/
place the following text in a script called C:\Temp\createPNG.bat:
convert -size 1920x1080 xc:white temp.png
convert -transparent white temp.png canvas.png
convert -fuzz 10%% -transparent white -density 300 -resize x1080 %1 temp.png
composite -gravity center temp.png canvas.png %1.png
-->
<PostExportHook name="convertToPng">
<Command>C:\Temp\createPNG.bat</Command>
<Args>$exportDir\$fullExportName$fileExtension</Args>
<SupportedFileExtensions>.pdf</SupportedFileExtensions>
</PostExportHook>- C Clear current filter
- L Select Latest revision only
- O Open Selected Sheet(s)
- Q [Quick] Open of saved view set
- S Select current sheet only
- V Verify selected sheets
- W Save[Write] selected sheets to new view set.
- X Start Export
- 0-9 Filter main view by sheet number