Targets screen - acidbubbles/vam-timeline GitHub Wiki
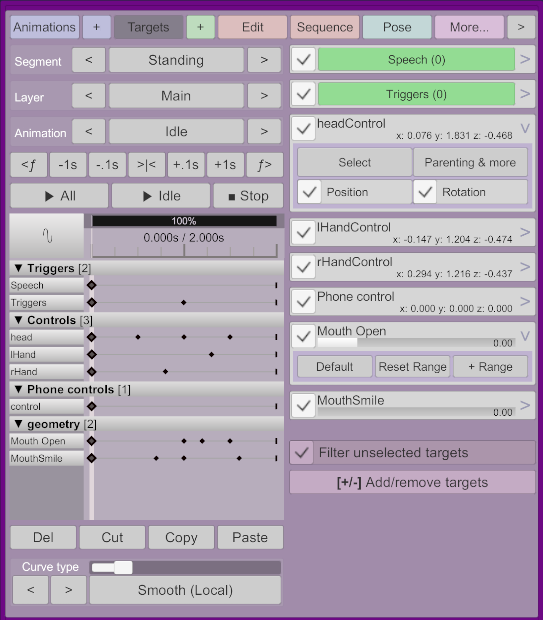
This is where you will spend most of your time in Timeline. This screen shows all targets, their values, and means to change them.
If the checkbox is checked on a target, it means there is a keyframe at the current time. If it's not, it means the value is being interpolated based on the previous and next keyframes, and their curve type. Click on the checkbox to create a keyframe at the current time, which will record the current value and use the nearest curve type. Uncheck it to delete the keyframe and revert to the interpolated value.
Note that if you have currently selected targets, only those targets will be shown, making it easier to work on a subset of your targets without scrolling. To see everything while having a selection, uncheck the "Filter unselected targets" checkbox.
You can add targets or edit controller settings, e.g. parenting from here.
Trigger targets
You can create multiple trigger tracks. Each track will invoke the start, transition, and end triggers based on that track's keyframe. Learn more about them in the targets page.
You can expand the target to rename the track, and to active the "live" option. Live allows you to sync up audio, and play triggers while you scrub even when the animation is not playing.
Controller targets
To animate controllers, simply move the scrubber to the desired time, and move the controller box in the desired position. Make sure you have enabled them in add/remove targets screen and that they are "on" in Virt-A-Mate (they should show up in green).
Note that changing controllers by loading a pose will not create keyframes automatically. You can use the advanced keyframe tools screen to keyframe all targets at once, or simply click on the checkbox once to uncheck it, and another to check the box again which will record the poses' value for that controller.
When in the targets screen, selecting controllers will show their path in-game. This can be very useful to preview what the animation looks like, but remember that physics may affect the actual path.
By selecting the small arrow, you can go to the controller properties or edit Timeline's controller settings...
If you want to use parenting, it is recommended to do so in the settings screen, which will allow per-animation parenting and parenting blending.
Float param / morph targets
You can modify the slider directly to create a keyframe. You can select the small arrow to open advanced options, such as the ability to increase range or select the default value. Note that even if the animation curves sets values outside of the allowed range, Timeline will clamp values before sending them to the float param.