Playback controls - acidbubbles/vam-timeline GitHub Wiki
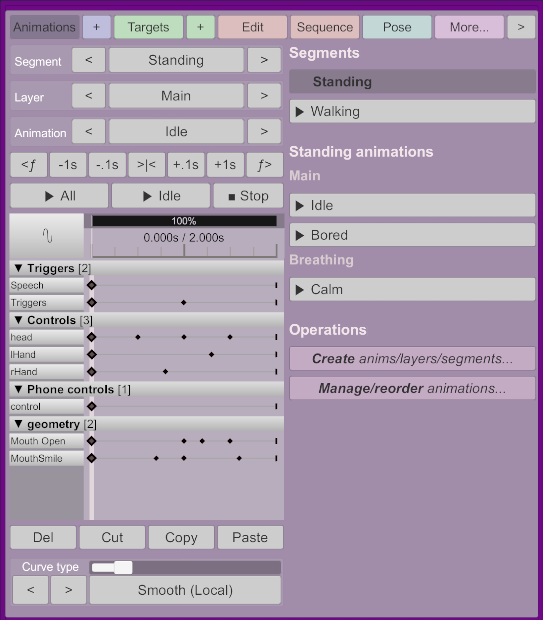
The playback controls allow you to navigate and make edits to the animations. On the top, you will find the tabs, and on the left, the playback controls themselves. On the right is the "screen", which can be accessed using the tabs as well as buttons in italic.
Tabs are the main way to navigate screens. They will update the right side of the panel.
- Animations lets you see and manage all animations and layers
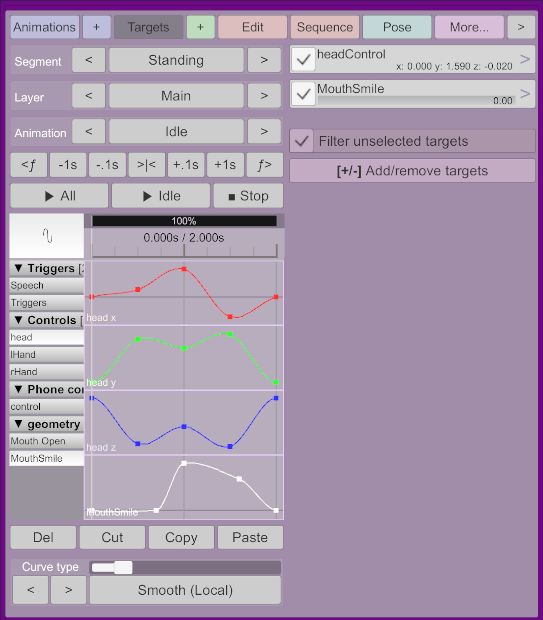
- Targets lets you see all targets and make modifications to them
- Edit lets you configure the animation's name, length, looping, and other options
- Sequence lets you configure sequencing and blending
- More... allows importing and exporting animations and offers more advanced features such as bulk edit and mocap.
When Virt-A-Mate is in play mode, Timeline will be locked.
- < ƒ Moves back one frame. When targets are selected in the dope sheet, it will only cycle frames within the selected targets.
- -1s Moves back one second from the current time.
- -.1s Moves back one tenth of a second from the current time.
- [|] Snaps to the closest second.
- +.1s Moves forward one tenth of a second from the current time.
- +1s Moves forward one second from the current time.
- > ƒ Moves forward one frame. When targets are selected in the dope sheet, it will only cycle frames within the selected targets.
Starts the current animation and all "default" animations on other layers. Sequenced animations will play if configured.
Starts the current animation, or resumes it if paused. Only affect other layers in the same set or with the same name, and will play similarly in other atoms. It will not play sequenced animations. Use to work on the current clip.
When playing, pauses the animation at the current time. When paused, resets the time to zero.
Displays and controls the animation time. It will snap to the value defined in the options screen. By default, 0.1s increments.
You can also zoom in by using the left and right ends of the black bar with "100%" written on it, as well as move the zoomed area left and right.
On the left, you can switch from Dope Sheet mode to Curves mode.
This shows you all animated targets and their keyframes, grouped by storable (e.g. all morphs, all controls, all float params of a given plugin etc.).
You can click on a target name to select it, again to deselect it. Selected targets will affect many features of Timeline, such as frame navigation, mocap import, change curve, etc.
You can click on the target type header to select/deselect all targets within that group at once.
You can click on the arrow in the target headers to collapse the list of targets (selected targets will still show when collapsed).
You can also click on a keyframe to select that target and move the scrubber to that keyframe, effectively selecting a single keyframe. Use the ctrl key to select multiple keyframes at a specific time.
You can right-click on a target controller to select it in VaM.
This will show the x, y and z curves for controllers, or the value for float params. It is helpful to see what the resulting curve looks like. Right now, this is only a viewer and no modifications can be done in this component. Rotation is not displayed.
- Del deletes all keyframes at the current time for the selected targets.
- Cut copies and deletes all keyframes at the current time for the selected targets.
- Copy copies all keyframes at the current time for the selected targets. Targets without keyframes will not be copied.
- Paste will overwrite or create copied keyframes at the current time. This works on any animation of the same layer.
This will change the curve type at the current time for all keyframes of selected targets.
-
Smooth (Global): Attempts to make the curve as smooth as possible. Every keyframe will be affected. Ideal for loops with regular movement. -
Smooth (Local): Default curve type. Attempts to keep the curve speed smooth through the keyframe. Only affects the segments before and after the keyframe. May overshoot. Ideal for most human movements. -
Linear: Abrupt stop and start. Useful for when an object hits something without bouncing. -
Constant: Change value at the keyframe time without interpolation. Ideal for eye movements or "teleportation". -
Flat: The animation will slow down to constant speed, and re-accelerate again. This will never overshoot, and is ideal for the top or bottom of a curve, for example for a smile morph. -
Bounce: Accelerates towards the keyframe, and immediately change direction with the same force. Ideal for a bouncing effect. -
Linear -> Flat: Linear curve followed by a flat curve. Useful for feet leaving the ground. -
Flat -> Linear: Flat curve followed by a linear curve. -
Copy Previous Keyframe: Default for the last frame of non-looping controller targets. This is a special curve type that will always copy the same values as the previous keyframe. This lets you create a non-looping animation from scratch, and avoids your last frame "going back" to the first frame. This curve type will clear as soon as you change that controller's position or rotation.