get started with feeds website - acfr/snark GitHub Wiki
- Table Of Contents
- Overview
- Installation
- point clouds
The feeds website can be set up to display various live data in the browser. See also live camera data.
                                             +------------------------------------+
+-------------------------------+            |  Webserver: http://localhost:80    |
|  Web browser                  |            |                                    |
|                               |<-----------+  Document root: /var/www/html/     |
|   http://localhost:80/feeds   |            |   feeds/                           |
|                               |<-----+     |     config/                        |
+-------------------------------+      |     |       front-end.json               |
                                       |     |     js/                            |
                                       |     |     lib/                           |
                                       |     |     <html files>..                 |
                                       |     |                                    |
                                       |     +------------------------------------+
                                       |
                                       |
                                       |Sensor data: image, csv, numeric value
                                       |
                                       |     +------------------------------------+
                                       |     |                                    |
                                       +-----+  Webframes: http://localhost:7000/ |
                                             |               camera               |
                                             |               ntp                  |
                                             |               disk-uage            |
                                             |               <sensor>...          |
                                             +------------------------------------+
The webserver hosts the snark web feeds website.
snark-webframes is a backend HTTP server responsible for retrieving the sensor data such as: text/plain or image/jpg. Its config file defines the commands to run to retrieve a "frame" of data from a particular sensor, or OS status.
Streaming images is supported through the use of websockets. This project uses websocketd.
The snark-image-frames websocketd endpoint uses the same 3 configuration files above to connect and stream live data.
The frontend config specifies which feeds to display, its type (e.g. image or csv) and the backend URL to retrieve the data.
The frontend configuration files are assumed to be in the web root directory: <web_root>/feeds/config.
sudo apt install apache2 libapache2-mod-php
src_dir=~/src/snark
build_dir=~/build/snark
mkdir -p $build_dir
cd $build_dir
cmake $src_dir

# enable the cmake option snark_build_web
# enable the cmake option snark_build_web_feeds
# configure the cmake option snark_web_feeds_dir

make
sudo make install
snark-webframes is built and installed as part of the snark web feeds installation. It comes with a systemd service snark-webframes.service. The default backend config is /usr/local/etc/snark/web.backend.json. The service can be customised to use other config files by editing /etc/default/snark-webframes. It is often run with a robot config specifying the address and format of sensors.
Example service customization /etc/default/snark-webframes:
DAEMON_ARGS="--config /usr/local/etc/example/web.backend.json --robot-config /usr/local/etc/example/robot.json"
Example back-end config /usr/local/etc/example/web.backend.json:
{
    "my_camera":
    {
        "content-type": "image/jpg",
        "command": "cv-cat 'timestamp;encode=jpg;head=1' --output=no-header"
    }
}
- my_camera - name of the feed
- content-type - the content-type of the command output
- command - command to be run to output a frame
The name will be used to look up the feed source address, port and packet size in the publish and robot config (in that order). If the feed source address, port and size are found, a connection will first be made and 1 frame will be piped to the command. If not found, the command is simply run.
There is an optional xpath entry which can be used to look up the feed information in the publish and robot config.
{
    "my_camera":
    {
        "xpath": "my_camera/publisher/data",
        "content-type": "image/jpg",
        "command": "cv-cat 'timestamp;encode=jpg;head=1' --output=no-header"
    }
}
The feed source address, port and packet size will be looked up following the xpath my_camera/publisher/data in the robot config.
Example robot config /usr/local/etc/example/robot.json:
{
    "my_camera":
    {
        "address": "localhost",
        "port": 10000,
        "binary": "t,3ui,304128ub",
        "size": 304148
    }
}
Start the snark-webframes service:
sudo systemctl start snark-webframes.service
Example websocketd config: /usr/local/etc/websocketd.json
{
    "snark-image-frames":
    {
        "config":
        {
            "backend": "/usr/local/etc/example/web.backend.json",
            "robot": "/usr/local/etc/example/robot.json",
            "publish": "/usr/local/etc/example/publish.json"
        }
    }
}
Start websocketd:
sudo systemctl start websocketd.service
Simulate IR feed if required:
ir_format=$( name-value-get ir/binary < /usr/local/etc/example/robot.json )
ir_size=$( name-value-get ir/size < /usr/local/etc/example/robot.json )
ir_port=$( name-value-get ir/port < /usr/local/etc/example/robot.json )
cat ir.bin | csv-play --binary $ir_format | io-publish --size $ir_size tcp:$ir_port
Frontend configurations are located in <web_root>/feeds/config. The configuration files must end with .json.
e.g. <web_root>/feeds/config/web.frontend.json <web_root>/feeds/config/logging.frontend.json
Configuration file structure:
Configuration file contains host and feeds to be displayed.
{
    "host": "http://localhost:7000",
    "feeds":
    {
        "my_camera":
        {
            "type": "image"
        }
    }
}
Configuration file might have port instead of host, in this case host is localhost (the same machine for deployment). Example is as below:
{
    "port":7000,
    "feeds":
    {
        "my_camera":
        {
            "type": "image"
        }
    }
}
When a configuration file have both host and port specified then the host settings override port.
Configuration should contain at least host or port.
-
host: URL to feed source, in this setup it is the URL to
snark-webframeson the backend. Host name formats supported are:-
localhost:<port number>- E.g. localhost:8000 -
<IP address>:<port number>- E.g. 127.0.0.1:8000 -
<ip address or localhost>- E.g. 127.0.0.1 , localhost
-
-
port: port of feed source, in this setup it is port number of
snark-webframeson the backend. -
feeds: List of feeds. Each feed consists of following:
- my_camera: name of the feed
- type: type of feed. Types of Feeds lists all the feeds available with properties applicable.
data to be displayed (options: image, text, graph, track, map)
- image: any browser-supported image format
- text: plain text
- graph: the data received is expected to be a single numerical value which will be graphed
- track: data received is plotted over an optional image; expected format: x,y
- map: alternate implementation of track, is able to plot data over maps (Bing Maps)
- Start-stop: Form widget for start-stop actions. e.g. logging
Each feed consists name, type and list of optional parameters.
 <feed_name>:
    {
        "type": <feed_type>,
        "url" : <"host:port/<feed name>">
        "bing_maps_key": "Bing Maps API key. Get yours at http://bingmapsportal.com/",
        "height":<number>,
        "form":
         {
            "fields":
            {
               <field_name>:<field-value>,
               <field_name>:<field-value>,
            },
            "buttons":
            {
               "show": <true|false>
            }
        },
        "refresh":
        {
               "interval": <number>,
               "auto": true
        }
}
optional parameters:
-
url - specifies the full URL to retrieve a frame to display, the default url is formed by
<host>/<feed name>e.g. http://localhost:7000/my_camera -
Refresh options - each feed block may contain refresh options:
"refresh":
{
    "interval": <number>,
    "auto": true
}
- auto: true or false, specifies if auto refresh is enabled or disabled respectively; if an interval is specified auto defaults to true.
- interval: the auto refresh interval in seconds
- Map options - map feed block should contain map key option:
 <map_feed_name>:
 {
    "bing_maps_key": "Bing Maps API key. Get yours at http://bingmapsportal.com/",
    "map":
    {
    }
 }
- bing_maps_key: Bing Maps API key. Get yours at http://bingmapsportal.com/.
-
Form options
Any feed can have optional form. E.g. The below feed with name 'feed1' is of type 'text' but can have form if form section is defined in the configuration as below.
 "form":
 {
        "fields":
        {
               <field_name>:<field-value>,
               <field_name>:<field-value>,
        },
        "buttons":
        {
               "show": <true|false>
        }
 }
- form : Contains all form related configuration parameters.
- fields: This section contains all the form fields. Textbox will be displayed for each field specified in this section. The value specified for each field will be populated in the textbox UI field.
- buttons: This section specify all the configuration parameters for buttons.
- show: If specified as true, form and the buttons section will be displayed in the UI. Default buttons specified for form are ' Submit' & 'Clear'. If set as false, no buttons will be displayed for form and form will be wrapped in section called ' input fields' and will be hidden. Input fields link can be used to display this form. The form field values specified in this form is sent to the backend with each request.
This form send form data to the backend as request parameters.
http://<host>:<port>/<widget_name>?_=<ramdom_number>&<field1>=<value1>&<field2>=<value2>
If form submit is successful, return data will be displayed, or error will be displayed in the widget.
Example:
    "log-time":
    {
        "type": "text",
        "height":300,
        "form":
        {
            "fields":
            {
               "path":"/log/time.log",
               "comment":"abc",
               "reset": "0"
            },
            "buttons":
            {
               "show": "true"
            }
        }
    },
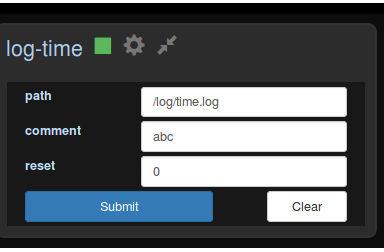
This form send form data to the backend as request parameters.
http://<host>:<port>/log-time?_=1498800878417&path=%2Flog%2Ftime.log&comment=abc&reset=0&path=%2Flog%2Ftime.log&comment=abc&reset=0
If form submit is successful, return data will be displayed, or error will be displayed in the widget.
- grid options:
feeds of type "image", "track" or "stream" may optionally have a grid displayed
"grid":
{
    "axis_width": <number>,
    "step_length": <number>,
    "x_offset": <number>,
    "y_offset": <number>,
    "x":
    {
        "min": <number>,
        "max": <number>,
        "step": <number>,
        "color": <color>
    },
    "y":
    {
        "min": <number>,
        "max": <number>,
        "step": <number>,
        "color": <color>
    },
    "grid_lines":
    {
        "show": true|false,
        "color": <color>,
        "width": <number>
    },
    "labels":
    {
        "show": true|false,
        "color": <color>,
        "font": <font>
    }
}
- axis_width: x-/y-axis width (default: 2)
- step_length: length of each step on the axis (default: 5)
- x_offset: x offset in pixels (default: 0)
- y_offset: y offset in pixels (default: 0)
- x: x-axis options
- min: min x value (default: 0)
- max: max x value (default: 10)
- step: x value steps relative to 0 (default: 1)
- color: x axis color (default: rgba(255, 0, 0, 0.5))
- y: y-axis options
- min: min y value (default: 0)
- max: max y value (default: 10)
- step: y value steps relative to 0 (default: 1)
- color: y axis color (default: rgba(255, 0, 0, 0.5))
- grid_lines: grid line options
- show: show grid lines (default: true)
- color: grid line color (default: rgba(100, 100, 100, 0.4))
- width: grid line width (default: 1)
- labels: label options
- show: show labels (default: true)
- color: label color (default: rgba(0, 0, 0, 0.9))
- font: label font (default: '18px sans-serif')
Example:

csv feed can be used to display data in tabular format. The below properties are optional and can be specified for csv feed.
   "csv":
   {
       "fields": "<col1>,<col2>,<col3>"
       "min": "<csv min values>",
       "min_color": "<css-color>",
       "max": "<csv max values>",
       "max_color": "<css-color>",
       "alert": true
   }
- fields: The field headings.
- min: csv min values e.g. set min value of 3rd field: ,,40
- min_color: css color, values below its specified min (if any) will be colored, default: orange
- max: csv max values e.g. set max values of 5th and 7th fields: ,,,,100,,10
- max_color: css color, values above its specified max (if any) will be colored, default: red
- alert: values which are out of range will trigger a panel alert
'text' feed can be used to display pre-formatted text.
   "text":
   {
       "show_items": <number>,    "type": "start_stop",
"form":
{
    "fields":
    {
        "log-config":"/var/www/html/feeds/config/log.json",
        "sensor-config":"/var/www/html/feeds/config/config.json",
        "log-path": ""
    }
},
"refresh":
{
    "interval": 2,
    "auto": true
},
       "height": <number>,
       "style": <css style>
   }
- show_items: number of text "frames" to show.
- height: height of the text element in pixels. e.g. 100
- style: an optional css style, e.g: "style": "font-size:40px;color:yellow" or "font-size:40px;color:#ffff00"
Graph feed can be used to display data in graphical format.
    "graph":
    {
        "min": <number>,
        "max": <number>,
        "units": "<unit>",
        "thresholds": [
            {
                "value": <number>,
                "color": "<css-color>",
                "alert": true|false
            }
        ]
    }
- min: graph min value (default: 0)
- max: graph max value (default: 100)
- units: units to display on graph
- thresholds: array of thresholds
- value: received values less than or equal to this value will colored by the corresponding color
- color: any css recognized color string
- alert: true or false, enables alert if a received value falls within this threshold
Track feed is used to show tracks.
"track":
{
    "image": <url>,
    "extent": <array|url>,
    "scale": <number>,
    "trail": true|false,
    "draw_interval": <number>,
    "alpha_step": <number>,
    "radius": <number>,
    "fill: <color>,
    "stroke": <color>,
    "stroke_width": <number>
}
- image: url of image
- extent: extent of image as an array "[min x, min y, max x, max y]" or url to a csv or world file (default: [0, 0, image.width, image.height])
- scale: image scale in % (default: 100)
- trail: show trailing points (default: false)
- draw_interval: canvas is constantly redrawn at this interval in milliseconds (default: 100)
- alpha_step: alpha decrement step on each draw to create a fade out; values between 0 and 1 (default: 0)
- radius: radius of each track point, (default: 5)
- fill: fill color (default: "#10a81a")
- stroke: stroke color (default: "#3aee23")
- stroke_width: stroke width (default: 2)
Map feed can be used to display map.
{
    "bing_maps_key": "Bing Maps API key. Get yours at http://bingmapsportal.com/",
    "map":
    {
	"imagery_set": "Aerial"|"AerialWithLabels"|"Road",
	"image": <url>,
	"extent": <array|url>,
	"follow": true|false,
	"trail": true|false,
	"draw_interval": <number>,
	"alpha_step": <number>,
	"radius": <number>,
	"fill: <color>,
	"stroke": <color>,
	"stroke_width": <number>
    }
}
- bing_maps_key : Bing Maps API key. Get yours at http://bingmapsportal.com/
- imagery_set: Bing Maps imagery set Aerial, AerialWithLabels, Road (default: "Road")
- image: optional url of image to use instead of maps
- extent: extent of image as an array "[min x, min y, max x, max y]" or url to a csv or world file (default: [0, 0, image.width, image.height])
- follow: re-center map on each new track point (default: false)
- trail: show trailing points (default: false)
- draw_interval: canvas is constantly redrawn at this interval in milliseconds (default: 100)
- alpha_step: alpha decrement step on each draw to create a fade out; values between 0 and 1 (default: 0)
- radius: radius of each track point, (default: 5)
- fill: fill color (default: "#10a81a")
- stroke: stroke color (default: "#3aee23")
- stroke_width: stroke width (default: 2)
Start-stop widget is a form widget, displayed with 3 buttons. 'Start', 'Stop' and 'Clear'. Each of these buttons fire 'start action' , 'stop action' and 'clear action' respectively.
{
    "type": "start_stop",
    "form":
    {
        "fields":
        {
            <field_name>:<field-value>,
            <field_name>:<field-value>
        }
    }
}
- form : Contains all form related configuration parameters.
- fields: This section contains all the form fields. Textbox will be displayed for each field specified in this section. The value specified for each field will be populated in the textbox UI field.
start-stop widget is displayed with 3 buttons. 'Start', 'Stop' and 'Clear'. Each of these buttons fire 'start action' , 'stop action' and 'clear action' respectively.
- start action: this action calls backend, sends all form fields are request parameters alone with one more parameter 'command' with value 'start'.
- stop action:this action calls backend, sends all form fields are request parameters alone with one more parameter 'command' with value 'stop'.
- clear action: clears the form field values.
Example:
"log":
{
    "type": "start_stop",
    "form":
    {
        "fields":
        {
            "log-config":"/var/www/html/feeds/config/log.json",
            "sensor-config":"/var/www/html/feeds/config/config.json",
            "log-path": ""
        }
    },
    "refresh":
    {
        "interval": 2,
        "auto": true
    }
}

This form send form data to the backend as request parameters.
http://<host>:<port>/log=%2Fvar%2Fwww%2Fhtml%2Ffeeds%2Fconfig%2Flog.json&sensor-config=%2Fvar%2Fwww%2Fhtml%2Ffeeds%2Fconfig%2Fconfig.json&log-path=
<web_root>/feeds/config/stream.web.frontend.json
{
    "websocket": "ws://localhost:8888/snark-image-frames",
    "my_stream":
    {
        "type": "stream"
    }
}
- websocket - URL to websocket server, in this setup it is the URL to websocketd on the backend using the snark-image-frames endpoint
"type": "stream" options:
"stream":
{
    "autoplay": true|false
}
- autoplay: autoplay stream on load (default: false)
Start a simple http server if none is installed:
cd <web_root>
sudo python -m SimpleHTTPServer 80
Go to http://localhost/feeds.
See also:
- frontend config description:
<source>/web/frontend/readme.txt - frontend config example:
<source>/web/frontend/examples/web.frontend.json
The feeds website also has a page to view point clouds: http://localhost/feeds/point-cloud.html.
This page requires tcp-ws-server (streams tcp data over websockets) to be running. An systemd script is provided for this service (/usr/local/lib/systemd/system/tcp-ws-server), when you install snark with webfeeds turned on.
It has a dependency on Autobahn|Python which can be installed by:
sudo apt-get install python-pip
sudo pip install autobahn[twisted]
Start the daemon the usual way:
sudo systemctl start tcp-ws-server
Check it is running:
sudo systemctl status tcp-ws-server
Load the feeds page in a browser http://localhost/feeds/point-cloud.html
The page can be configured using the buttons in the page itself, to connect to any tcp data stream of points where each point consists of 3 32-bit floats: x,y,z. Set the port in the web feeds, e.g. to 12345, then stream some binary=3f point data to that port. For example:
velodyne-to-csv --model=puck --binary=3f --fields=x,y,z | io-publish tcp:12345 --size $(csv-size 3f)