Installing Loris in Brief - aces/Loris GitHub Wiki
For install instructions, please visit our new guides for Ubuntu and CentOS.
Last tested on Ubuntu 16.04, LORIS 21.0.1
The following instructions must be executed in sequence. If you get an error at any of the steps, troubleshoot them before continuing.
When you're done, don't forget to continue following the rest of the Setup Guide including imaging setup.
- You are on Ubuntu 16.04;
lsb_release -ashould say Ubuntu 16.04 - You'll be ssh'ing into a remote machine. If you are not, just ignore the steps that tell you to
ssh
If you are a LORIS team developer installing RaisinBread (new for LORIS 21):
- See also the Readme in the
raisinbread/directory in this repo (choose your branch wisely) - Use your MCIN login to view this beta install doc
-
sshinto your remote machine as a user in thesudogroup (likeroot) sudo apt-get updatesudo apt-get install -y mysql-server mysql-clientsudo apt-get install -y zip curl wget python-software-properties software-properties-commonsudo add-apt-repository ppa:ondrej/phpsudo apt-get updatesudo apt-get install -y apache2sudo apt-get install -y php7.2 php7.2-mysql php7.2-xml php7.2-json php7.2-mbstring php7.2-gd php-astsudo apt-get install -y composersudo apt-get install -y libapache2-mod-php7.2sudo a2enmod php7.2sudo service apache2 restart
-
sshinto your remote machine as a user in thesudogroup (likeroot) sudo useradd -U -m -G sudo -s /bin/bash lorisadminsudo passwd lorisadminsu - lorisadmin-
whoami, you should seelorisadmin
Make sure you're ssh'd as lorisadmin
Note that the path is assumed to be var/www/loris however your own path may be var/www/
<project-name>, depending on your setup.
cd /var/www-
Get the latest release URL and then (e.g.)
sudo wget https://github.com/aces/Loris/archive/v21.0.1.zip -O release.zip sudo unzip release.zip-
ls, you should see a directory namedLoris-_XX-X-X_ sudo mv Loris* loris-
ls, you should see alorisdirectory sudo rm release.zipsudo chown -R lorisadmin.lorisadmin loris
Make sure you're ssh'd as lorisadmin
Note that the path is assumed to be var/www/loris however your own path may be var/www/
<project-name>, depending on your setup.
cd /var/www/loris/tools./install.sh- Fill in your
<project-name>(You get to choose what it is) - When
install.shasks to configure apache2 for you, accept - Key in
lorisadmin's password - Wait
- Installation complete
- Run
make(for production instances) ormake dev(for development sandboxes)
After running the install script, if your apache configuration isn't working, try:
sudo a2enmod rewritesudo a2ensite <project-name>sudo service apache2 restart
You must already have MySQL installed, and MySQL root credential set up.
- Figure out your
<loris-url>(It's probably the IP address of your remote machine) - Open your internet browser
- Navigate to
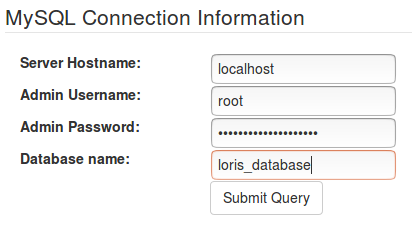
<loris-url>/installdb.php - Fill in
<mysql-host-name>; if the MySQL server is on the same machine that is hosting Loris, it will belocalhost - Fill in
<mysql-admin-username>; it is easiest to just use the existing MySQLrootcredential - Fill in
<mysql-admin-password> - Fill in
<mysql-database>; this database must not exist yet as the installer will try to create it - Submit
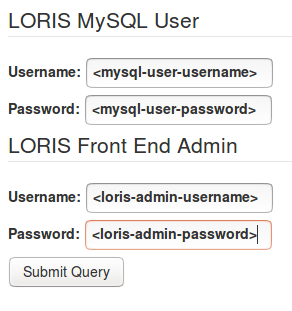
- Fill in
<mysql-user-username>,<mysql-user-password>; must not be the same as root/admin MySQL credential - Fill in
<loris-admin-username>,<loris-admin-password>; 8 or more characters, must include a capital letter and a special character - Submit
- Open your internet browser
- Navigate to
<loris-url> - Fill in
<loris-admin-username> - Fill in
<loris-admin-password> - Log in

You now have the basic LORIS features installed and are ready to set up configurations, Behavioural instruments and Imaging support.
Note that the path is assumed to be var/www/loris however your own path may be var/www/
<project-name>, depending on your setup.
Check the following:
-
Verify the
hostandbasepath settings in your Config table.
If your front-end is not loading: Back-end troubleshooting instructions here -
That
/var/www/loris/smarty/templates_cexists; if it doesn't,cd /var/www/loris/smartysudo mkdir templates_csudo chmod 777 templates_c
-
That
/var/www/loris/smarty/templates_cis owned bywww-data(Runls -al /var/www/loris/smartyto check) or has777permissions (Not ideal butinstall.shdoes something similar, Runsudo chmod 777 /var/www/loris/smarty/templates_c)