Tutorial - accountforgithub/enyo GitHub Wiki
Welcome to Enyo 2.0!
If you're reading this tutorial, you probably want to see how Enyo can help you make Web applications. That's exactly what we'll show you as we make a simple application to perform Twitter searches.
We start by creating an application folder on our local computer. This will contain the HTML file that hosts the app, the JavaScript code for the app, and any assets it uses.
Next we create the host HTML file, app.html, with the following contents:
<!DOCTYPE html>
<html>

<head>
  <title>My Twitter Search</title>
  <link rel=stylesheet href="http://enyojs.com/enyo-2.0.1/enyo.css">
  <script src="http://enyojs.com/enyo-2.0.1/enyo.js"></script>
</head>

<body>
</body>

</html>
(Note that, for the sake of expediency, we're referencing minimized JavaScript
source and CSS files--enyo.js and enyo.css--from the enyojs.com Web site.
In a production app, you would refer to local copies of these files.)
At this point, we have a minimal Enyo app--an empty HTML document that pulls in the base Enyo JavaScript file and style sheet. We have a title, but no actual page content, and there are no calls into the Enyo code. We'll add these things in due time, of course, but for now, let's think of this blank page as our playground. (Note: If you're following along at home, you can open your Web browser's JavaScript console and enter much of the code that follows directly into the console window.)
In Enyo, all APIs for both methods and objects are stored in a master enyo
object, which acts as a namespace for the framework. In general, you won't see
things like $() defined in Enyo. This can make the code more verbose, but
it also limits potential conflicts between Enyo and your own code
or that of other frameworks. Libraries may extend the enyo namespace,
usually by adding into the enyo object. This is sometimes done by using
a sub-namespace (e.g., enyo.dom).
The core Enyo code covers four major functional areas:
- The object model
- HTML rendering
- Components and event dispatching
- The Async and Ajax objects
We'll look at each of these areas as we build our simple application.
Enyo is built around the idea of kinds. A kind is a JavaScript constructor
for an object that's been defined using the enyo.kind method. (We would have
used the word "class", but that's a reserved word in JavaScript and is also
overloaded with the CSS definition of class.) Most of Enyo's code is defined
using kinds that create different objects when invoked using the new operator.
Enyo provides the ability to easily create new kinds based on existing kinds,
and to wrap common functionality in published properties or collections of
components.
Enyo's core code provides a kind called enyo.Control. This is the basic building block used to make all the widgets and content that will be rendered into your Web page.
enyo.Control is a kind defined in the Enyo code using the
enyo.kind method. To create a new control,
call enyo.Control as a constructor, passing in an object containing properties
for the new instance. For example, the following code creates a paragraph
showing the text "Hello, World!" in blue.
var control = new enyo.Control({
  name: "helloworld",
  tag: 'p',
  content: 'Hello, World!',
  style: 'color: blue'
});
After running this code, we have an enyo.Control object in the control
variable, but nothing is visible to the user because nothing has been added
to our HTML.
In Enyo, there are two ways to make a control visible. The first is by calling
the control's write method. This causes the control to render its contents
to a string, which is then output into the DOM using the document.write()
call. This is useful if you're invoking controls at page load time. In our
example, the string output to the DOM would be:
<p style="color: blue;" id="helloworld">Hello, World!</p>
The second way to make a control visible is by calling renderInto(domNode) on
it. This replaces an element in the existing DOM with the HTML output from the
control. Continuing with our example, the following code will render control
into document.body, making the blue "Hello, World!" text visible:
control.renderInto(document.body);
A common pattern for Enyo apps is to define one large control comprising the
application's entire hierarchy of controls, then render that into
document.body, replacing all the HTML that loaded with the page. The
JavaScript that calls renderInto goes inside the <body> of the host HTML
page. As an example (and a preview of things to come), here's the how the
<body> section of the app.html file for our Twitter search app will
ultimately look:
<body>
<script>
    var twitterSearchApp = new TwitterSearchApp();
    twitterSearchApp.renderInto(document.body);
</script>
</body>
(Note: Enyo treats the act of rendering a control into document.body as a
special case, automatically adding an enyo-fit class to the new element.)
Returning to our "Hello, World" example, you may have noticed that the
generated HTML includes an id based on the name property of the control.
Enyo keeps track of the names that it generates, so even if you have two
controls with the same name in different parts of your application, they'll
have unique IDs when rendered into the document. Because of this, the way to
access the DOM node corresponding to a control is to call the control's
hasNode method (instead of looking up the node by ID).
If we expect to make lots of "Hello, World" controls, we can simplify the process by defining our own kind, like so:
enyo.kind({
  name: "HelloWorld",
  kind: enyo.Control,
  tag: 'p',
  content: 'Hello, World!',
  style: 'color: blue'
});
This makes the creation of new instances relatively painless:
var control2 = new HelloWorld({});
If we want to override our control's default content, we can explicitly declare
a new value for content when creating a new instance, prior to rendering the
control...
var control3 = new HelloWorld({
  content: "Hello, Everyone!"
});
control3.renderInto(document.body);
...or, alternatively, we can change the content after creation:
control3.setContent("Goodbye, World!");
Note that if the control has already been rendered into the page,
calling setContent will cause it to be re-rendered to reflect the new
content value.
You may remember from enyo.Object that any
published properties of an object have get<Property> and set<Property>
methods created automatically. What's more, calling setContent on a control
will trigger a call to that control's contentChanged method. contentChanged
looks to see if the control has been rendered to the DOM; if so, it calls
render to refresh everything.
The same pattern applies to other properties, too. For instance, you could call
control3.setStyle("color: red");
and the style attribute would change, with the styleChanged method then
being called.
As a side note, in practice you'll probably to want make style changes by
calling methods such as addClass and applyStyle, which are smart about how
they adjust the style properties, ensuring that changes made by other code are
preserved. So we would create the previous effect like so:
control3.applyStyle("color", "red");
In order to make our Twitter search app, we'll need two different kinds of
objects to display the search results. The first is a display widget to take
the raw data for a tweet and show it nicely on a Web page. For this, we'll make
a new object that's derived from enyo.Control. (As we'll see later, the
second kind of object we need is one that, among other things, lets us
administer a set of these display widgets.)
In Enyo, controls have many capabilities beyond simply rendering their own content. Because a control may host other controls, it's possible for a single control to contain a complex hierarchy of DOM elements. For example, we might have a control that hosts a header and an unordered list with several list elements:
var list = new enyo.Control({
  tag: "div",
  components: [
    { tag: "p", content: "The Additive Primary Colors" },
    { tag: "ul", components: [
      { tag: "li", name: "red", content: "red" },
      { tag: "li", name: "green", content: "green" },
      { tag: "li", name: "blue", content: "blue" } ] } ]
});
list.renderInto(document.body);
This is possible because enyo.Control is derived from
enyo.Component, and a component may act
as host to a whole hierarchy of items. Any component listed in a kind's
components block will be added to a special hash called $, based on its name
property. So, if we wanted to make the "red" list item display in red, we could
write
list.$.red.applyStyle("color", "red");
list.$.green.applyStyle("color", "green");
list.$.blue.applyStyle("color", "blue");
and it would change. In this code, red's parent is the unordered list, but
its owner is the <div> control at the top level (i.e., list).
(Note that if you try to modify the content property of list, nothing seems
to happen. For a control, having children takes precedence over having
content, so when the control is rendered, you only get the content of the
children, not that of the control itself--in this case, list.)
Now, how can we apply what we know about controls in the context of our Twitter
search app? Let's look at the data that Twitter returns when you use its APIs
to get a list of tweets. When you perform a search using the JSON interface,
the matching tweets come back as an array of objects. We can ignore most of the
properties of these objects, but we want to pay attention to a select few:
name, avatar, and text.
A simple way to render this data in HTML would be to make a div with a border and some internal padding, place the avatar icon inside it floated to the left, and show the username in bold and the tweet text in a normal font. For example, the following code
<div style="border: 2px; padding: 10px; margin: 10px; min-height: 50px">
<img src="https://github.com/enyojs/enyo/wiki/assets/twitter-bird-blue-on-white.png"
    style="width:50px; height:50px; float: left; padding-right: 10px">
<b>handle:</b> <span>tweet text</span>
</div>
renders as
 handle: tweet text
We'll use this model as the basis for a new kind called Tweet, which we'll
define in a new file called Tweet.js:
enyo.kind({
  name: "Tweet",
  kind: enyo.Control,
  tag: "div",
  style: "border-style: solid; border-width: 2px; " +
         "padding: 10px; margin: 10px; min-height: 50px",

  published: {
    icon: "",
    handle: "",
    text: ""
  },

  components: [
    { tag: "img", name: "icon",
      style: "width: 50px; height: 50px; float: left; padding-right: 10px" },
    { tag: "b", name: "handle" },
    { tag: "span", name: "text" }
  ],

  create: function() {
    this.inherited(arguments);
    this.iconChanged();
    this.handleChanged();
    this.textChanged();
  },

  iconChanged: function() {
    this.$.icon.setAttribute("src", this.icon);
  },

  handleChanged: function() {
    this.$.handle.setContent(this.handle + ": ");
  },

  textChanged: function() {
    this.$.text.setContent(this.text);
  }
});
Notice that we're exposing name, avatar, and text as published properties
of the new kind. As you'll recall, this gives us automatically-generated setter
and getter methods.
Also notice that we're using the same names for the properties as we are for the
components that the properties affect. This is OK since the properties reside
directly on the created object, while the components live in the $ hash.
In our components block, we do not specify kinds for the individual components,
instead allowing each component to inherit the default kind, enyo.Control.
(The default kind for a control's children is actually a property that can be
set when you define the kind, and can be different from the control's kind. For
example, you could define a list widget in which the child controls are list
elements by default.)
Next, we override the create method and call the changed methods of all the
properties. This is a very common pattern when working with components that
have properties. Since the properties are all being changed prior to rendering,
the rendering itself is pretty lightweight. If, instead, we changed the
properties after the control was rendered, the control would be re-rendered after
each property change.
It's very important that the code for the override start with the call to
this.inherited(arguments), since that allows all of the inherited creation
code to continue to work.
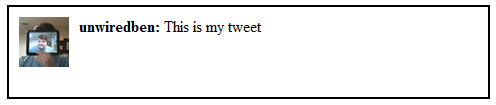
Now, if we create a Tweet object...
var t = new Tweet({
  icon: "touchhead_sq_normal.jpg",
  handle: "unwiredben",
  text: "This is my tweet"});
...then render it into document.body or a <div> on a blank page...
t.renderInto(document.body);
...we'll get output that looks like this:
If we wanted to, we could make a whole column of Tweet objects by creating a
Control object to hold the Tweets, then adding each Tweet as a child using
createComponent:
var l = new enyo.Control;
l.createComponent({
  kind: Tweet,
  icon: "touchhead_sq_normal.jpg",
  handle: "unwiredben",
  text: "First tweet"});
l.createComponent({
  kind: Tweet,
  icon: "touchhead_sq_normal.jpg",
  handle: "unwiredben",
  text: "Second tweet"});
l.createComponent({
  kind: Tweet,
  icon: "touchhead_sq_normal.jpg",
  handle: "unwiredben",
  text: "Third tweet"});
l.renderInto(document.body);
We haven't specified names for the Tweets, so Enyo will generate names based on
the name of the kind. If you look at the l.$ array after running the code
above, you'll see items named "tweet", "tweet2", and "tweet3". If you
wanted to remove the second item, you could use the code
l.$.tweet2.destroy();
which will both destroy the second Tweet object and let the owning control know
to remove that object from its list. If you then call createComponent again
to add a new Tweet, it will be named "tweet4", as names aren't reused.
Note that Enyo doesn't provide APIs for reordering components; you always add to the end of the list. If you're making a control that needs an embedded list with UI above and below, you'll need to embed another control in the middle to serve as the location where items are added and removed.
What we've created so far is fine for displaying static content, but it isn't much of an application because it doesn't allow for any user interaction. In order to respond to user input, we'll need to start handling events.
Enyo provides its own event abstraction on top of the standard HTML DOM event model. This abstraction supports the routing of events between controls and components, while also facilitating the handling of synthetic events (in which the framework abstracts away such things as the distinction between mouse events and touch events).
We'll place our event handling code in a new application kind called TweetApp,
which will go in a new file, TweetApp.js. The TweetApp kind will contain
simple controls for a button and a div. The following code creates these
controls and adds a new Tweet to the div container:
enyo.kind({
  name: "TweetApp",
  kind: enyo.Control,
  components: [
    { tag: "button", content: "Add Tweet", ontap: "addTweet" },
    { tag: "div", name: "tweetList" }
  ],

  nextTweetNumber: 1,
  addTweet: function(inSource, inEvent) {
    this.createComponent({
      kind: Tweet,
      container: this.$.tweetList,
      icon: "touchhead_sq_normal.jpg",
      handle: "unwiredben",
      text: "A new tweet! #" + this.nextTweetNumber
    });
    ++this.nextTweetNumber;
    this.$.tweetList.render();
  }
});
var tweetApp = new TweetApp();
tweetApp.renderInto(document.body)
When we compare this with our previous kind definitions, we see three new
things. First, before the definition of the addTweet method, there's an
internal property called nextTweetNumber. Since nextTweetNumber isn't in
the published array, it does not have auto-generated setter and getter
methods, and each instance of TweetApp has its own value for the property.
Second, in the components block, the button definition includes an ontap
property. This is how you hook up event handlers in Enyo--you provide a
property name ("ontap") based on the event type ("tap") and set its value to
the name of the handler method ("addTweet") that's called on the component's
owner. Enyo automatically hooks up most of the common DOM events. (In this
case, we could have used "onclick" instead of "ontap", but we chose to work with
the "tap" event because the framework synthesizes it from either mouse or touch
events.)
The addTweet handler method follows a standard model. The first parameter to
any event handler is the object that's the source of the event. The second
parameter is an event object; depending on the event, there could be other
parameters with additional information. In this example, since we know there's
only one control hooked up to addTweet, and a tap is such a simple event, we
ignore the parameters and just perform our action, adding a new Tweet to the
list container.
The third and final thing to note is the appearance of a new attribute in the
createComponent call--namely, container. This lets us create the Tweet
object with its owner being the top-level application object, even though the
object is contained within tweetList for layout purposes.
Unlike modifying the attributes of a control, adding new components to a control
doesn't cause the control to be re-rendered immediately. Instead, you have to
call the render method yourself. This is an optimization so you don't do too
much work when adding mulitiple components; instead of rendering things over and
over, rendering is delayed until the whole set is ready.
Now that we've defined a few kinds, let's look at how to put them together to
form an Enyo application. Enyo apps are usually structured as a set of .js
files bundled together in a package. Define the contents of the package by
adding a package.js file to your application folder. Within package.js,
you'll list all the JavaScript and CSS source files inside a call to the
enyo.depends method.
Assuming that we saved our Tweet kind definition in Tweet.js and our
TweetApp definition in TweetApp.js, our package.js file will look like
this:
enyo.depends(
  "Tweet.js",
  "TweetApp.js"
);
You may pass multiple source files as arguments to enyo.depends. The order
is important, as that determines the order in which the JavaScript code is
loaded and run. You need to list kinds that stand alone first, then the kinds
that depend on the standalones.
You may also list directory names; if you do so, the Enyo loader will try to
find a package.js in each listed directory and process any items it contains.
(This may continue recursively for quite a while; for example, see the Enyo
core code's top-level package.js file, which lists all the subdirectories in
which the framework code lives.)
For an application in development, the HTML file will often have two <script>
tags, one to load the minimized enyo.js and one to load the local package.js
file, which then references all the source. For example, our app.html file
will contain the following:
  <link rel=stylesheet href="http://enyojs.com/enyo-2.0.1/enyo.css">
  <script src="http://enyojs.com/enyo-2.0.1/enyo.js"></script>
  <script src="package.js"></script>
For deployment, the Enyo minimizer script knows how to look through the
package.js files and use that information to make minified JavaScript and CSS
files for the application.
Now that we've seen how to display tweets and handle some user input, let's turn our attention to the missing piece of the puzzle--talking to a remote Web server. In this case, we're communicating with Twitter, a very popular service with several stable APIs.
To perform a Twitter search, we need a field in which to enter the search term, a button to start the search, and code to handle making the request, interpreting the results, and preparing the list of tweets to display.
For many Web APIs, it wouldn't be possible to make the request directly to the
API. This is because of a security feature of browsers that limits the
servers with which an XMLHttpRequest can communicate to ones sharing the same
origin. However, as Web APIs have become more and more popular, a scheme has
been devised to get around this limitation. Web pages have always been able to
load <script> tags from foreign servers, so some developers realized that
the script could be dynamically-generated JavaScript code that just sets a
variable or calls a function. This scheme has been named JSONP, or JavaScript
Object Notation with Padding.
Enyo has a built-in method that wraps XmlHttpRequests (the enyo.Xhr and
enyo.Ajax code). For JSONP, we'll use a
variant of this kind called
enyo.JsonpRequest. This uses the
script method to load a foreign URL, so it allows cross-domain access, but you
must be able to trust the remote site completely, since its code will be running
in the same context as your own application.
Here's an example of how to work with the Twitter search API. If you fetch the
URL http://search.twitter.com/search.json?q=enyo&callback=cb, you'll get a
response that is structured like this:
cb({
  // header about request
  "results": [
    {
        // tweet data
    },
    {
        // tweet data
    },
    ...
  ]
});
The call sends back the normal JSON results that Twitter's search API would
return without the "callback" parameter, but wrapped with the padding of cb(
in the front and ); at the end. More details on this and all the other
supported parameters may be found in the Twitter Search API docs.
(A quick tip: the website JSONLint is great for making a hard-to-read pile of JSON data readable. It complains about JSONP results, but still manages to reformat all of the internals for viewing. I used it with this output to determine what fields are returned.)
Outside of the "results" header, there isn't much here that we need to concern
ourselves with. There are fields indicating the current maximum tweet ID, and
how to request the next page of data, but what we really want is the tweet data
in "results".
Because our application kind will change significantly from its earlier
incarnation, we'll give the kind a new name, TwitterSearchApp, and place the
code in a new file, TwitterSearchApp.js. (Note that package.js will need to
be updated to reflect the new file name.)
Here's the code for the new TwitterSearchApp:
enyo.kind({
  name: "TwitterSearchApp",
  kind: enyo.Control,
  components: [
    { tag: "input", name: "searchTerm" },
    { tag: "button", content: "Search", ontap: "search" },
    { tag: "div", name: "tweetList" }
  ],

  addTweet: function(inResult) {
    this.createComponent({
      kind: Tweet,
      container: this.$.tweetList,
      icon: inResult.profile_image_url,
      handle: inResult.from_user,
      text: inResult.text
    });
  },

  search: function() {
    var searchTerm = this.$.searchTerm.hasNode().value;
    var request = new enyo.JsonpRequest({
        url: "http://search.twitter.com/search.json",
        callbackName: "callback"
      });

    request.response(enyo.bind(this, "processSearchResults"));
    request.go({ q: searchTerm });
  },

  processSearchResults: function(inRequest, inResponse) {
    if (!inResponse) return;
    this.$.tweetList.destroyClientControls();
    enyo.forEach(inResponse.results, this.addTweet, this);
    this.$.tweetList.render();
  }
});

var twitterSearchApp = new TwitterSearchApp();
twitterSearchApp.renderInto(document.body);
Notice that the kind now includes all the UI elements that we previously identified as necessary--an input field, a button, and our container.
The search method takes the search term from the input field, creates a
JsonpRequest object, sets up a success callback, and then initiates the
request. We use a new Enyo method here, enyo.bind--this lets you run a
method in a bound "this" context and is similar to the ECMAScript 5 bind()
method for functions. (The Enyo version has the advantage of doing property
lookups on the provided this object, as well as working on older JavaScript
engines that don't directly support the new call.)
The results are displayed when our processSearchResults method is called by
the JSONP code. This happens when we get a response back from Twitter. First
we destroy any existing tweets that were displayed from a previous search; then
we use the enyo.forEach utility method to iterate through the array, calling
addTweet on each item.
In the new addTweet method, we map data from fields in the Twitter API results
to properties of our existing Tweet UI control. The from_user field maps to
our handle, the text field maps to our text, and profile_image_url maps
to ouricon. In a break from the previous version, we don't immediately call
render here, but instead delay rendering until we've added all of the results.
A working version of this app may be found at http://enyojs.com/tutorial/search.html. However, there's plenty still left to do. Input validation and error handling are both missing; there's also nothing shown to the user while the search results are being fetched. A user on a mobile device (or other slow network link) may find it helpful to see a spinner or some other indication that the request has started.
It would also be good to apply more styling to the results. We've worked a bit
with inline styles in this example, but you can also use CSS classes and have
an external stylesheet. See the docs for enyo.Control() for information on
the methods and attributes governing the application of CSS classes to controls.
For more help with Enyo, check out the samples we've got on the Enyo Web site and ask questions in our developer forums. Thanks for sticking with this, and enjoy coding with Enyo!