construction - acaird/raspi-scale GitHub Wiki
The construction of the BeanBot has an electronic component and a physical component.
The electronics of the BeanBot are based on the Raspberry Pi, an analog-to-digital converter chip, and a resistor that changes its resistance based on how much pressure is on it. The basic design is:
- The beans sit on a platform; this is the physical component described below
- The platform presses on the resistor
- The resistor changes its resistance based on how much weight is on the platform
- The analog-to-digital converter (ADC) takes the analog measurement from the resistor and converts it to a digital signal ranging from 0 to 1023
- The digital signal from the ADC is sent to the Raspberry Pi
- There is a computer program on the Raspberry Pi that reads the digital signal; this is the software component described below
- The program that reads the signal makes some decisions based on what value it gets; examples of those decisions are: send the data to the plotting website to update the graph; send an alert via email reminding you to buy more beans
In January 2015 I described this on my blog, but am doing it again here; this is likely to be the more definitive and complete documentation.
- a Raspberry Pi
- a Pi Cobbler that will let you attach the Pi to a breadboard with a ribbon cable
- a breadboard so you can plug everything in
- a force sensitive resistor
- a MCP3008 analog to digital converter to convert the analog signals from
the FSR to digital signals that the Raspberry Pi can read
You can get a different ADC, but then these instructions will need some interpretation.
- some wires to make connections on the breadboard
- a 10k Ohm resistor
I’ve linked these to AdaFruit and RadioShack, but that’s just because that’s what Google told me first, and that’s where I’ve ordered most of my components; I have no affiliation with either of them.
Most of the wiring information I got was from AdaFruit’s instructions at Reading a Analog Input…, which I’ll gratefully paraphrase here.
First, attach the Pi Cobbler and th MCP3008 to the breadboard along the center (see the diagram below).
Next, wire the Pi Cobbler to the MCP3008 following these instructions:
                      +-----------+
unused loc            |           |
on breadbd---Ch 0 ----+ 1      16 +----Vdd----3.3V
                      |           |
             Ch 1 ----+ 2   M  15 +----Vref---3.3V
                      |     C     |
             Ch 2 ----+ 3   P  14 +----AGND---ground
                      |     3     |
             Ch 3 ----+ 4   0  13 +----CLK----Cobbler #18
                      |     0     |
             Ch 4 ----+ 5   8  12 +----Dout---Cobbler #23
                      |           |
             Ch 5 ----+ 6      11 +----Din----Cobbler #24
                      |           |
             Ch 6 ----+ 7      10 +----CS-----Cobbler #25
                      |           |
             Ch 7 ----+ 8       9 +----DGND---ground
                      |           |
                      +-----------+
On the same unused location on the breadboard where Channel 0 is connected, connect one of the leads from the FSR and connect that same row on the breadboard to ground using the 10kOhm resistor. If you leave this “pull-down resistor” out, the readings from the FSR will just flap all around and be useless (at least, so says a friend of mine who did that; you wouldn’t know him). Attach the other lead of the FSR to the power rail (a resistor without a current isn’t much good).
Finally, attach the 3v3 from the Pi Cobbler to the power rail of
the breadboard to deliver power to everything.
The end result should look something like this:
file:assets/rasp-pi-fsr-breadboard.png

I built a simple platform using some scrap wood from a crate a gift came in, a hand saw, and some glue. The plans look like:
file:assets/coffee-scale-platform.png
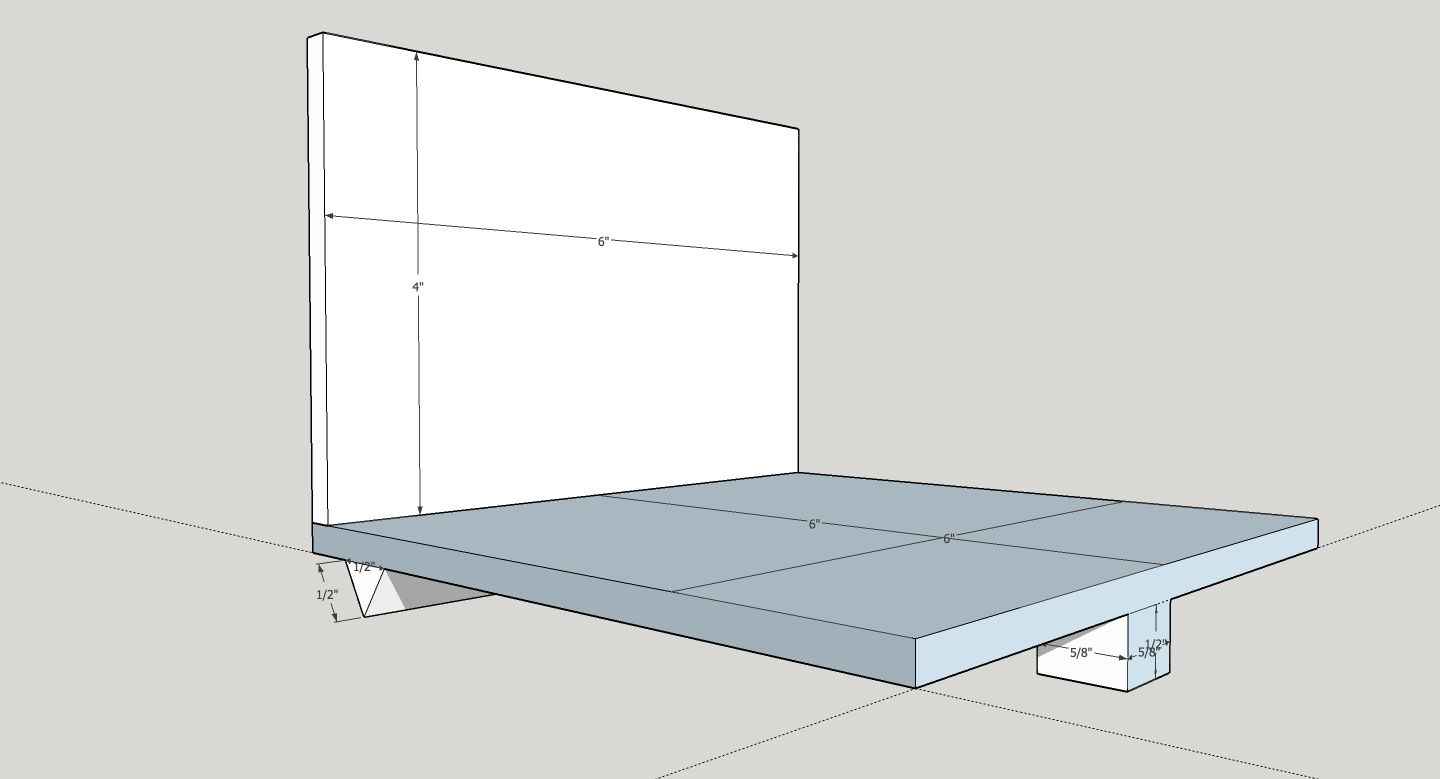
The force sensitive resistor is a circle that I attached to the 5/8” foot with some cellotape; yes, there is a better way.
The software component is described in detail later on, but the summary is that it is a Python program that reads the value of the ADC using the RPi GPIO library, uses configured values to decide whether to graph the data, send an update via Twitter or email, or send a low bean alert via Twitter or email.
All of the software is available on Github at https://github.com/acaird/raspi-scale and the installation instructions are in the Software Documentation section.