Cars – Rain occlusion tweaks - ac-custom-shaders-patch/acc-extension-config GitHub Wiki
To estimate, which car mesh should be wet and which one should be try, during loading CSP does a very basic per-vertex AO baking. If a vertex is illuminated, we can consider that it’s visible from outside enough, so it could be wet. It takes a bit of time, but it only happens once per car (in most cases), and then the result is cached in “cache/cars_data/…/rain_occlusion”.
For actual baking, CSP evenly arranges 256 lights around a car (from all directions, not just from top half, so the bottoms of flipped cars could also get wet), generates shadow maps for those lights and then goes over all the vertices and compares them with those shadow maps.
Few things to note:
- Meshes using shaders
ksBrokenGlass,ksWindscreen, or ones with a name starting withDAMAGE_GLASSare excluded; - If any of a mesh parents doesn’t have an “active” flag, it won’t cast a shadow (that’s how
COCKPIT_LRdoesn’t contribute); - Process happens for LODs as well;
- CSP estimates the size of a car to compute how large shadow map should be (it’d need to encompass the entire car, after all). If you have a tiny piece of geometry really far away from the car, CSP will see it, stretch shadow map out and you won’t get any feasible quality as a result;
- If no vertex of a mesh gets more than 5% wetness, mesh doesn’t get flagged as needing an expensive rain drops shader when it rains entirely;
- You can see the baked rain occlusion in CSP Debug app. Note that CSP also has a separate dynamic car wetness map it applies on top, so you’d need to spend some time with a car fully under rain to see the exact wetness;
- By default, any skin with a skin-specific
MODEL_REPLACEMENT_…section gets its own shadow map, so if a skin swaps out a piece of car’s exterior geometry, it’d get properly wet. However, if a skin only swaps, for example, something on a dashboard, it’d also lead to it getting its own wetness compute slowing things down, so you might want to specify if a separate rain occlusion compute is needed explictly.
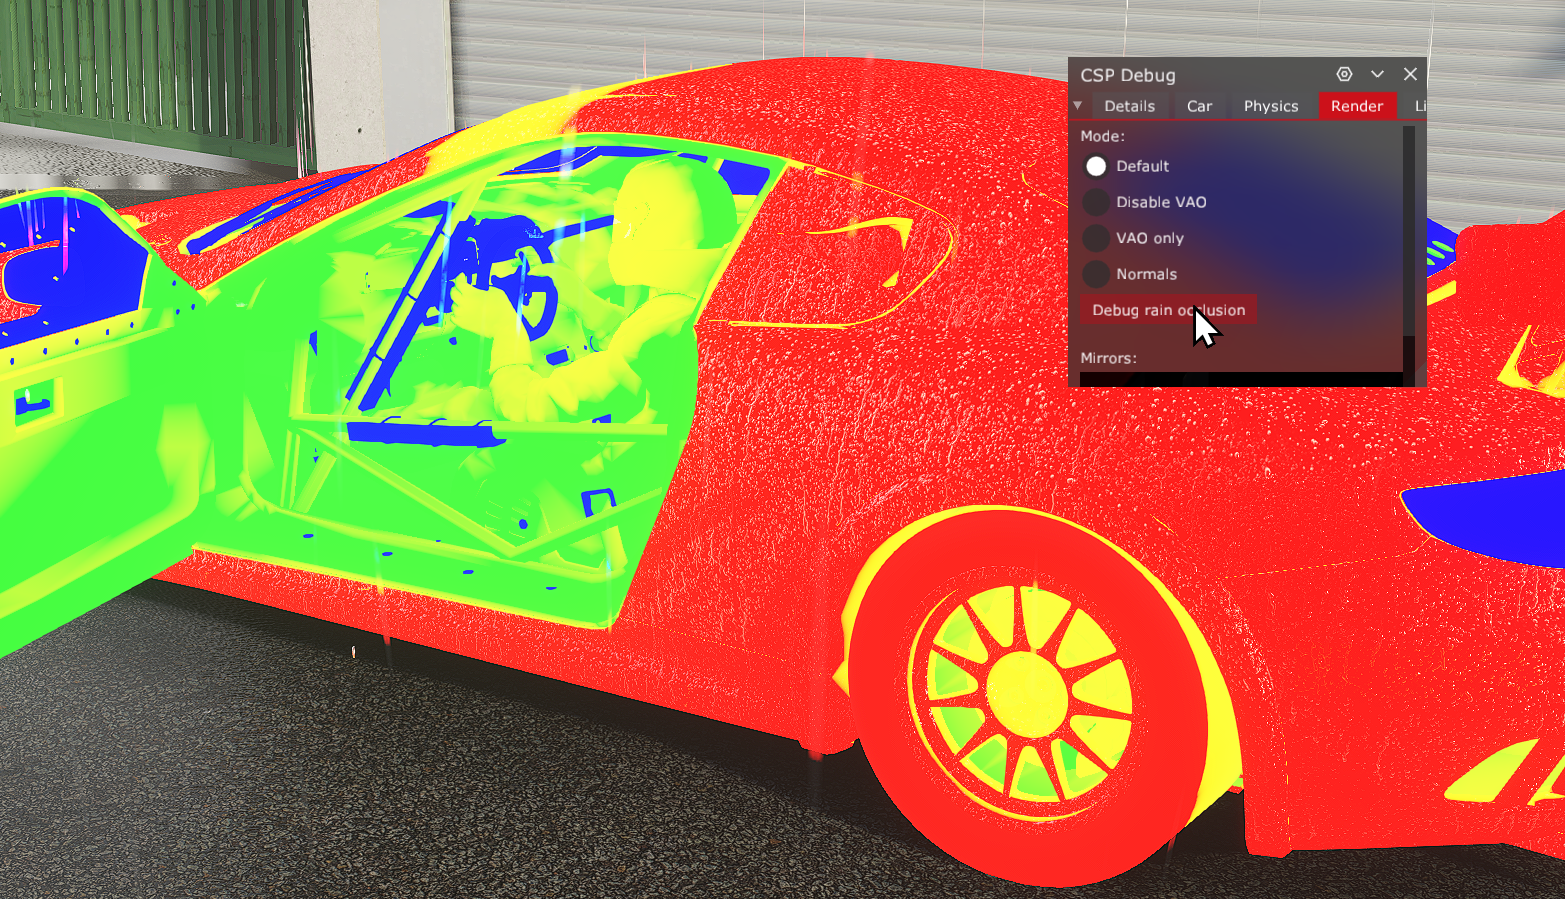 Meshes without rain drop shaders flag are shown in blue. Red is fully wet, green is dry.
Config
Actual computation can be tweaked using these settings:
[RAIN_FX]
CUSTOM_SKIN_OCCLUSION = 0 ; set to 1 to have a separate rain occlusion for each skin. Only case where you’d want to use this one is to set it to 0 if you have a skin with `MODEL_REPLACEMENT_…` changing something in interior which wouldn’t affect rain distribution.

; For occluding water in specific places, you can add these sections describing extra spheres casting shadows:
[RAIN_FX_OCCLUSION_CASTING_SPHERE_…]
POSITION = X, Y, Z ; relative to car model coords
RADIUS = Rx, Ry, Rz ; per axes, in meters
  ; Please note, for all of these Rx/Ry/Rz you can set a single value as well and it’ll be used for all three axes

; For adjusting certain materials or meshes, use these:
[RAIN_FX_OCCLUSION_ADJUSTMENT_…]
MESHES = ?
MATERIALS = ? ; this and MESHES are regular filters. If none are set, applies to all.

SAMPLE_OFFSET = 0 ; shift points of shadow maps sampling along normals in meters. If an overlaying mesh casts shadows on an underlying mesh, you can increase this value for an underlying mesh and it’d sample shadows maps a bit further out. If not set, helpful defaults are used.

WETNESS_MULT = 1
WETNESS_ADD = 0
WETNESS_MIN = 0
WETNESS_MAX = 1
WETNESS_EXP = 1 ; basic post-processing. If you want some mesh to get fully wet, set WETNESS_MIN to 1. If you want to stop a mesh from getting any rain (for example, if a thin roof is leaking around the edges), set WETNESS_MAX to 0.

; Default sample offsets slightly lowering interior wetness and increasing exterior windows wetness (helps with stickers):
[RAIN_FX_OCCLUSION_ADJUSTMENT]
INTERIOR_SAMPLE_OFFSET = -0.01
EXTERIOR_WINDOWS_SAMPLE_OFFSET = 0.01
EXTERIOR_MIRRORS_SAMPLE_OFFSET = 0.01
Heating
There is also a separate thing where wetness decreases around heated areas when a car is warmed up. By default it only affects exhaust, and wheels. Here are the parameters you can tweak:
; Default parametes for exhaust points:
[RAIN_FX_OCCLUSION_HEATING_EXHAUST]
RADIUS = 0.3, 0.4, 0.5 ; Rx, Ry, Rz of a heating sphere around exhaust points (using flames or, if present, `PARTICLES_FX_EXHAUST_…` entries)
GRADIENT_OFFSET = 0.2 ; point relative to radius at which intensity starts to fade out
INTENSITY = 0.4 ; set this and INTENSITY_FACING to 0 to disable
INTENSITY_FACING = 5 ; higher intensity for 0.1 radius with GRADIENT_OFFSET of 0.8, pretty much stopping any rain on the actual exhaust point

; Extra heating points:
[RAIN_FX_OCCLUSION_HEATING_…]
MESHES = ? ; filter for affected meshes
POSITION = X, Y, Z
RADIUS = Rx, Ry, Rz
GRADIENT_OFFSET = 0
INTENSITY = 0.5
Optional roof case
With all of that, a case where the roof can be toggled in setup menu is tricky, but doable. A single entry of [WING_BASED_SWITCH_…] can have a ALTER_SHAPE = RAIN_OCCLUSION param and it’ll generate an alternative rain occlusion set. Alternatively, name your animation “roof.ksanim”, and if you’re not using [WING_BASED_SWITCH_…] and the animation is set correctly, CSP (newer versions, 0.2.11 and such) should pick it up and generate an alternative wetness compute automatically.