DDE - abdullin/Dexter GitHub Wiki
DDE allows users to develop and run software on multiple platforms to control the Dexter 5 axis robot arm. In addition to providing standard robot control functions like kinematics, it is fundamentally a JavaScript development environment with lots of extensions. See DexRun-DDE-communications for more detail about the communications between DDE and Dexter.
Links to current LTS and other versions
Download and run the .exe
- In the Documents folder, create a subfolder called "dde_apps".
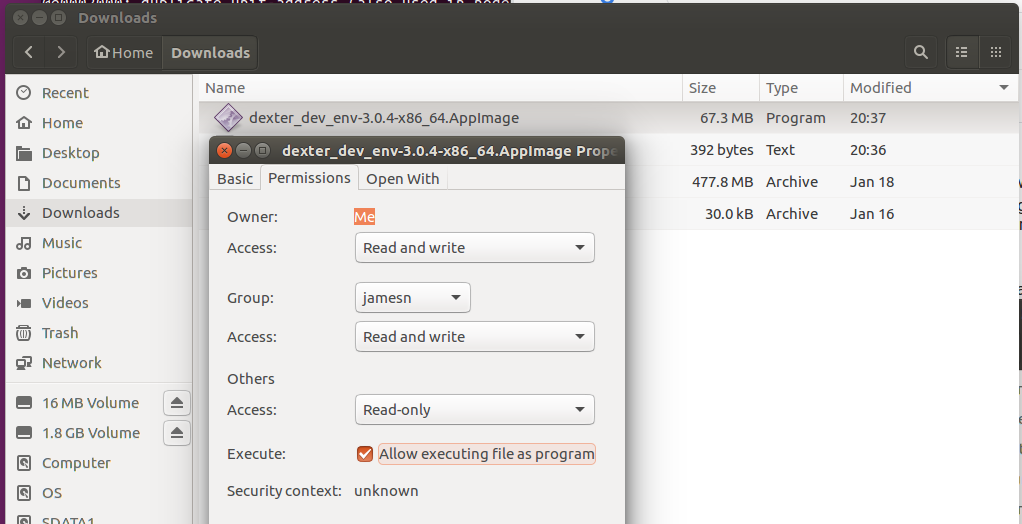
- Download the AppImage file, change the execution permissions, and start it.
In this case, we don't need to make a distributable package, we just want to run the source. And having the source directly run means we can develop on Dexter and also use parts of it in other ways (see Job Engine below). So instead of installing the Electron package, we just install the source and use npm to pull in the dependencies. Note: This requires the 16.04 version of the operating system on Dexter, and Dexter must be connected to the internet directly (not just to your PC).
$ git clone https://github.com/cfry/dde
$ cd dde
$ npm i
$ npm run start
Note: If you find the dde won't build after the npm i command, try checking out a prior version. e.g. git checkout v3.0.7 is known to work or git checkout v3.5.2 may work for the Job Engine.
Of course, the GUI part of the app will only be visible with an X-Server running and since Dexter does not have a video adapter, this must be a remote the X-Windows Desktop. On the current images, an icon is provided to launch DDE from the desktop when logged in via X-Windows. The program takes a while to load (need faster SD Card and interface?) but operation isn't horribly slow.
A "dde_apps" folder is created under the "/root" folder (alongside Documents, not in it) for the DDE application. Setting the dexter0 ip address to localhost in the /root/dde_apps/dde_init.js file allows local connection of DDE to DexRun.
To run DDE jobs without the full DDE GUI interface, e.g. via SSH, you can start them from /root/Documents/dde with the command:
node core define_and_start_job job_file.dde
where job_file.dde is replaced with the path and file name of the job file you want to start.
Jobs can be run on Dexter automatically on startup by appending the following to the /srv/samba/share/RunDexRun script or in /etc/rc.local. The sleep 5 is required to get DexRun time to start, and sudo is required because the startup script doesn't have root access by default.
cd /root/Documents/dde
sleep 5 && sudo node core define_and_start_job /srv/samba/share/autoexec.dde
Job Engine Initialization: When run for the first time, the job engine creates a dde_init.js file in the /root/Documents/dde_apps folder. (note this is different than for the GUI DDE on Dexter which is in /root/dde_init.js). If this folder doesn't exist, you will need to create it with mkdir /root/Documents/dde_apps. The job engine defaults to simulate, so the jobs don't actually make the robot move until the dde_init file is edited to add ,simulate: false after the IP address in the definition of dexter0. The IP address is set to localhost so it will work no matter what IP address Dexter is actually assigned.
/root/Documents/dde_apps/dde_init.js:
persistent_set("ROS_URL", "localhost:9090") //required property, but you can edit the value.
persistent_set("default_dexter_ip_address", "localhost") //required property but you can edit the value.
persistent_set("default_dexter_port", "50000") //required property, but you can edit the value.
new Dexter({name: "dexter0", simulate: false}) //dexter0 must be defined.
When you 'run a job' as defined above, it sets window.platform to "node". If you are in dde, window.platform == "dde" will evaluate to true. That means you can customize any code written based on this "platform" i.e.
if(window.platform == "node")      { /* hey I'm in node. */ }
else if (window.platform == "dde") { /* we're in dde! */ }
The system software takes advantage of this. One important case is that the "out" function is defined as:
function out(val="", color="black", temp=false, code=null){
    if(window.platform == "node") { console.log(val) }
    else { /* do formatting and print to DDE's Output pane */ }
}
Thus when running on node, 'out' only pays attention to its first arg, and it sends the first arg directly to the console.
For more information on the Job Engine, see the dde/core/job_engine_doc.txt file
A folder can be created and a systemd path unit^ setup to send any .dde files dropped into the folder to the job engine, then delete them when finished. Then DDE's [write-to-robot] function can be used to send a .dde file to the folder. See Issue 60 Versions of DDE after 3.3.0 support running jobs on Dexter via the Jobs menu.
Units: Note that Dexter uses the metric system of measurement. So all units of distance are in meters. A meter is about 3 feet which is about Dexters full reach at the size Dexter has been made at so far. A tenth of a meter (e.g. 0.1) is about 4 inches which is about the length of your finger. A hundredth of a meter (e.g. 0.01) called a "centimeter" is a about a half inch (actually closer to 0.4 inches) or about the width of your little finger. And a thousandth of a meter (e.g. 0.001) called a "millimeter" is tiny, about a half of a tenth of an inch or about the thickness of a fingernail.
So if you change the first digit to the right of the decimal point, you are moving about a finger length. The next digit, 2nd to the right, moves you about a finger width, and the 3rd moves you about the thickness of a fingernail.
Debugging: Note that all of this is documented in the help system inside DDE. Download and install the program to access that in it's formatted form.
- the
outfunction can be wrapped around anything to dump a copy of the result to the output panel when it is evaluated without any change in program behavior. It returns whatever it prints, so there is no side effect to it being included. E.g.let variable = out("Hello" + "World").toUpper())will still put "HELLOWORLD" in variable, but it will also let you see "HelloWorld" on the screen. -
inspectprovides a very nice interactive inspector in the output panel. It does not return values likeoutas of this time. - To debug DDE code in the Chrome debugger, launch that by right clicking anywhere in the Editor pane and select Inspect Element to open the debugger UI. Then add
debugger;anywhere in the code and "Eval" it. You can explore variables, step, etc... everything you can do in a web page. - To update / debug any part of DDE, simply overwrite the objects property in the Editor script. To retain that between restarts, add the code to the dde_init.js file in the dde_apps folder. e.g. To get a report to the output panel of the result of any call to Dexter.sleep in the job, just redefine the original function:
Dexter.sleep = function(seconds){ return make_ins("z", seconds) }
as a new function including a call toout. e.g.
Dexter.sleep = function(seconds){ return out(make_ins("z", seconds)) }
any job evaluated after that line will show the instruction array generated by a Dexter.sleep in the do_list.
In general, you can override any function in a class with:
Class.function-name = function(parameters) { code }