Creating a REST API - aatishnn/it350_sample GitHub Wiki
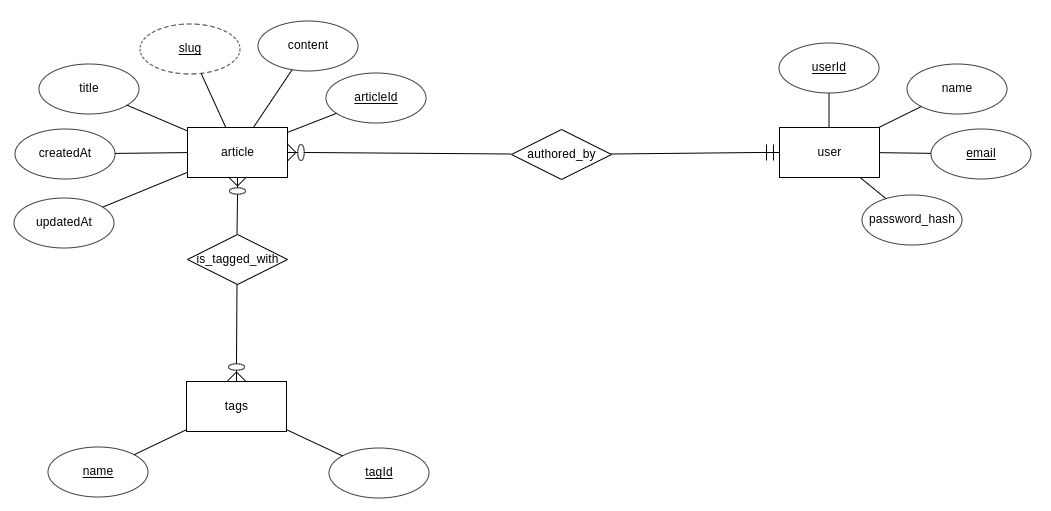
In this tutorial, we are going to create a REST API for a sample blogging platform. The ER diagram, relational model, and initial SQL statements are provided below. Go through this and understand the design before diving into the rest of the tutorial.
The next part builds upon this tutorial and adds authentication and authorization so don't worry about it right now.
And the following SQL query was used to create a database:
CREATE TABLE users (
   userId SERIAL,
   email VARCHAR(256) NOT NULL,
   password_hash VARCHAR NOT NULL,
   name VARCHAR(100) NOT NULL,
   PRIMARY KEY (userId),
   UNIQUE (email)
);

CREATE TABLE tags (
   tagId SERIAL,
   name VARCHAR(50) NOT NULL CHECK (name NOT IN ('badword1', 'badword2', 'badword3')),
   PRIMARY KEY (tagId),
   UNIQUE (name)
);

CREATE TABLE articles (
   articleId SERIAL,
   title VARCHAR(500) NOT NULL,
   content TEXT NOT NULL,
   userId INT NOT NULL,
   isPublished BOOLEAN DEFAULT FALSE NOT NULL,
   createdAt TIMESTAMP NOT NULL,
   updatedAt TIMESTAMP NOT NULL,
   PRIMARY KEY (articleId),
   FOREIGN KEY (userId) REFERENCES users(userId)
);

CREATE TABLE is_tagged_with (
   articleId INT NOT NULL,
   tagId INT NOT NULL,
   PRIMARY KEY (articleId, tagId),
   FOREIGN KEY (articleId) REFERENCES articles(articleId),
   FOREIGN KEY (tagId) REFERENCES tags(tagId)
);
We identified that this platform will need the following set of pages and functions:
- Homepage
- List latest 10 articles sorted by createdAt date in descending order
- Article Detail Page
- Display a single article with all the details about it
- List of Tag pages (think tag cloud)
- List all the tags and number of articles each tag is associated with
- Tag Detail Page
- List all the articles that have that particular tag assigned to them
Apart from the public views, we also need an admin interface for authors to create articles and edit articles they have created. So we need the following features on the admin interface as well:
- Admin Section
- Login / Signup as authors
- CRUD (Create, Read, Update, Delete) articles
- CRUD (Create, Read, Update, Delete) tags
- Change published status of articles
- Assign tags to articles
You did this last week. You looked through your requirements and identified types of queries and views that might be necessary for your app. For this example, we're going to use the following views:
-
Homepage
- List latest 10 articles sorted by createdAt date in descending order
SELECT * FROM articles
WHERE isPublished IS TRUE
ORDER BY createdAt DESC
LIMIT 10;
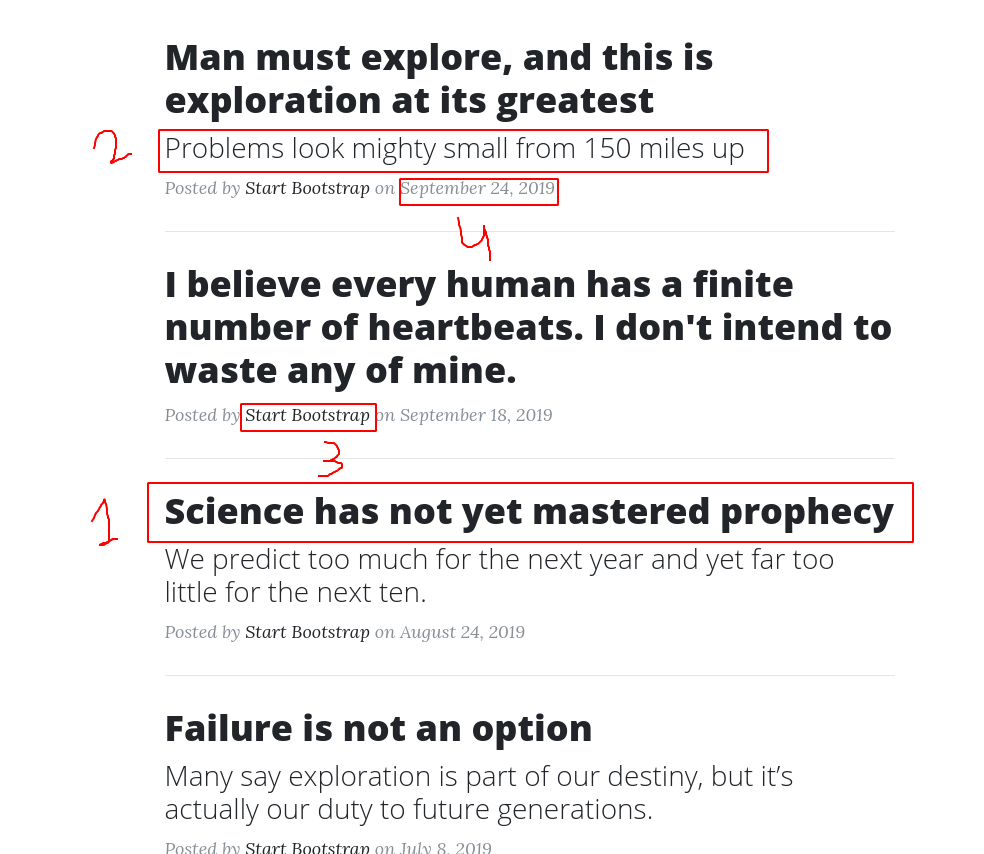
but wait, for the homepage, we do not require all the fields and the whole content of the articles. Bandwidth is not cheap so let's improve this view so it only returns required data. If we look at the prototype of the homepage below, we can see that we require 4 things: (1) title of the page, (2) First few lines of the content (3) Name of the author, and (4) Date it was posted.
So, our updated view will look something like:
DROP VIEW IF EXISTS homepage_articles;
CREATE OR REPLACE VIEW homepage_articles AS
    SELECT articleId, title, LEFT(content, 200) as "short_content"
    FROM articles
    WHERE isPublished IS TRUE
    ORDER BY createdAt DESC
    LIMIT 10;
-
Article Detail Page
- Display a single article with all the details about it. We do not require a dedicated view for this as this is pretty simple with standard SQL statements.
SELECT * from articles WHERE id=1;
Similarly, we can identify queries and views for other requirements in this same fashion.
Now that we have the database together with views, let's use PostgREST to create a REST API on top of it.
wget https://github.com/PostgREST/postgrest/releases/download/v7.0.1/postgrest-v7.0.1-linux-x64-static.tar.xz
tar xf postgrest-v7.0.1-linux-x64-static.tar.xz
mv postgrest /bin/
chmod +x /bin/postgrest
Create a file named postgrest.conf with the following contents:
db-uri = "postgres://<username>:<password>@127.0.0.1/<dbname>"
db-schema = "public"
db-anon-role = "<username>"
server-port=8000
Replace <username> and <password> with the credentials you used to connect through PgAdmin. Also replace <dbname> with your database name.
You can now start the API using the following command from the directory where you created the postgrest.conf file:
postgrest ./postrest.confYour REST API should be running at http://localhost:8000 . If you are running this on a server and want to access it from a different machine, replace localhost with the IP address of the server.
-
If you have a table named
xyz, it is available as a RESTful API athttp://localhost:8000/xyz. For example, we have a table namedarticles, we get the following auto-generated APIs: -
GET http://localhost:8000/articles (same as SELECT * FROM articles)
-
GET http://localhost:8000/articles?articleid=eq.1 (same as SELECT * FROM articles WHERE articleid=1)
-
POST http://localhost:8000/articles (same as INSERT INTO articles VALUES ...)
and since we have views such as homepage_articles, they are also exposed in similar ways. For example:
- GET http://localhost:8000/homepage_articles (same as SELECT * FROM homepage_articles)
and many more. You can do filtering, limits, and ordering all through these APIs. Refer to the PostgREST docs for more examples.
Insomnia is a GUI tool to try out HTTP and REST requests and test their functionalities. We are going to use it to test some of the endpoints that PostgREST created.Download and Install Insomnia from the official website
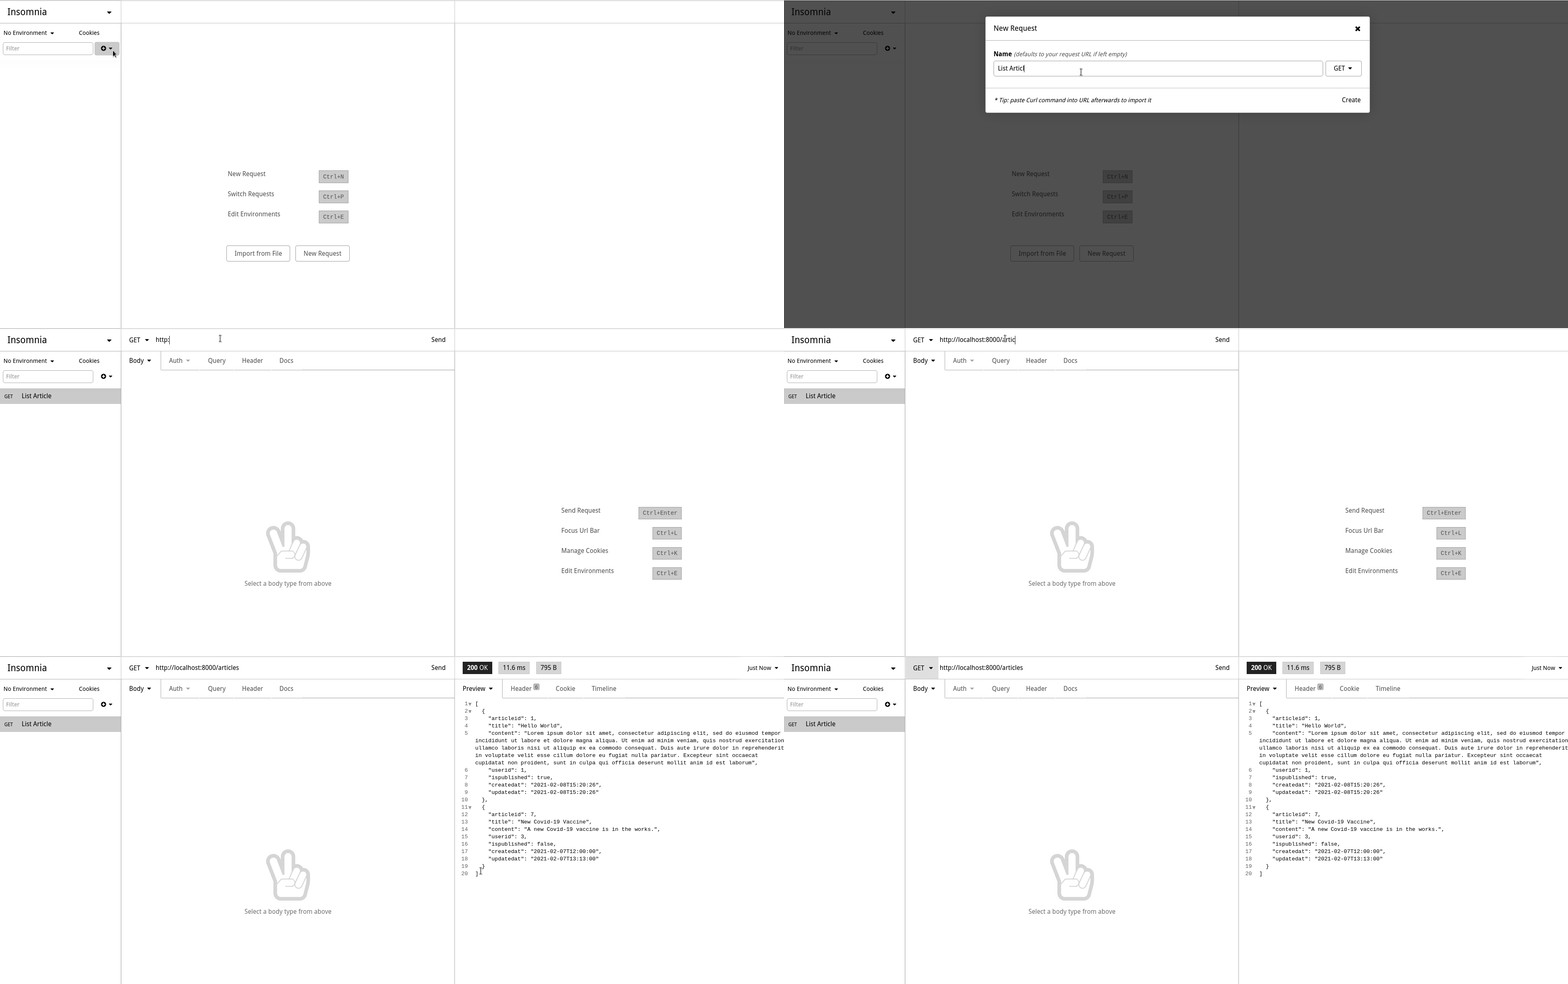
Let's test the endpoint to list all articles. You can do that by creating a new GET request in Insomnia:
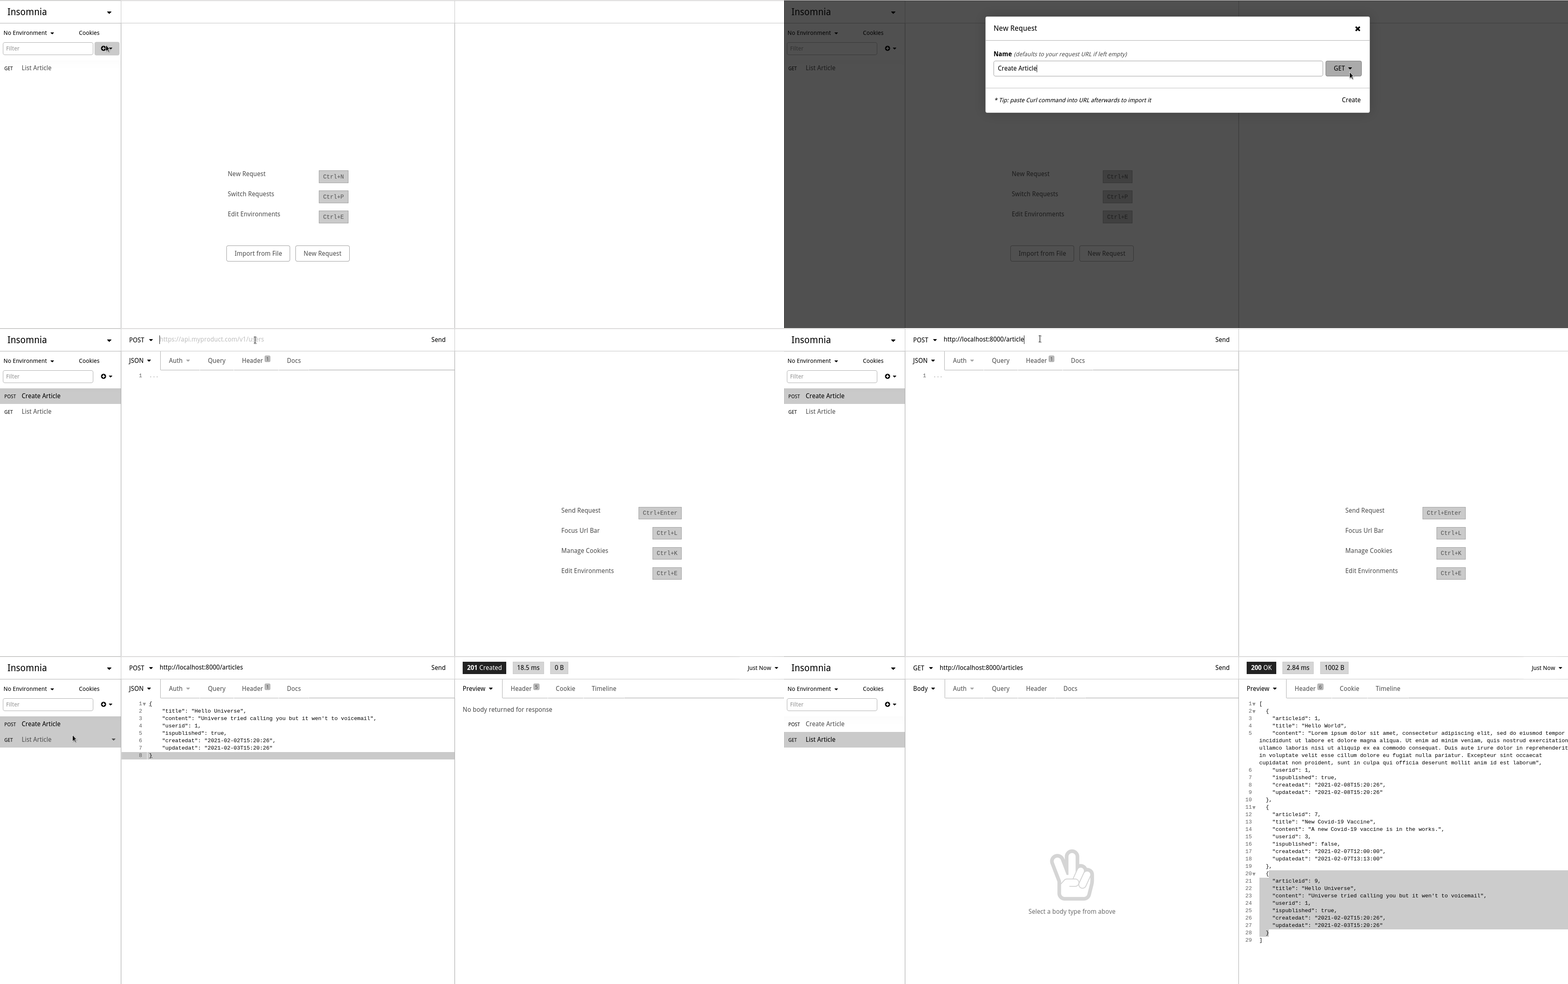
We can also create POST requests to modify the contents of the database. For example, we can create a POST request to add a new article in the following way:
An author made a typo in the article with id 9. Let's fix that. We can update existing resources using PATCH request:
Turns out that article had a copyright issue and we need to take it down. Let's issue a DELETE request and remove that article:
When we were creating an article with the following data:
{
  "title": "Hello Universe",
  "content": "Universe tried calling you but it went to voicemail",
  "userid": 1,
  "ispublished": true,
  "createdat": "2021-02-02T15:20:26",
  "updatedat": "2021-02-03T15:20:26"
}
We were passing in createdAt and updatedAt fields ourselves. But these are timestamps that can be automatically calculated in the backend. So, let's fix that by using triggers and stored procedures.
First define functions (or stored procedures) to generate timestamps:
CREATE OR REPLACE FUNCTION trigger_set_update_timestamp()
RETURNS TRIGGER AS $$
BEGIN
  NEW.updatedAt = NOW();
  RETURN NEW;
END;
$$ LANGUAGE plpgsql;

CREATE OR REPLACE FUNCTION trigger_set_insert_timestamp()
RETURNS TRIGGER AS $$
BEGIN
  NEW.createdAt = NOW();
  NEW.updatedAt = NOW();
  RETURN NEW;
END;
$$ LANGUAGE plpgsql;
Now create triggers that will call these functions whenever an article is created or updated:
CREATE TRIGGER set_update_timestamp
BEFORE UPDATE ON articles
FOR EACH ROW
EXECUTE PROCEDURE trigger_set_update_timestamp();


CREATE TRIGGER set_insert_timestamp
BEFORE INSERT ON articles
FOR EACH ROW
EXECUTE PROCEDURE trigger_set_insert_timestamp();
Now, all we have to do to create a new article is pass the following data:
{
  "title": "Hello Universe",
  "content": "Universe tried calling you but it went to voicemail",
  "userid": 1,
  "ispublished": true
}
and PostgreSQL will take care of updating those timestamp values for us. In your projects, you should find similar use cases and implement at least one trigger that calls a stored procedure.
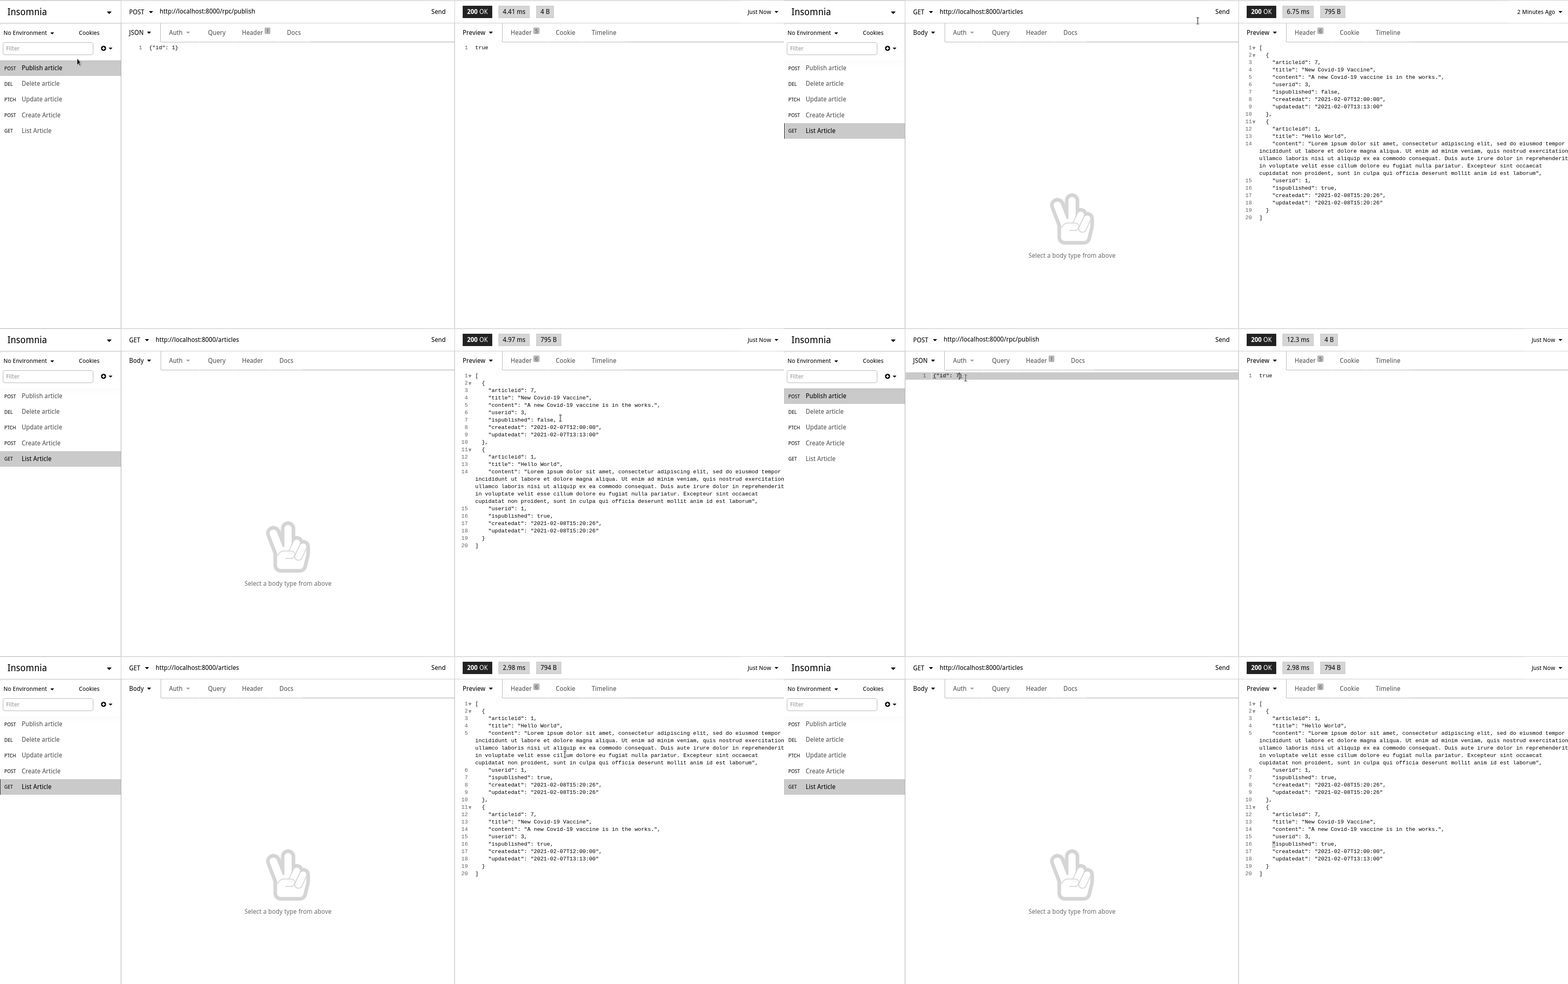
Now, let's implement some backend logic. What if we need an API that takes in id of the article and publishes it (i.e. set isPublished to true). We can implement that using stored procedures and expose it through PostgREST.
Let's create a stored procedure first:
CREATE OR REPLACE FUNCTION publish(id integer)
RETURNS BOOLEAN AS $$
BEGIN
  UPDATE articles SET isPublished = TRUE WHERE articleId = id;
  RETURN TRUE;
END;
$$ LANGUAGE plpgsql;
We can now access this through our API using:
Note that all stored procedures and functions are available through PostgREST at URLs like: http://localhost:8000/rpc/<function_name>.
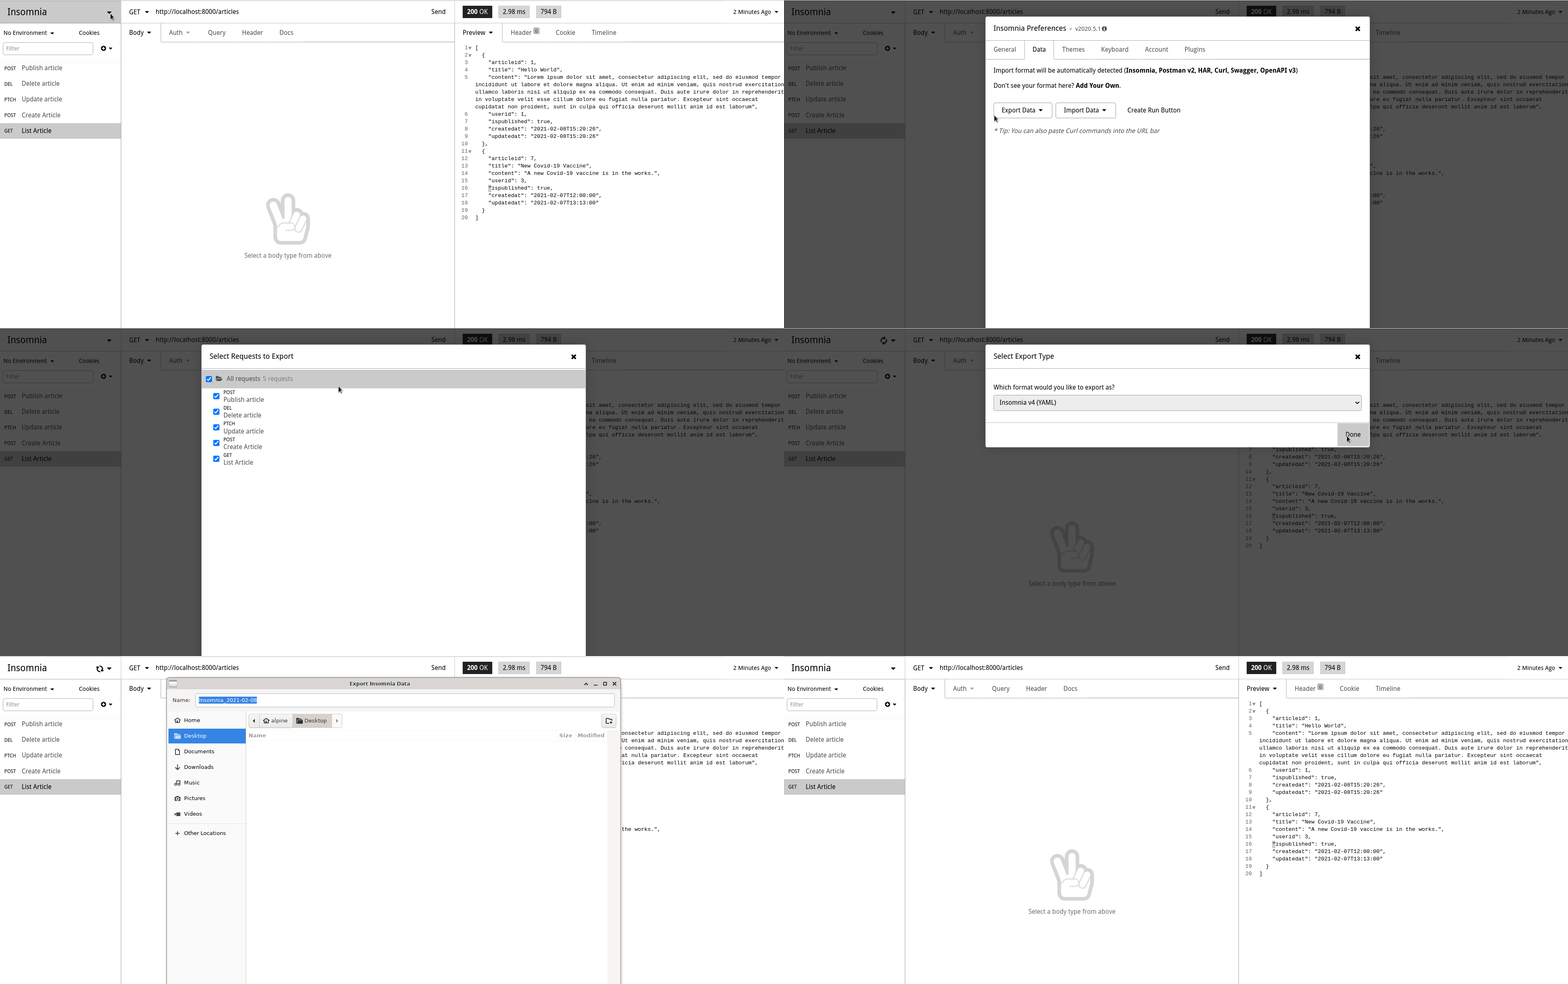
- Create Insomnia requests for each API endpoints that you need for the app (queries and views)
- Export the workspace and submit it on Canvas
- Create a simple text file and put all the new triggers and stored prodecures that you have created in it. Upload it on Canvas as well. You should have at least one trigger and a stored procedure for your project.
