Securing Windows Lab - Zacham17/my-tech-journal GitHub Wiki
In this lab, you will walk through some simple ways to secure a Windows 10 installation and some of the applications on it. As security professionals in training, this will be a great learning experience for the servers you’ll be responsible for in the future!
These are the accounts at your disposal:
- Ookie (Administrator)
- Pokie (Administrator)
- Rocky (Standard Account)
- Rookie (Standard Account)
- Kooky (Bad Actor)
Ookie and Pokie are the only administrators. Rocky and Rookie are legit users.
Don’t Delete the Champlain account.
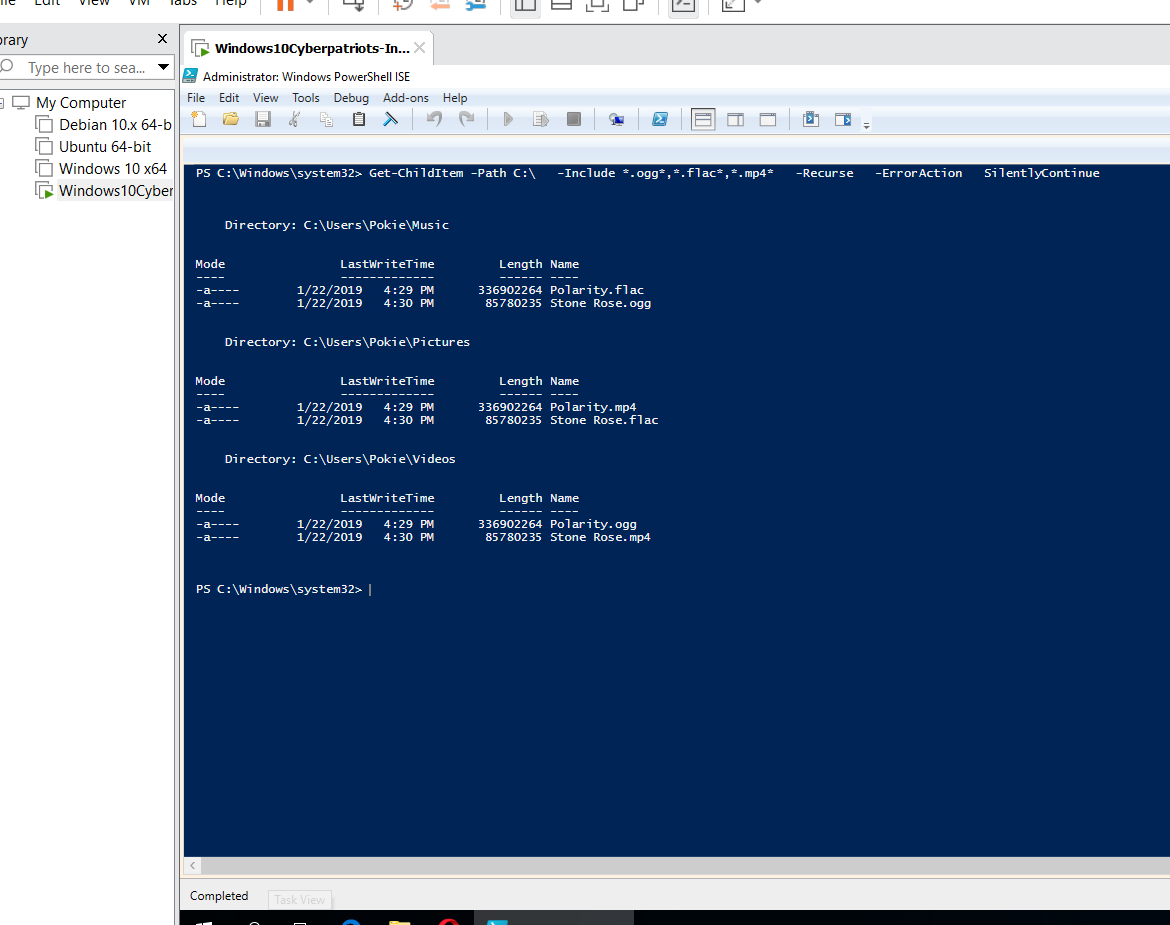
Background: This machine is strictly for web-surfing, so nobody should be storing files of any sort on it. We can use Powershell to search for files that have been downloaded onto the system. Do you know how to find all the media from Windows, without knowing the exact directory it’s in? Hit the Windows Icon in the bottom left and search for “Windows PowerShell ISE”. Run this as an administrator. Next, type the following command:
Get-ChildItem -Path C:\ -Include .ogg,.flac,.mp4 -Recurse -ErrorAction SilentlyContinue
- Get-ChildItem: Gets the files and folders in a file system drive
- -Path: Specifies the desired location
- -Include: Shows only the files that are being searched for
- -Recurse: Shows the directory’s contents, including the contents of any subdirectory within
- -ErrorAction: Decides how to respond when an error is thrown
- SilentlyContinue: Tells the computer that you don’t want to see the error
SUBMIT: Take a screenshot that shows the output of a command to demonstrate the files have been removed.
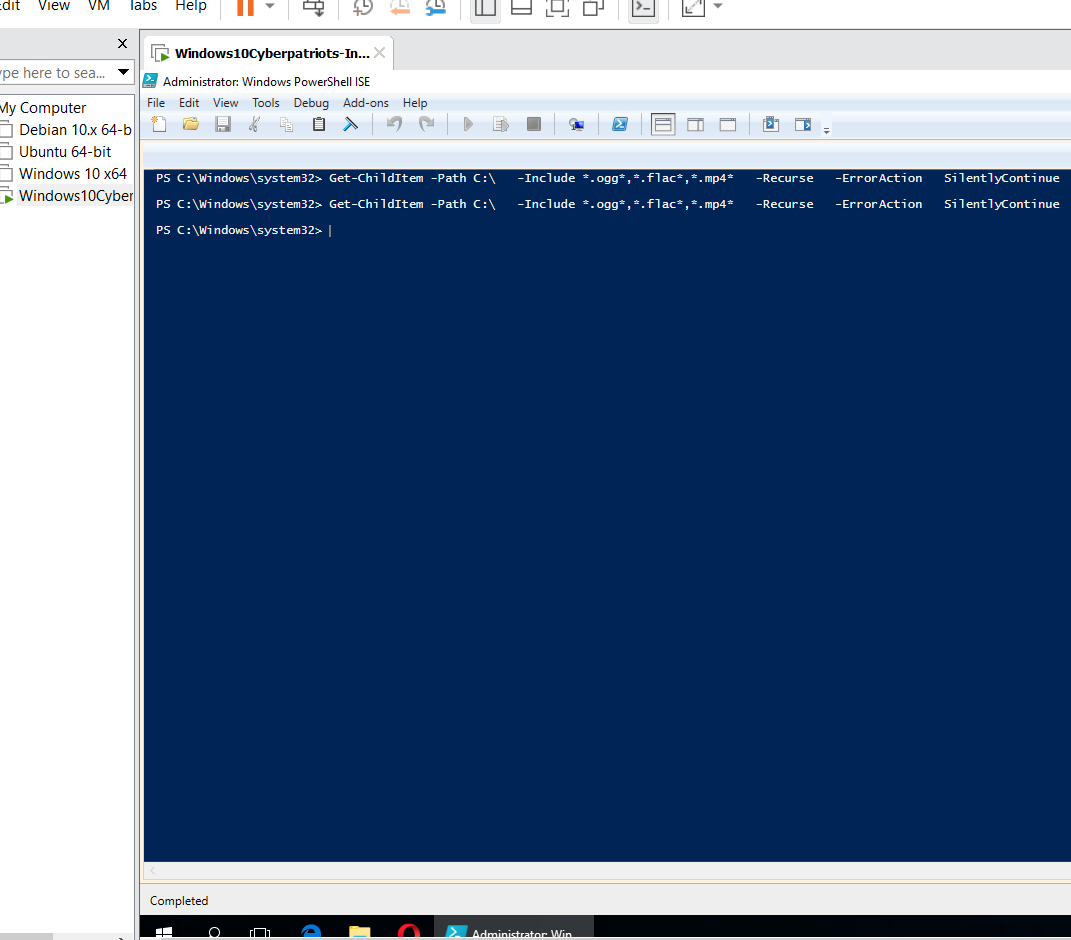
Do you know how to delete all the media that you have found? After the first script, type: Get-ChildItem -Path C:\ -Include .ogg,.flac,.mp4 -Recurse -ErrorAction SilentlyContinue | foreach { Remove-Item -Path $_.FullName }
- Foreach: A loop statement. Basically, each time it finds what it is looking for, it will execute the commands it is given.
- $_.FullName: The full path name to a file and not just the file’s name itself.
SUBMIT: Once you’ve done this, re-run the command from step 1b. Take a screenshot of the results of this command, and submit it as part of your lab.
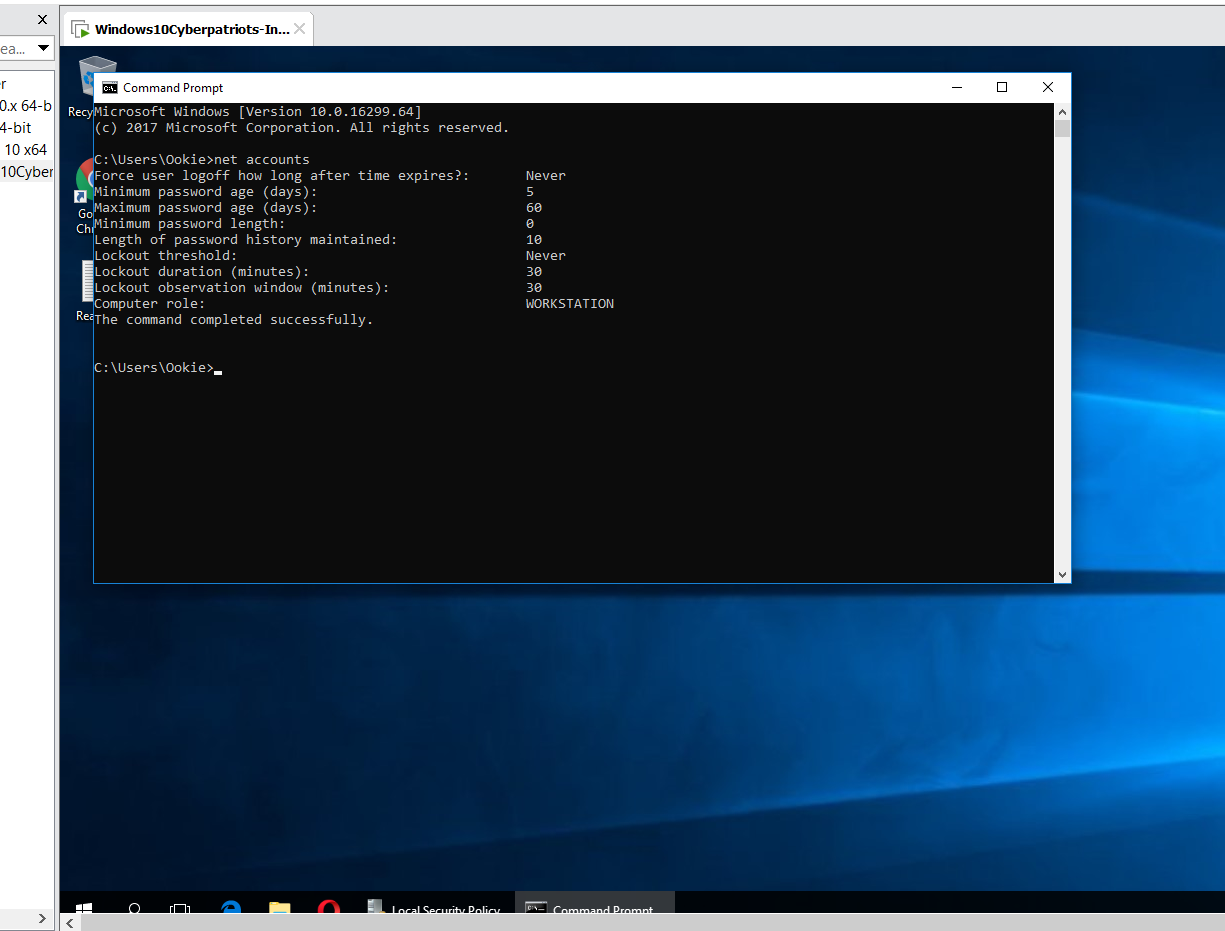
Background Knowledge: We worked with setting password policies in an earlier lab, Do you know how to set the password policy for local users?
- Click on the Windows Icon in the bottom left and search.
- Local Security Policy (Right-click and run as an Administrator)
- Click on Account Policy
- Click on password policies
- Edit the different settings:
- Change the password history
- Password Complexity
- Minimum/Maximum Age
SUBMIT: After setting your password policies appropriately, open up a command prompt and run the command “net accounts”. Take a screenshot of the results and submit them as part of your lab.
Background Knowledge: File shares can open up a lot of holes for an attacker (improper access to certain documentation, spreading of infected media throughout the system/network, etc.), so we must monitor their usage carefully. Do you know how to change the file share access? To find file shares on a computer, open up command prompt and type in net share.
Look for the file share that was created and where it is located in the computer Since “Ookie” is an administrator, their account should not have shares. It could expose very sensitive information or allow someone to gain control of their account all from a remote location. Accordingly, you’d want to disable that share. How do you know to look for it? Keep in mind the usernames you see with shares. If an administrator account has a share, disable it.
- Right-click on the Folder that is being shared and select properties. In this case right-click on: c:\users\ookie
- Click on the “Sharing” tab and select “Sharing”
- Change the permission settings or remove people who shouldn’t have access.
- A better option is to just disable file share for the entire directory. Click on “Advanced Sharing” on the “Sharing” tab and de-select “Share this folder.” and click “OK.”
SUBMIT: Once you’ve done this, run the ‘net share’ command again from a command prompt. Take a screenshot of the results and submit it as part of your lab.
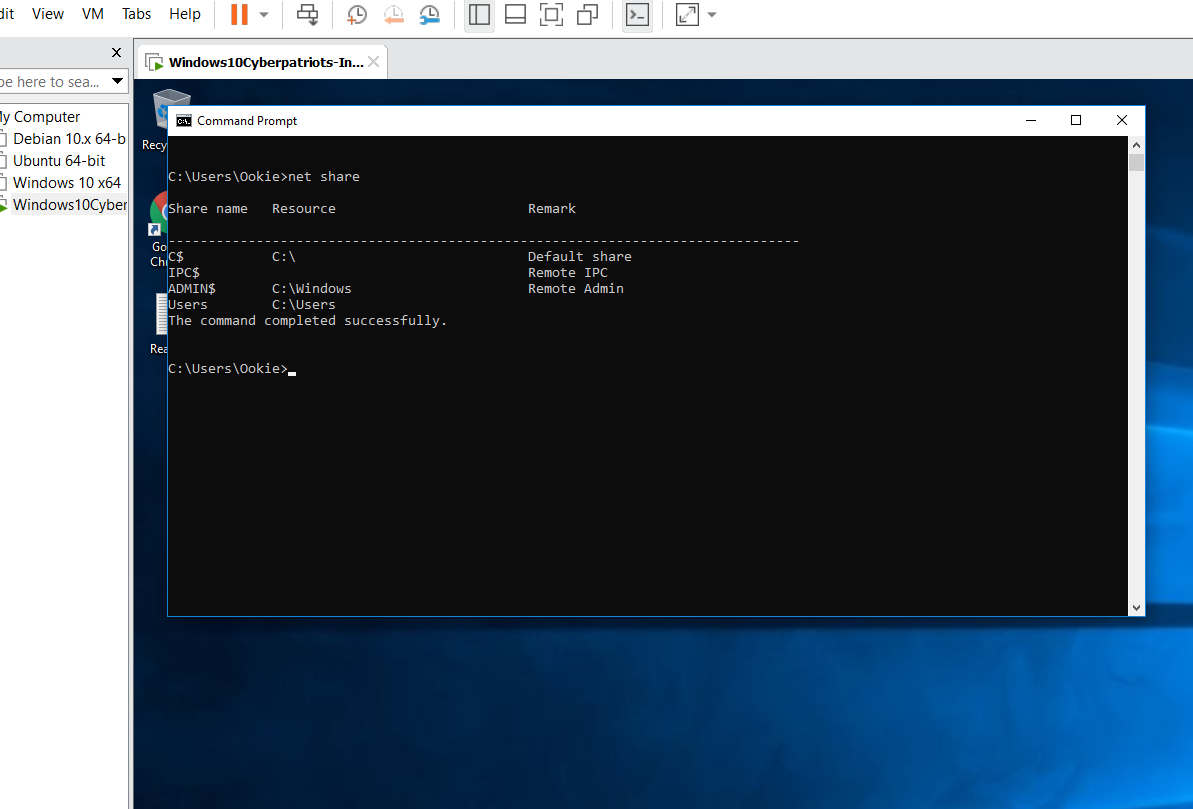
What does the screenshot output show?
The screenshot output shows all the shared directories and files, but this time the C:\users\Ookie is no longer there.
Do you know how to Set a password required to access the file share?
- Open File Explorer and locate the file share.
- Right-Click on File Share and select properties.
- Click on “Network and Sharing Center” link in the bottom of the properties page.
- Open “All Networks” Tree 5.Select “Turn on password protected sharing”
SUBMIT: Take a screenshot of the program window showing that password-protected sharing has been enabled, and submit it as part of your lab.
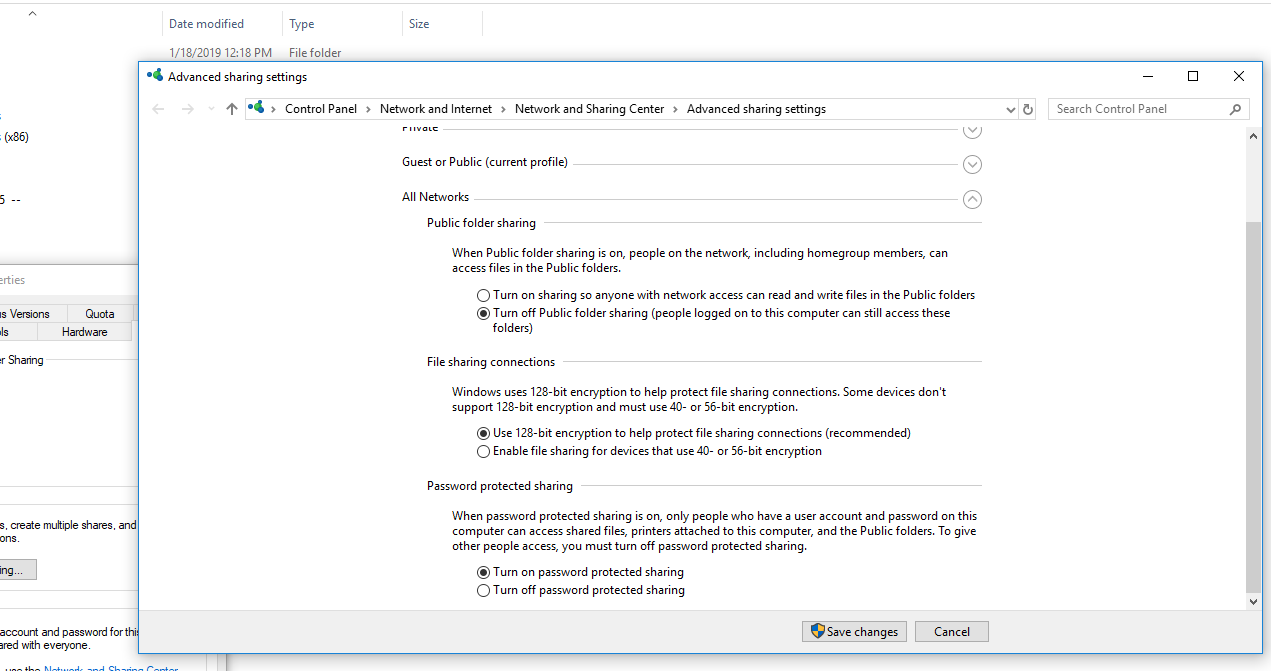
What does the screenshot output show?
This screenshot shows that in order to access shared files a password will be required
Background Knowledge: Web servers are enticing targets for attackers, so we want to give them as little information as possible about them (remove any information about the server, remove the ability to see what files are indexed on the server, etc. A web server’s basic function is to host web pages for others to access. Do you know how to find the Apache Web Server if you don’t know what directory it’s in?
-
Search for services
-
Find the service and right click on it and select properties
-
Look for the Path to Executable in the General Tab
-
If this doesn’t work, you can always use PowerShell. Type in the command show below.
-
Get-WMIObject: gets instances of Windows Management Instrumentation (WMI) classes or information about the available WMI classes.
-
-Class Win32_Service: Selects the given class “Win32_Service” and displays the running services.
-
| select Name, PathName: Filters the information that is found from the section before and configures it by pulling and displaying only the given fields. In this Instance that would be Name and PathName, which show the name of the Service and the full path to where it is in the machine.
- Look for the Apache Service listed
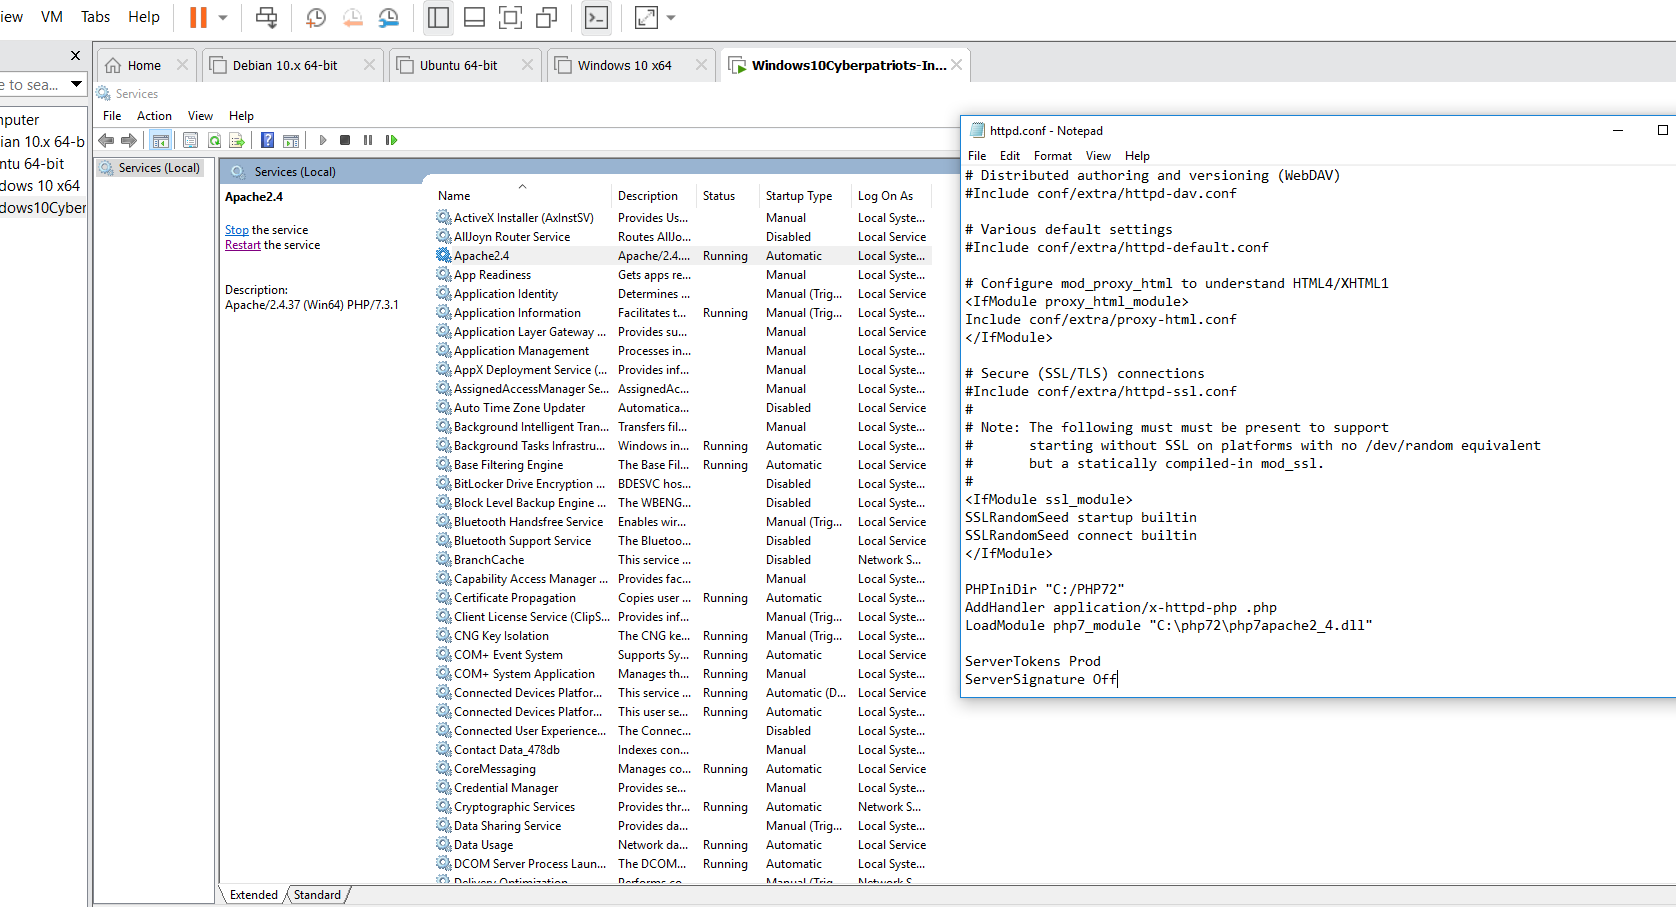
Do you know how to harden an Apache Web Server in case you need one?
-
Open up File Explorer and find the Web Server
-
Go to the conf directory and open up httpd.conf.
-
If you can’t find httpd.conf, then the file extensions are hidden for files (.conf in this case). To display hidden files then go to the view tab and change that to show hidden by clicking “File name extensions” and “Hidden items”.
-
At the bottom of the file add:
- ServerTokens Prod
- Tells apache to only return Apache in the Server header, returned on every page request.
- ServerSignature Off
- Tells apache not to display the server version on error pages, or other pages it generates.
-
Go to services (By searching from the start menu)
-
Find apache in the list
-
Click on the restart button in the left field
SUBMIT: Take a screenshot of the httpd.conf file with the ServerTokens and ServerSignature options set, and submit this as part of your lab.
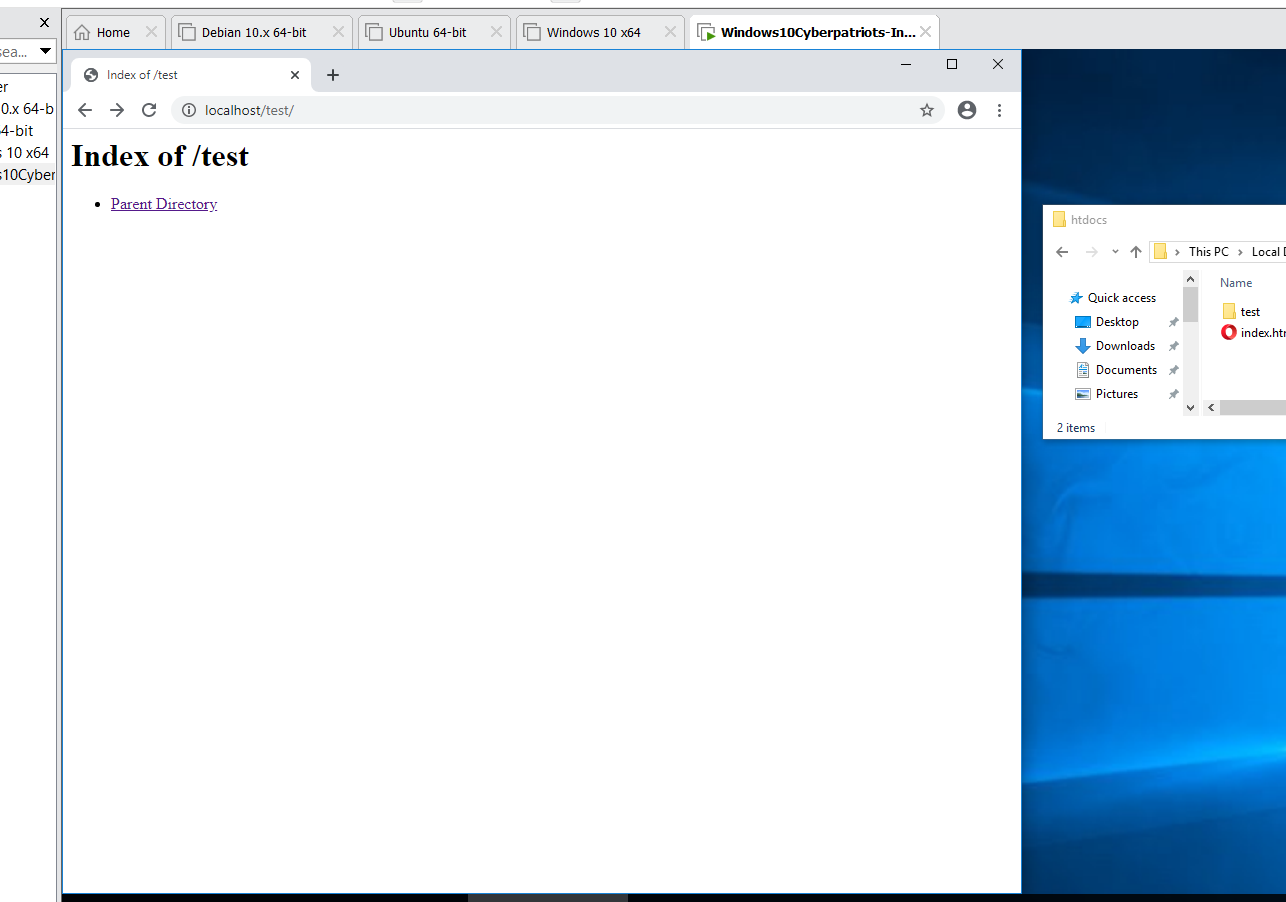
Do you know how to Disable Directory browsing? Directory browsing could inadvertently expose sensitive documents or documents you don’t want the entire Internet to have access to.
- Navigate to the web server’s root directory (C:\Apache24\htdocs), and create a directory “test” in this folder. (Right-Click => New => Folder and name it: test
- Open a web browser and browse to http://localhost/test/. You should see a screen similar to the screenshot below. (NOTE: localhost is a name for your local computer. It is has a default address of 127.0.0.1 which every computer has, though that IP is only accessible on your physical machine, meaning another person on the LAN cannot access it directly.
SUBMIT: Take a screenshot of http://localhost/test/, and submit it as part of your lab.
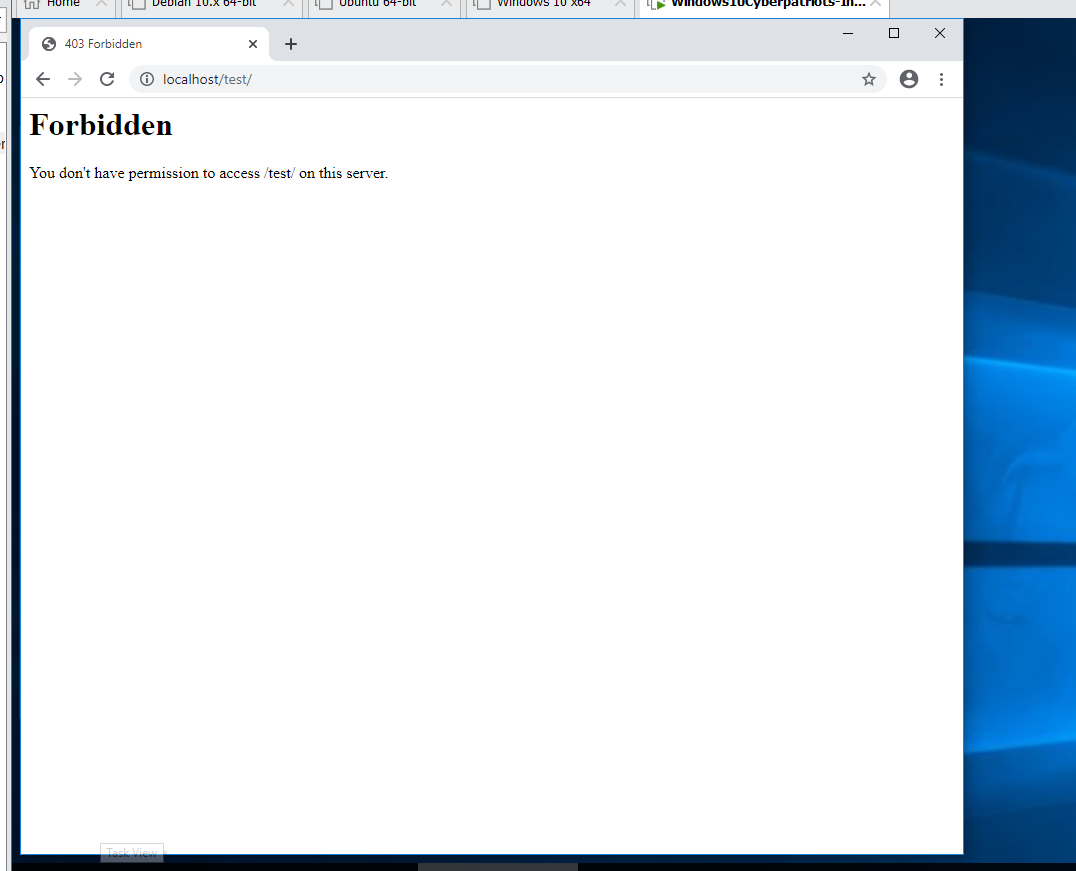
To disable directory browsing:
-
Return to the Apache directory (C:\Apache24).
-
Open the httpd.txt file in the conf directory
-
Search for <Directory “${SRVROOT}/htdocs”>
-
Change Options Indexes FollowSymLinks to Options None FollowSymLinks
-
Save and close the file
-
Restart Apache from services
-
Browse to http://localhost/test/
SUBMIT: Take a screenshot of what you see at http://localhost/test/ now, and submit it as part of your lab.
Background Knowledge: FTP stands for File Transfer Protocol, an FTP server is a computer that sends files over the network. But this is a browsing machine only! We’re going to have to turn off this server. How to find an ftp server?
Using the command mentioned earlier, search through the showed list and find the FileZilla Service.
This will show you where on the computer you can find the main .exe that is running the server.
How to Stop/Uninstall FileZilla:
-
Go to the location that you discovered earlier
-
As you see above. If you double click on the Server, it will offer to stop the server, and at the bottom, you see the option to uninstall the service
SUBMIT: Once you’ve uninstalled FileZilla, re-run the command from Step 1a. Take a screenshot of the results, and submit that as part of your lab.
What does the screenshot output show?
The screenshot shows the output of the command, which shows file paths, but the FireZilla server is no longer on the list. This is because it was uninstalled.
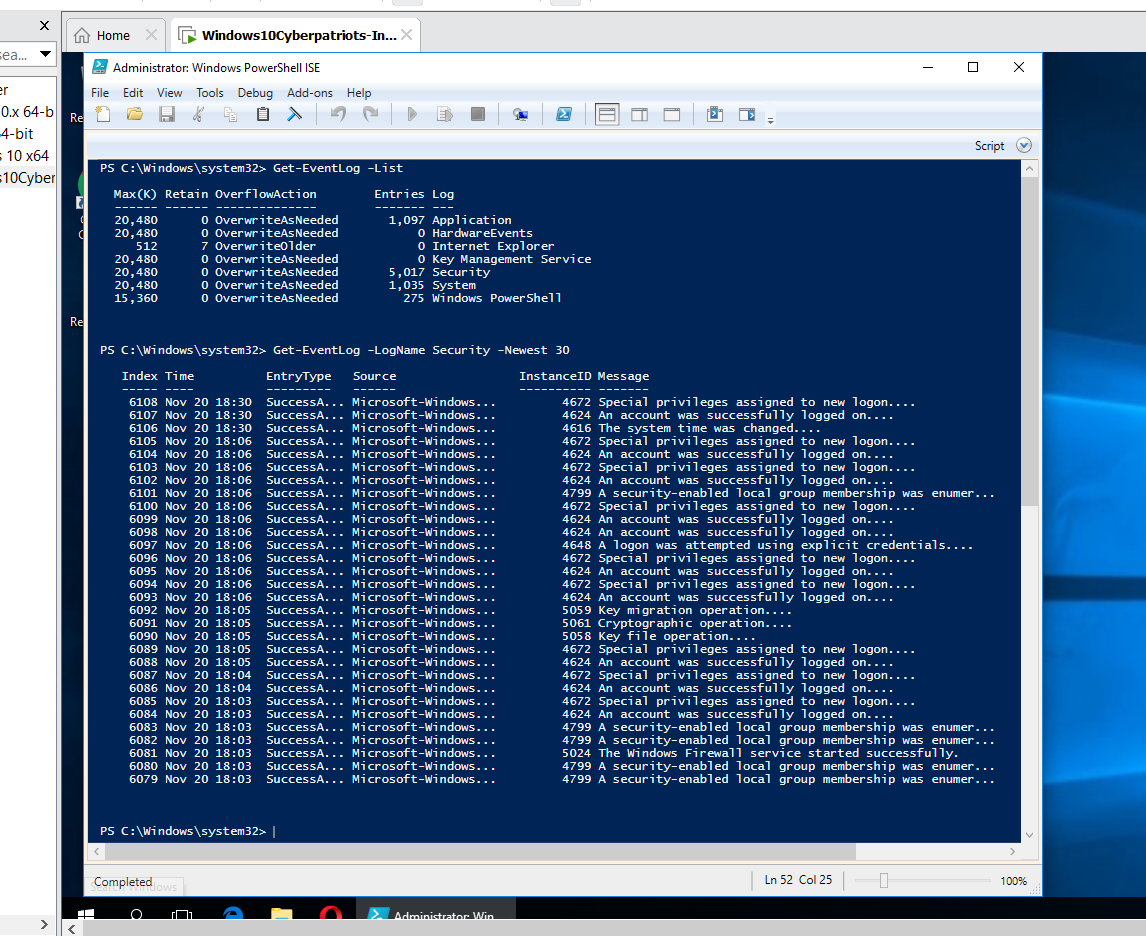
Background Knowledge: Event logs are basic logs that are analyzed and monitored for higher level “network intelligence.” They are used to monitor the ins-and-outs of a network. They allow the admin to see all that is happening, whether it be abnormal, malicious, or normal activity. How to view Event Logs?
-
Open up Powershell ISE in administrator mode (Right click on powershell)
-
Type Get-EventLog -List
- This will show all the different Event Logs that you can view.
-
Type “Get-EventLog -LogName Security -Newest 30”, and run this command.
- -LogName: Is the Log Category that we are viewing
- -Newest: Shows how many of the most recent logs you want to see
SUBMIT: Take a screenshot of the results of this command, and submit it as part of your lab.
A good practice is to rename the administrator and guest account. Be sure it is not named something that makes it appear to have admin privileges like “chief” or “admin.” Instead use the same naming scheme for users.
Some exploits will take advantage of the fact that the Administrator accounts are left to their defaults on systems so this can help slow down an attack or prevent it from escalating privileges.
How can you change an account’s name?
- Go to https://www.top-password.com/blog/rename-windows-local-administrator-or-guest-account/ , and use Method 1 to change the name of the administrator account.
SUBMIT: Take a screenshot showing the results of the wmic command you ran, and submit this as part of your lab.
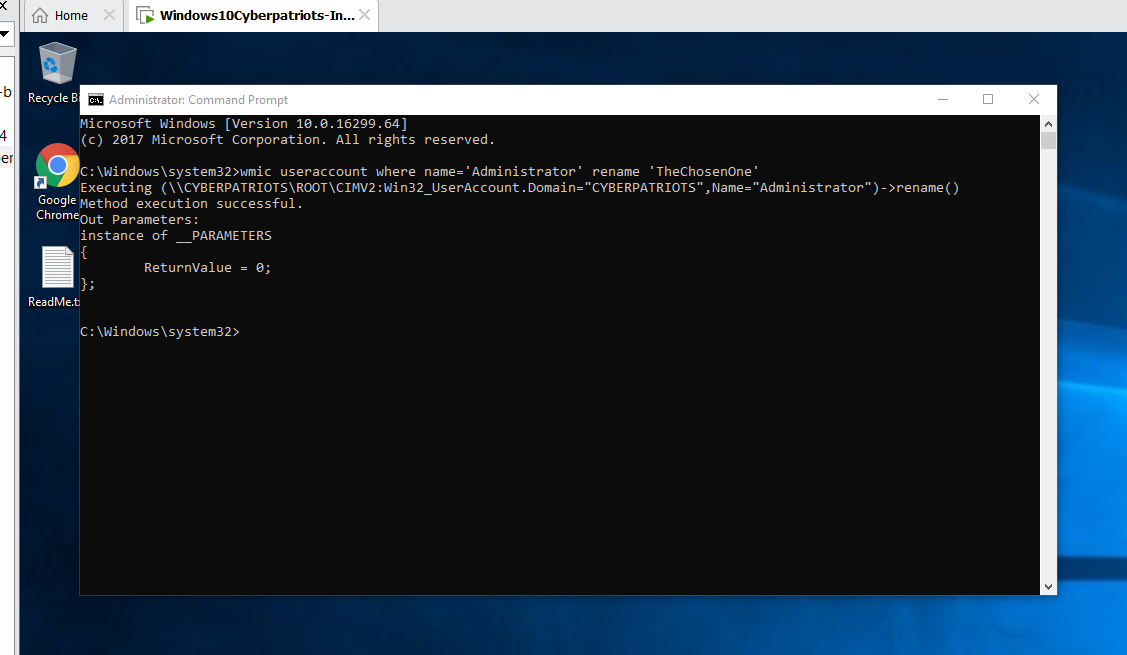
What does the screenshot output show?
The output shows that the command successfully changed the name of the Administrator to what I chose, which was "TheChosenOne"
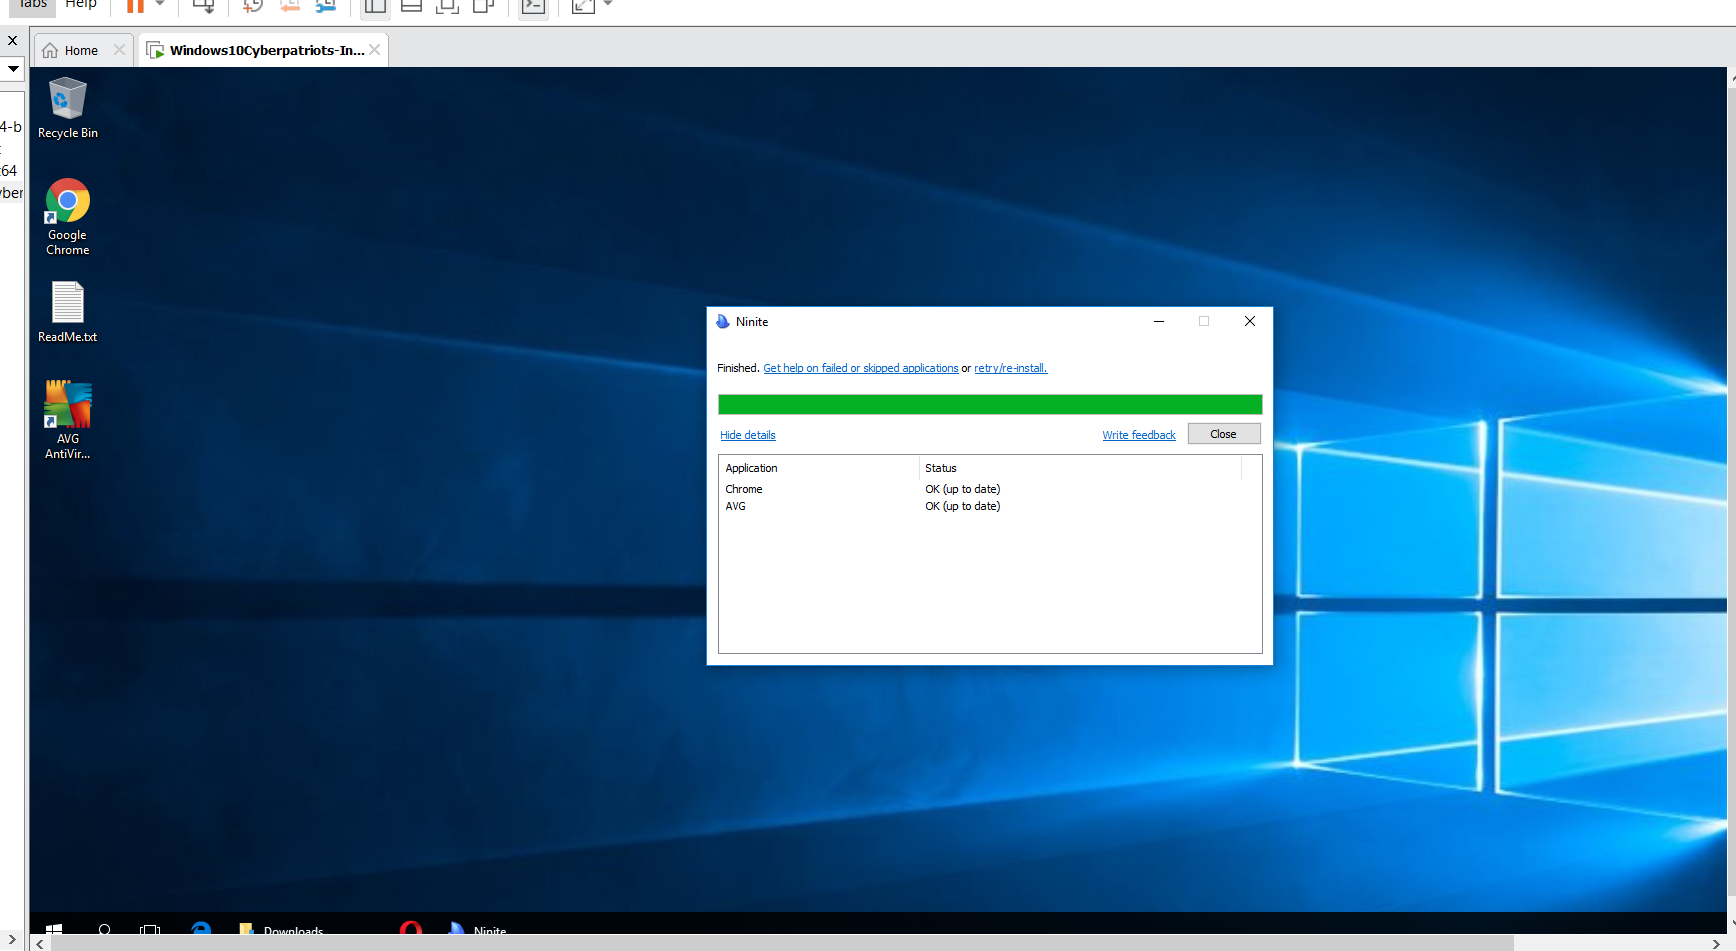
On this website: https://portableapps.com/apps The user will also need PWGen and VLC which should be installed to a folder to allow each application to run.
SUBMIT: provide a screenshot showing that ninite was installed..
Use the website, https://winaero.com/blog/add-remove-user-group-windows-10/
SUBMIT:
What steps did you take to modify users in the Administrator group?
I entered Local Users and Groups and modified the Administrators group to remove the “champlain” user. The Administrator user, which I had renamed “TheChosenOne” was unable to be removed, which I assume is because it is the built-in administrator.
Provide a screenshot showing the results of the command: net localgroup Administrators
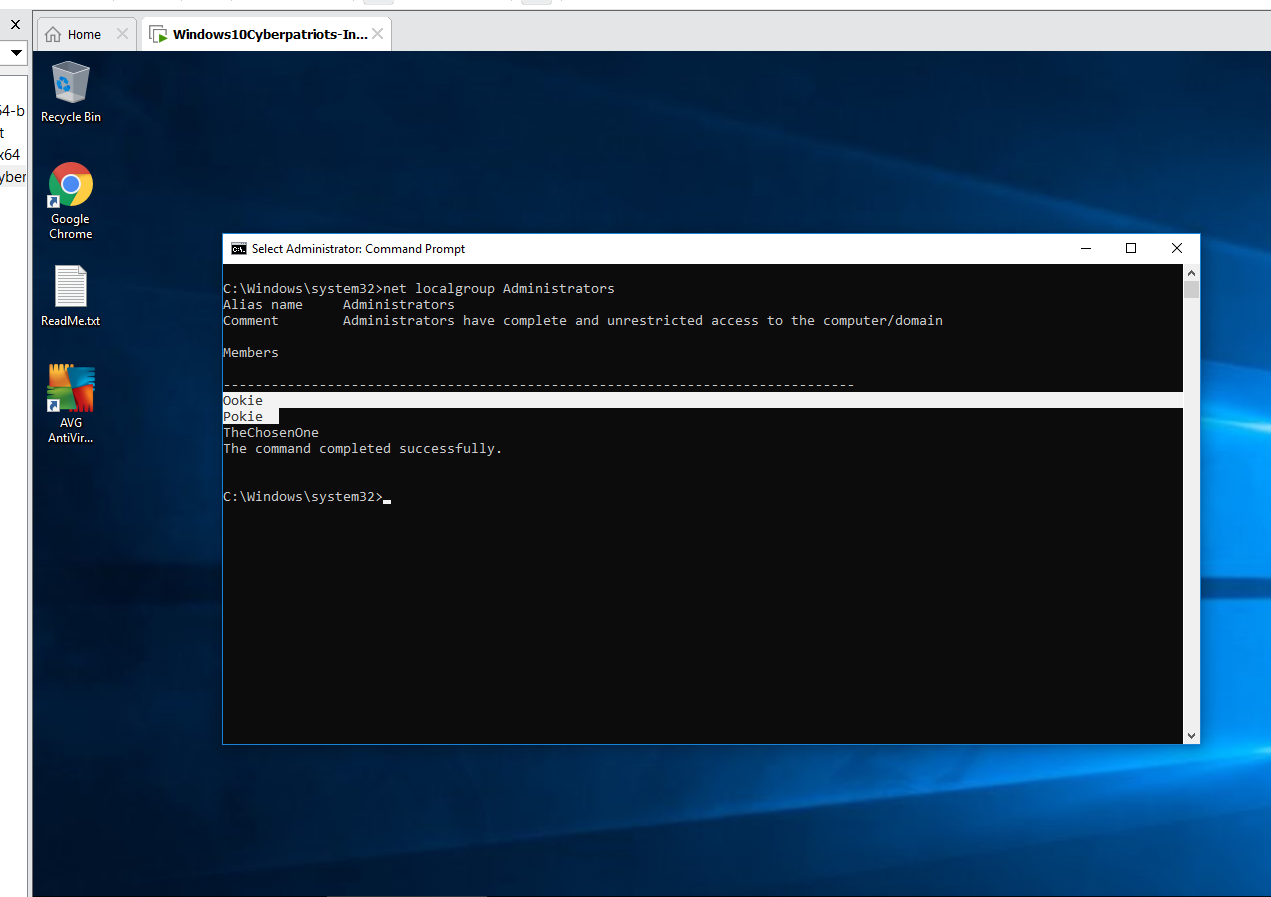
What does the screenshot output show?
The output shows which users users are currently a part of the Administrators group.