Getting started with command line and bash - YKul/Tutorials GitHub Wiki
- Access a terminal on your machine
- Understand your command prompt and filesystem
- Navigate your file system through the command-line
- Use the command line to create and delete some folders
- Make something cool
- Be inspired
Follow these instructions under "The Bash Shell" for your respective system. If you followed all the instructions, you should now have your terminal open and ready to work in the bash shell.
Note that the Windows instructions will also install Git on Windows machines, which we will need later anyways.
Your terminals may look slightly different, but you should see something similar to [USER_NAME]@[COMPUTER_NAME]:[DIRECTORY_PATH]$ followed by a text cursor (also called a "caret"). It is OK if some information like your username or computer name are not shown.
For example: user123@lab_computer:~$
A directory is just a "folder". Everything on your computer is organized as a hierarchy of folders within folders, and files with data within folders to make a filesystem. The directory path tells you which folders to follow to get to a specific location in the filesystem. The terminal works from a point within your filesystem that we call the "Working Directory". For example, if we want to open a file, we either need to change our "Working Directory" to the folder containing the file before opening it, or if we don't want to change our working directory, we can give a precise path to the file.
For example: /home/yourusername/Desktop/my_file.txt which is equivalent to ~/Desktop/my_file.txt
In the above example, the ~ is a special file path symbol which represents your HOME directory, which you may be familiar with as your user directory. This may be shown long-form on your terminal (For example/home/yourusername/ or C:\Users\yourusername\. Note on Mac and Linux systems your filepaths start with a /. This actually represents your 'root' folder, similar to C:\.
Also note that Windows file paths use the backslash '' whereas Mac and Linux use the forward slash '/'). The $ is a "prompt symbol", indicating that the terminal is waiting for a command.
If you are not comfortable with filepaths, you may find it difficult to follow what the next steps are really doing, so I have provided an opportunity to practice.
Consider the following example of a MacOS filesystem:
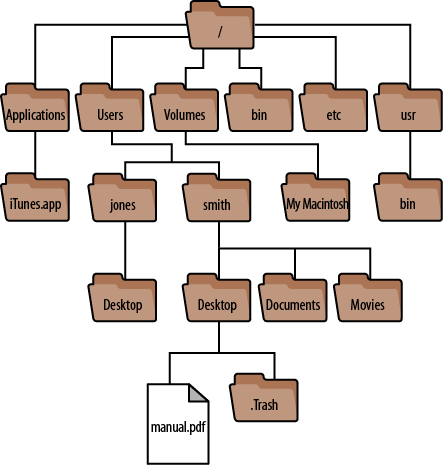
(Click to show answer) Write the full filepath to manual.pdf (filepaths are case-sensitive)
/Users/smith/Desktop/manual.pdf`While it is not required, here is a fairly short (11:46) video that goes over everything in this section, as well as reviewing the previous section. There are some helpful things in this lesson that are not in the video, and the directory structure we make at the end will be used again in later lessons. However, the video is helpful as he mirrors his command line actions in a more conventional graphical file manager to help you understand what's being done.
Commands used:
-
pwdPrint Working Directory - Prints the current working directory -
cdChange Directory - Changes the working directory -
lsList - List the directory contents -
clearClear - Clears the terminal screen
Path symbols used:
-
.Symbolizes the current working directory in a path, or a hidden file in the beginning of a filename (.Trash) -
..Symbolizes the directory one step before the current working directory -
~Symbolizes our HOME directory
Useful Tips
Getting used to these will help you get faster with the command line.
- Your terminal remembers a history of your commands which you can cycle through with the up and down arrow keys on your keyboard
- Usually located above the arrow keys, your Home and End keys move your caret to the beginning or end of a line
- Next to Home and End, the delete key deletes the character before the caret, while the insert key toggles your caret mode between insert and replacement modes (replacement replaces text before it as you type, insert inserts it).
- The
mancommand followed by another command will bring up the user manual for that command. Example:man ls
You may find it helpful to open your file navigator/manager (Explorer, Finder, etc) to follow along visually.
- Enter the command
pwdto determine your current working directory - If you are not in your HOME directory, or unsure if this is your HOME directory, enter the Change Directory command
cd, followed by a space, and then the symbol for our HOME directory path~. Press enter to submit the command. Example:cd ~ - Use the List command
lsto view the contents of the working directory. Typelsinto the command and press enter. You may notice files and folders are shown in different colours. - You should see a list of files and folders that are in this directory. Remembering that directories are case-sensitive, use
cdto change the Working Directory to your Desktop folder. Note that you can use tab to autocomplete based on the directory's file/folder names. Example:De+tabto autocompleteDesktop - Now that your are working in your Desktop folder, enter the appropriate command to view the contents.
- The
.and..can be used in a filepath to mean the current working directory (.) and the folder above the current working directory (..). View the contents one folder above your Desktopls ..(Remember, is your HOME directory) - Try to combine it all:
(Click to show answer) Without navigating away from the Desktop, list the contents of some other folder in your HOME directory using 1 command.
ls ~/Documentsls ../Documents
ls /home/yourusername/Documents (or Windows equivalent)
Commands used:
-
mkdirMake Directory - Creates a directory in the working directory with a given name. Also takesSOME/FILE/PATH/new_dir_name -
rmRemove - Removes files and/or folders permanently, without a prompt or verification. You can not recover deleted objects once you use this. There is no trash bin to recover from.
Foreword on the rm command
This command is an example of how command line doesn't hold your hand and assumes you know what you're doing. Anything you delete with this command is gone. It will not ask "Are you sure?". It will not even give output to tell you what it did. It will just remove things quietly and permanently. To make things more complicated, there are special symbols called "wildcards". For example * in a command can be used to represent any number of any character in any combination (In other words... The name of every file and folder in a directory). Just be careful of what you are typing.
The -i flag will add a prompt for everything rm is removing, but you need to add it every time (which we will do for now). Note that this flag is case-sensitive and -I may have different behaviour on your system.
Foreword on naming conventions
It is best practice to avoid using spaces, mathematical symbols (+-/ etc), or special characters (~,. etc) in file and folder names. The space is used to separate command arguments in the terminal, and requires special flags to indicate when it is part of a name. Mathematical operators may have unpredictable results, or may be confused for a directory path. Special operators may have special 'wildcard' meanings, or may tell the system to hide the file, etc.
- Navigate your working directory to any folder your are comfortable creating folders in (such as your Desktop).
- Create a folder called "sandbox"
mkdir sandbox - Change your working directory to the sandbox folder.
- Create a folder with multiple subfolders in the sandbox using the
-pflag and a filepath of new folders. If you do not include the flag, you will get a "No such file or directory" error. Example:mkdir -p test1/test2/test3/test4 - Explore these new subdirectories until you are satisfied you understand what the
-pand filepath in the previous command did. - Navigate your working directory back to the sandbox (if it has changed)
- Confirm that you are in the sandbox directory
pwd - The
rmcommand by default only works on files. To delete directories we use the-r(recursive) flag. Enter the commandrm -ri test1to remove the test1 directory and all its subdirectories. Notice that we can stack the-rand-iflags into-ri, or we can keep them separate (-r -i) both will work the same. Because we used-iyou will be prompted if you want to descent into the directories and you can respond "y" or "yes". You will then be asked if you want to delete the directories and you may likewise respond yes to confirm.
We're going to create a complex directory structure that we will use later on. This will demonstrate that single commands can perform complex tasks, and hopefully gives some contextual motivation to explore further on your own.
You may want to use copy and paste for this part, but just as drawing teaches you to notice details about visual object, typing commands can teach you to recognize the syntax and structure of each command. In terminal, ctrl+c is used to forcefully terminate a running process (useful to know if you ever get hung up in a process). If you want to copy a line from your terminal, you can highlight with your mouse and use ctrl+shift+c. Likewise to paste we use ctrl+shift+v. This only applies to the terminal window/command line. Your command line might differ, so if this does not work just ask Google for your specific terminal.
- Make sure you are working in your sandbox directory.
- Enter the following commands:
mkdir -p Winter_2024/{BIOL1000,CHEM1000,ENG1000}/{Notes,Assignments}
mkdir -p Winter_2024/{BIOL1000,CHEM1000,ENG1000}/Notes/$(date +%Y_%m_%d)
mkdir -p Winter_2024/{BIOL1000,CHEM1000}/Assignments/Assignment_{1..4}
mkdir -p Winter_2024/ENG1000/Assignments/Assignment_{1..6} - Explore the directories you have just made either through command line or your file manager (or both!)
Note that the {TERM1,TERM2} is called a list, and 1..6 is called a range
This discussion may help you understand what we did with the commands in section 5 a bit better.
For a more thorough introduction to bash, I recommend the lesson material by The Carpentries.
The Carpentries is a non-profit organization that hosts workshops to teach computational science skills. Many of them are free, and some of them are online. You can find videos of their workshops through YouTube, including lessons that go a little more in-dept with command line and bash. However, they are usually around 3 hours long and cover more than we needed, so I did not rely on them for this lesson.
Otherwise, computational sciences are unique in that there is such a range and quality of free learning material available online, with many communities to answer questions and guide you. Being proficient is not about learning all of the computer languages or memorizing commands, but knowing enough that you can understand what you don't know and where you can look to find the answers.