How to connect and troubleshoot via SSH - Xen-neX/Hiddify-Manager GitHub Wiki
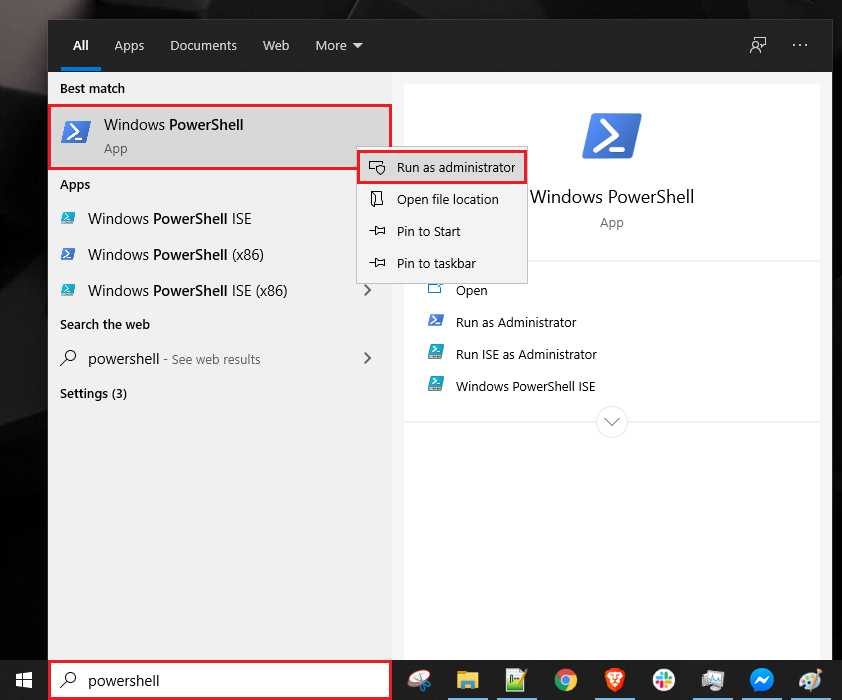
- If your client is Windows; You can use Powershell. First, if you haven't installed the OpenSSH module yet; Open PowerShell with admin access, that is, right-click PowerShell and click Run as Administrator.

Then run this command:
Add-WindowsCapability -Online -Name OpenSSH.Client
After that you should see something like this:

Congratulations, ssh installation is complete.
If for any reason access to the panel is not available through the web or your access is cut off and you do not have the emergency link; In this case, the only way to control and apply changes, as well as restore web access, is through the terminal.
In this case, you need to ssh to the server first. for this job: According to your operating system, open one of the following programs
- Windows:
PowerShell - Mac:
Terminal - Linux:
Terminal
Then connect to the server by running the following command: ssh user@<IP_Address>
Usually, when you purchase a VPS you get the user ``root'' on the server. suppose your server's IP is 1.1.1.1, so the command is as follows:
After connecting to the server, the panel menu will be shown like this.

For more information, each part will be explained separately.
By selecting cancel, you can exit the menu and reach the normal terminal of the server.
Note: To return to the menu, you must run this command in the terminal.
bash /opt/hiddify-config/menu.sh
This menu is used to know the status of the system, if everything is normal, the result should be displayed like this.

To return to the main menu, you must press the q key.
This section displays admin links. If you need these links for any reason, use this option.

Press a key to return to the main menu.
Most used:
If you installed the panel but forgot to copy the admin links.
Used to view system logs. After selecting it, you must also select the desired log type.

For example, if we want to see the logs related to the installation, we can choose the install-log option.

Here, the installation logs are displayed as above, at the end of which the system status and admin links are displayed.
Most used:
If one of the services is not working properly and you need to check its log.
This option resets all panel services without changing the settings.

You can return to the main menu by pressing any of the buttons on the keyboard.
Most used:
If one of the services is disabled and you need to reset all services at once.
This section is used to apply saved settings. After selecting it, the panel will start resetting the values.

Press any key to return to the main menu.
Most used:
If you registered changes in the panel, but for any reason you lost web access
This option is used to update the system. If you select that panel, it will be updated to the latest version available on the project's GitHub. There are three options here as follows.

By selecting this option, the program will be updated according to the setting of the web panel.
By selecting this option, the program will be updated to the latest stable version.
By selecting this option, the program will be updated to the latest development version.
In all three cases, you will see something like this in the terminal.

Most used:
If you lost access during the update through the panel.
If you need to reinstall the system, use this option. At the end, the system status and admin links are displayed.

To return to the main menu, you must press the q key.
Most used:
If during installation one of the scripts is not executed correctly and the panel does not open.
This submenu contains several options.

This option is for when you have previously disabled the display of this window and want to re-enable its automatic display at server startup.
By selecting this option, the display of this window will be disabled at startup. That is, if the server is restarted, this window will no longer be displayed automatically.
If you need to remove the installed panel from the server, use this option. Also, keep in mind that this option does not remove all uninstalled items. If you need the server to return to the default settings before installation; It is better to rebuild it.
Select this option to completely remove the program and database from the server.
If this method did not work for you for any reason, you can
Rebuildthe server through your data center. This will delete all server data.
 فارسی
فارسی


